Asset Bundle Implementation
Asset Bundles are for the time being the only method which is recommended for instancing generally loading dynamically in Unity. Resources have many limitations like for example max 4GB file size which when You breach that limit, You will experience randomly not loading models, textures etc.

Unity does not recommend to use Resources, we know that it’s useful, so it’s also supported in Atavism especially in prototyping phase to make a faster iteration of Your games. Another limitation is that You cannot split that file.
At the very end also very important thing is memory management, which in general while You are using resources, You are not able to handle, because resources are packed using LZMA algorithm which has to decompress during loading into memory and it has to be loaded all or nothing, so 0 or 1. What does it mean? For example, You have 20 different mobs types and You want to spawn only one in specific are, which is a pretty common use case, but Unity will have to load all 20 mobs into memory, that’s why in previous Atavism version You could experience hiccups. In the present version, we are still supporting resources as they are fast in the development process but it’s easy to switch from Resources usage to Asset Bundles and take benefits from that.
So asset bundles can have 3 compression types (same as resources file LZMA, then we have LZ4, which is fine grained LZMA compression in some way, so Unity can decompress only necessary part of the asset bundle and at the very end there is a way to make them uncompressed which will give You an ability to stream it directly from net or disk, fewer CPU resources used in that case), which is important thing, can be streamed over the network, which can be crucial for mobile devices and can be downloaded over time, based on requirements. For example, if the player is new then he doesn’t have to have all files, he can just get asset bundles which are dedicated to a specific level or even are. This is another benefit of using them, You can split Your content based on any parameters You want, all it’s up to You.
So You may think that it’s hard to setup and You couldn’t be more wrong, thanks to our additional scripts it’s easy as 1,2,3… setup. Basically, we didn’t want to enforce our clients to use something new instead of old known resources, because maybe You are used to doing that and for Your smaller project it’s performing well enough, so You are also free to do it. Previously new mobs or NPCs had to be defined in the Resources folder in the project on which You had mesh, skeleton, animations, materials with textures setup but also what was required to work with Atavism, You can check the example of Princess prefab.
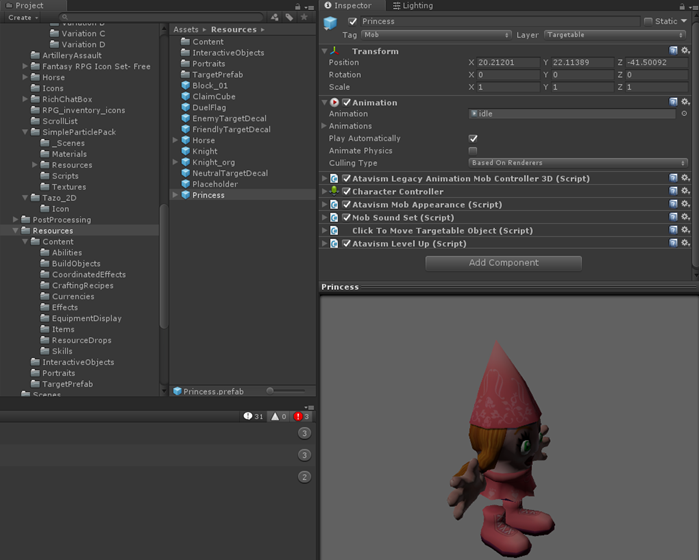
As You can see there are few standard Atavism components. After such prefab setup, You can put it into the Mobs template by using Atavims Editor

to finalize mob template configuration. The difference between Asset bundle configuration is that first You have to have two models: 1. The first model will contain mostly Atavism scripts and some extra scripts which will be responsible for loading rest of the asset from asset bundle package. 2. The second model the model which contain mesh, skeleton, animations, materials etc. You can find an example of such configuration in same Resource folder in Your project which is called Knight.
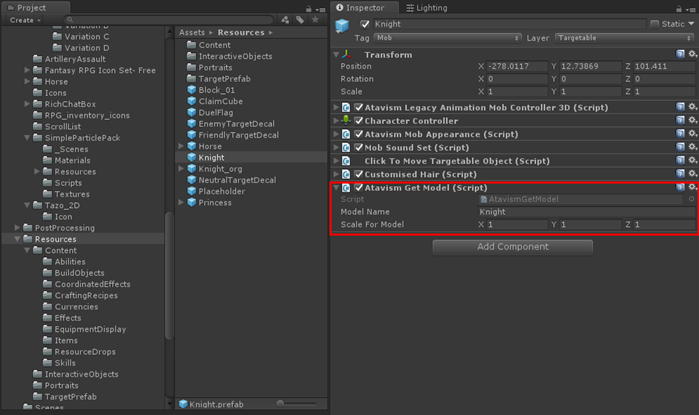
As You can see there are same scripts on the prefab with one additional: Atavism Get Model. In that script You have to setup Model Name which will correspond to the name of the prefab which we will have for Asset Bundle in this case: Knight and You can setup scale for that model, default it’s 1, 1, 1.
At this point, we can move to the actual model location which can be anywhere in the project but in our case of this example we are using: Assets/AssetsBuildBundles folder in which You will find Knight prefab presented below.
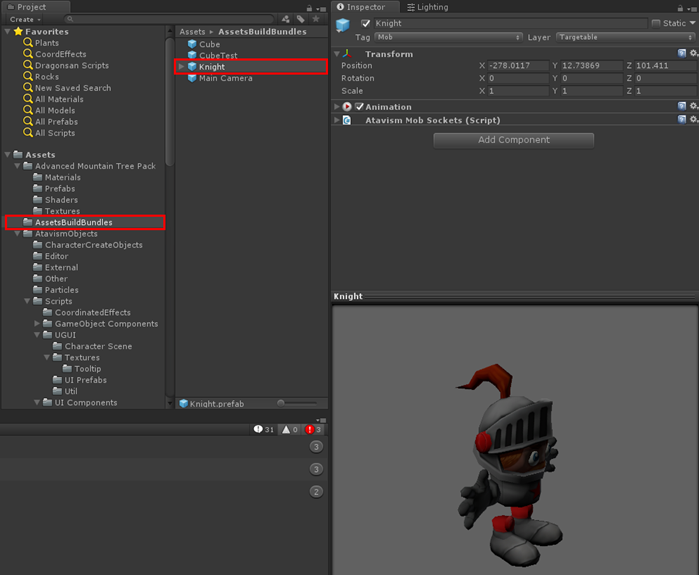
As You can see it’s normal model and there is nothing special on it, there is only one extra Atavism script which is called: Atavism Mob Sockets which is responsible for references between bones and sockets for the character. So, in this case, You should setup that sockets there if You want to use them, but it’s not necessary to do that, You can leave it as is.
Now You have to mark directory or specific object to let unity know that You want to build them into asset bundle. In order to do that, You have to follow this step by step clicks, because Unity is a bit tricky in that part.
In Your Unity Project tab You have two columns, in first You can browse only directories (left panel) and in second You can browse both: directories and files (right panel). To mark directory as asset bundle for example Assets/AssetsBuildBundles directory You have to select parent directory in left panel, so it will be Assets and then the directory which You want to be built in bundle so AssetsBuildBundles in the right panel and then in right corner You will have to click dropdown list called AssetBundle and put name whatever You want, in this tutorial we are using asset bundle called: test.
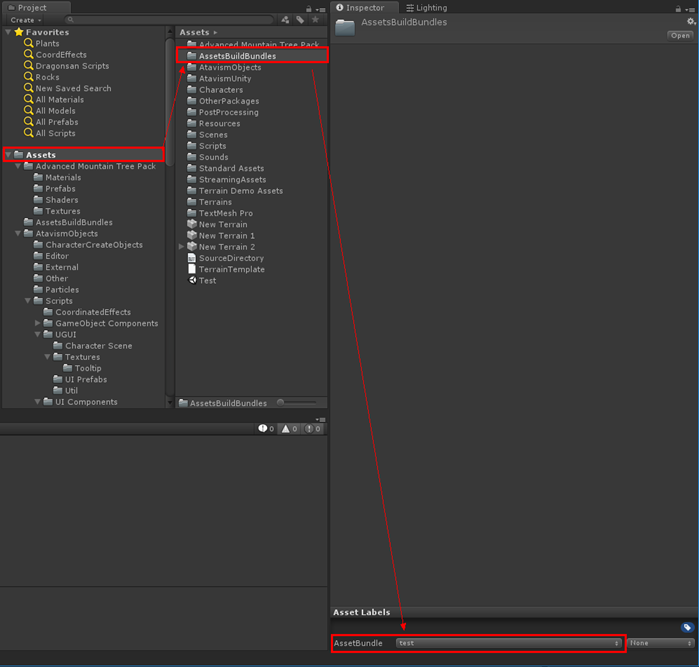
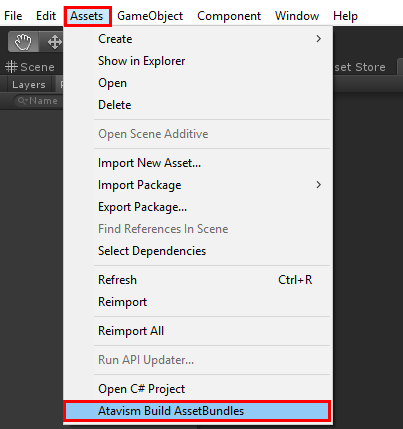
So in our case directory Assets/AssetsBuildBundles is already marked as Asset Bundle called: test. Now we need to build that asset bundle. To do that go to Assets menu and select Atavism Build AssetBundles option.
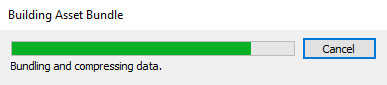
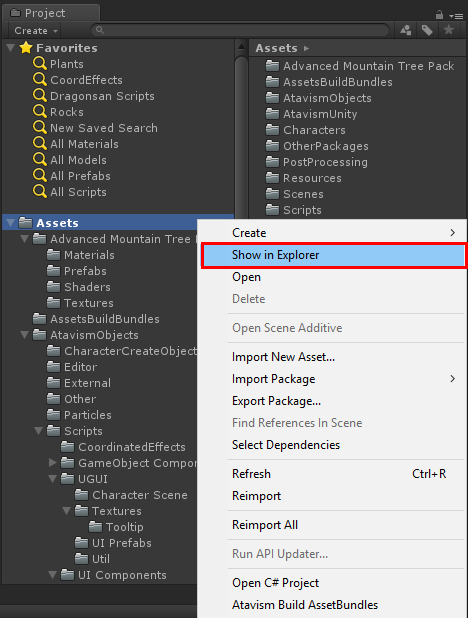
Building Asset Bundles will start, what is also worth notice is that if nothing changed since last asset bundle build then Unity won’t rebuild, so it will also speed up Your development process by making builds faster. Now You have to move to Your project directory and find AssetBundles folder, You can do that by pressing RMB on the Asset directory and choosing option Show in explorer.
Then in the newly opened window, You should see the directory called: AssetBundles, enter it and find Your asset bundle file names. There should be 2 files with the same name, one without an extension and second is manifest one. You have to copy the file without extension to the Assets/StreamingAssets directory in Your project.
At this stage we are almost done. Only one thing left. You have to let Atavism know what is Your asset bundle name and to do that You have to open Login scene which is located by default in the Assets/Scenes directory and find object called: Scripts. At the very bottom in Inspector You should see script component called: Atavism Asset Bundles Manager (Script) where You have an array of elements to define. There in the field Element 0…(n) You have to place name of asset bundle which You choose, in our case it was “test”. That’s pretty much it, now You should be able to load Your mobs or npcs from asset bundle.
Below You will find some more information how to use asset bundles and why not to use resources specially for release (we are highly recommend to read that documentation):
Also here is a link to official Unity Asset Bundle manager to build them and where You can pick what compression method You want to or to copy built asset bundles automatically to Your streaming assets so it can be pretty useful: