Atavism X (10.8.0) – Date of release 03.05.2023
New Features
- Server: Added Atavism Auto Tune System that will tune memory and threads settings based on various parameters like the number of spawned mobs, defined items, skills, abilities, effects, etc. It is turned on by default, and you can turn it off in the game settings through these parameters.
AUTO_ADJUSTMENT_MEMORY_THREADS – boolean – default: true
AUTO_ADJUSTMENT_MEMORY_THREADS_INTERVAL – integer – default: 10 (in minutes)
The system will save new configurations in the atavism_server/bin/backup where all previously modified files will be stored. - Server: Added Atavism All-In-One version. This version is bundled with the default server and by default, it’s turned on through atavism.all_in_one.enabled parameter in the world.properties configuration file. This version is perfect for one server installation and for development where there are limited resources. It reduces memory usage by around 50% and significantly CPU usage by creating 75% fewer threads. It also reduces server start time by around 85%.
All-In-One

Separate
- Added new unlearn ability effect
Changes to existing features
- AI: Significantly reduced amount of PropertyMessages generated by Combat Behavior.
- Bonuses: Modified bonuses and how they are handled. Before when a player had 10 bonuses active and 11th was added through an activity (equipped item, effect, etc.) then the atavism server was removing the whole list of 10 previous bonuses and added a list of active 11. It could cause some impact on performance where there were many bonuses and they were applied or removed frequently due to unwanted database usage. Now the server will add/remove particular bonuses only.
- Client: Cleaned up the project structure. Now there are separate directories for Atavism Demo content, Core, and other 3rd party assets. Some elements were replaced with our own, like icons, and some unnecessary ones were removed like unused legacy Atavism Editor scripts/elements that were replaced when Atavism Standalone Editor was introduced. Some scripts were reorganized as well, like Client API in the Login scene.

- Enchanting: Added abilities and effects for enchanted items.
- Item Sets: Added abilities and effects for item sets.
- Player Leveling: Modified Leveling by providing rewards:
- Item – gives the item to the player. If the player doesn’t have space in the backpack, then it will be given through in-game mail
- Item Mail – gives the item to the player but through in-game mail
- Skill Point – gives skill point
- Talent Point – gives talent point
- Ability – invokes selected ability
- Effect – invokes selected effect
Rewards can be given once or more than once as well as on level up or on level down
- Quests: Modified quests to send data related to them using Prefab Server, so they are no longer being sent every time a player is entering the game, which could cause disconnections if the player had a lot of quests with a lot of data, like long descriptions, etc. Now the prefab server will handle this task in the login and these static data will be cached. In some edge cases, it will reduce the amount of quest-related data being sent by the server during login by 99%.
- Socketing: Added abilities and effects for socketed items.
- UI: Modified cursor to be hardware one.
- VIP: Added option to define if the VIP should be per character of account-wide using VIP_PER_CHARACTER game setting parameter. The default value is true, which means that the VIP will be per character.
Fixes
- Combat: Fixed issue where weapon attack speed wasn’t taken into account.
- Controller: Fixed click to move controller that didn’t work with mounts.
- Instances: Fixed issue where invite to private instance was shown even for players that were on the block list.
- Pets: Fixed issue where the pet didn’t follow the player until follow action was invoked from the pet’s panel.
- Server: Fixed orientation setting for player templates
- Socketing: Fixed issue where statistics for sockets like gems/runs were not taken into account after the player relog.
- UI: Fixed issue where it wasn’t possible to create characters with Arabic font/names.
- World Builder: Fixed taking items from the backpack when the building was created from the item.
Known issues
- In arena 1 vs 1, if one person will restart the game and log in again, the second player will be dropped from the arena as a winner, the other logged character will be “stuck” in the instance of the arena, but there will be no longer treated as a typical arena.
- When in crafting definition there is no “Must Match Layout” option checked and for example, the same material is used for two slots with the same count, then if that material will be added into the crafting grid in one slot it will show the result item and craft button available, but the server will response that there are no sufficient items. It’s related to that server is checking requirements for an item in each slot for the recipe and if that amount is in the crafting grid.
- When an item reward and an item choice reward are the same then the item count for that item is overridden.
Fresh installation of Atavism X (10.8.0)
In order to install Atavism you can choose one of three types of installation:
1. Using premade Virtual Machine which is an Atavism-ready environment by following the Atavism Virtual Machine Installation process.
2. Using detailed instructions on what environment requirements should be met in order to install Atavism on your dedicated server.
3. Using the installation tutorial with our new Atavism Windows Manager for Windows Environment.
Then you should adjust your Unity project to work best with Atavism
If you are going to use UMA in your project you can follow the UMA installation step by step.
it is also recommended to refresh lighting and Asset Bundles because both are related to a specific Unity version. In order to rebuild your Asset Bundles (Bomber Bug is using them), you should head into the top menu in Unity Editor and choose Assets->Atavism Build AssetBundles (it will rebuild your asset bundles and then you should navigate to your project directory, and copy file infinitypbr from project_directoryAssetBundles to project_directoryAssetsStreamingAssets.
Updating to Atavism X (10.8.0)
Updating from Atavism X (10.7.0) to Atavism X (10.8.0) is moderately complicated due to many changes on both the server and client sides.
It is highly recommended you create a backup of your server, client, and databases before proceeding in case something goes wrong during the process.
Update using our Virtual Machine Installation
Step 1: Log in to your Virtual Machine using the WinSCP client and remove the atavism_server*.zip file first and then the atavism_server directory completely
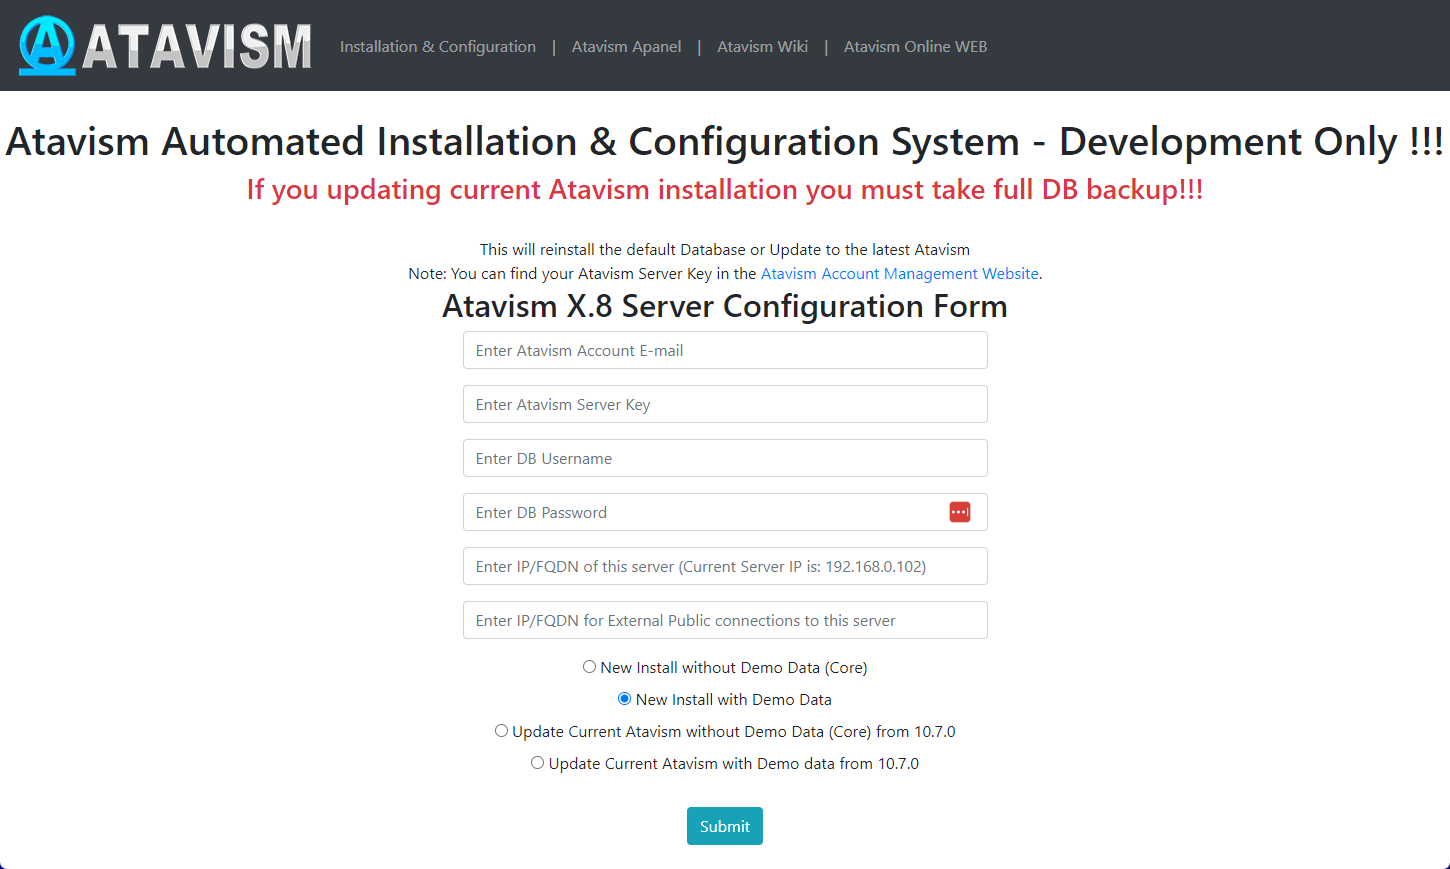
Step 2: Follow instructions like you would do the first installation but with the option Update Current Atavism depending on your installation (Core or with Demo Data). Open address in a web browser http://server_IP/atavism/installation/install.php
Warning: Make a Unity project backup. Importing the prefabs may break any customizations you had previously made to Your ones.
Step 3: Import Atavism Unity Package, Replace Files
Import the AtavismUnity_10.8.0_Patch_10.7.0_for_{Core|Demo}.unitypackage depending on which installation you did before.
Step 4: Update the UI Canvas
This procedure depends on how you modified your canvas. If it’s default then just open the AtavismBlankMainWorld scene and replace all components within your world scene, and repeat this procedure for the CharacterSelection scene.
Update using Custom Linux Installation
Step 1: Replace Server Files
Copy over all server files and adjust them as you did before with the previous Atavism version. Because server-side scripts and configuration files were changed, we recommend you put a fresh copy of the Atavism 10.8.0 server files.
Step 2: Update the Databases
Important note: Each time you are updating your database or files make a backup to have a copy of your work
Scripts to update your Atavism X (10.7.0) databases to Atavism X (10.8.0) are in your Atavism Server package. There are two types of scripts, structure, and data for both types of installations (Core and with Demo Data), you should use the proper ones depending on your previous installation method. In order to update the database, first, you have to update the structure, then the data. The script file for structure update :
- sql/updates/From_Atavism10.7.0/{Core|Demo}/Structure/admin.sql
- sql/updates/From_Atavism10.7.0/{Core|Demo}/Structure/atavism.sql
- sql/updates/From_Atavism10.7.0/{Core|Demo}/Structure/master.sql
- sql/updates/From_Atavism10.7.0/{Core|Demo}/Structure/world_content.sql
and script files for data updates:
- sql/updates/From_Atavism10.7.0/{Core|Demo}/Data/admin.sql
- sql/updates/From_Atavism10.7.0/{Core|Demo}/Data/world_content.sql
If you have renamed any of your databases from the default names (admin, atavism, master, world_content) make sure you have proper names in the “use” clause at the beginning of each script.
Step 3: Import Atavism Unity Package, Replace Files
Import the AtavismUnity_10.8.0_Patch_10.7.0_for_{Core|Demo}.unitypackage depending on which installation you did before.
Step 4: Update the UI Canvas
This procedure depends on how you modified your canvas. If it’s default then just open the AtavismBlankMainWorld scene and replace all components within your world scene, and repeat this procedure for the CharacterSelection scene.
Update using Atavism Windows Manager Installation
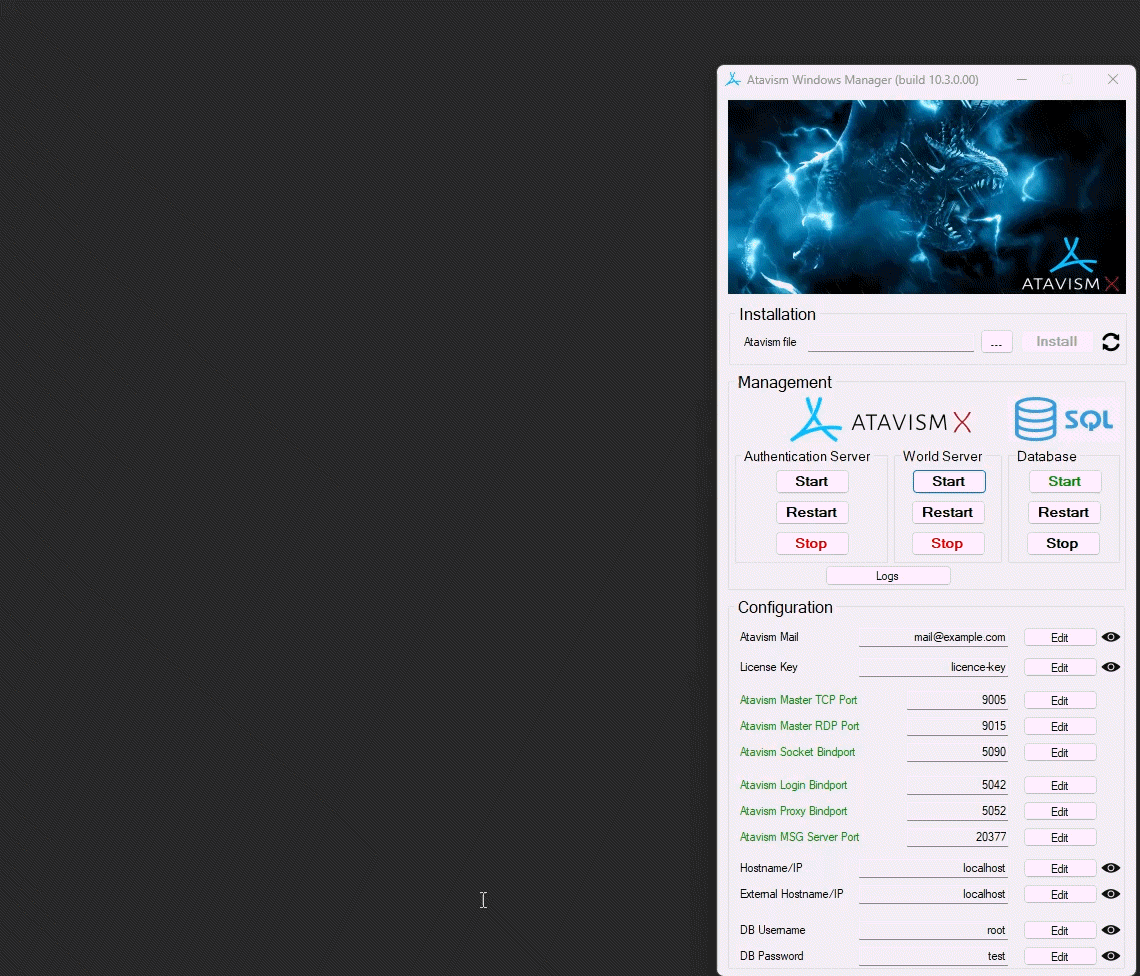
Step 1: Open the directory where you installed Atavism Manager (by default in c:\Atavism Manager)
Step 2: Rename the atavism_server directory to atavism_server_old or any other name
Step 3: Download the Atavism server zip file from apanel
Step 4: Unpack the atavism_server*.zip file into your Atavism Manager installation directory
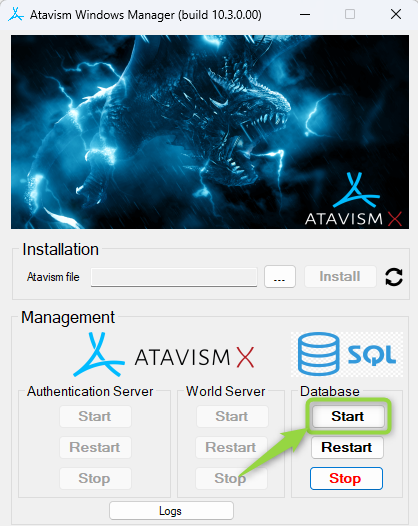
Step 5: In the Atavism Windows Manager panel start the database
Step 6: Open the command line console Windows + r shortcut and type cmd
Step 7: Change the directory to your Atavism Manager installation directory by typing the command
cd “c:\Atavism Manager\mariadb-5.5.61-win32\bin” or cd “c:\Atavism Manager\mariadb-10.6.11-winx64\bin” depending on which version of the database you are using
Step 8: Invoke database update commands where the root is the database user, the test is the password for the database user, following with by the path to the Atavism Manager installation directory. If you are not using our default databases, please adjust these commands.
If you have renamed any of your databases from the default names (admin, atavism, master, world_content) make sure you have proper names in the “use” clause at the beginning of each script.
Important note: Each time you are updating your database or files make a backup to have a copy of your work
mysql -u root -ptest admin < “c:\Atavism Manager\atavism_server\sql\updates\From_Atavism10.7.0\Demo\Structure\admin.sql”
mysql -u root -ptest admin < “c:\Atavism Manager\atavism_server\sql\updates\From_Atavism10.7.0\Demo\Structure\atavism.sql”
mysql -u root -ptest admin < “c:\Atavism Manager\atavism_server\sql\updates\From_Atavism10.7.0\Demo\Structure\master.sql”
mysql -u root -ptest admin < “c:\Atavism Manager\atavism_server\sql\updates\From_Atavism10.7.0\Demo\Structure\world_content.sql”
mysql -u root -ptest admin < “c:\Atavism Manager\atavism_server\sql\updates\From_Atavism10.7.0\Demo\Data\admin.sql”
mysql -u root -ptest admin < “c:\Atavism Manager\atavism_server\sql\updates\From_Atavism10.7.0\Demo\Data\world_content.sql”
You can use any third-party tool to handle this process for example MySQL Workbench or any other database management tool
Step 9: Start the Atavism.exe application
Step 10: Fill data according to your previous configuration including database credentials (if you changed them)
Step 11: Import Atavism Unity Package, Replace Files
Import the AtavismUnity_10.8.0_Patch_10.7.0_for_{Core|Demo}.unitypackage depending on which installation you did before.
Step 12: Update the UI Canvas
This procedure depends on how you modified your canvas. If it’s default then just open the AtavismBlankMainWorld scene and replace all components within your world scene, and repeat this procedure for the CharacterSelection scene.
Step 13: Download the updated file for Atavism Windows Manager from apane, and replace it. Remember to stop it before.