Setting up Resource Nodes
Atavism 10.5.0+
Watch this tutorial you will learn how to use the Atavism Resource Nodes Plugin, which allows you to place ores, wood, plants, herbs, chests, or any other objects in your game so players can use tools or skills to gather them, and get rewards.
With Ataivsm X.5 we bring a lot of randomization and customization and information on how it works you will find below.
Now Resource Nodes can be spawned in only part of the spots. Let’s say your map has 10 resource nodes placed.

In the Atavism Standalone Editor in the Resource node profile module for the installation with examples, there are two examples, we will analyze the one with OreProfile one.
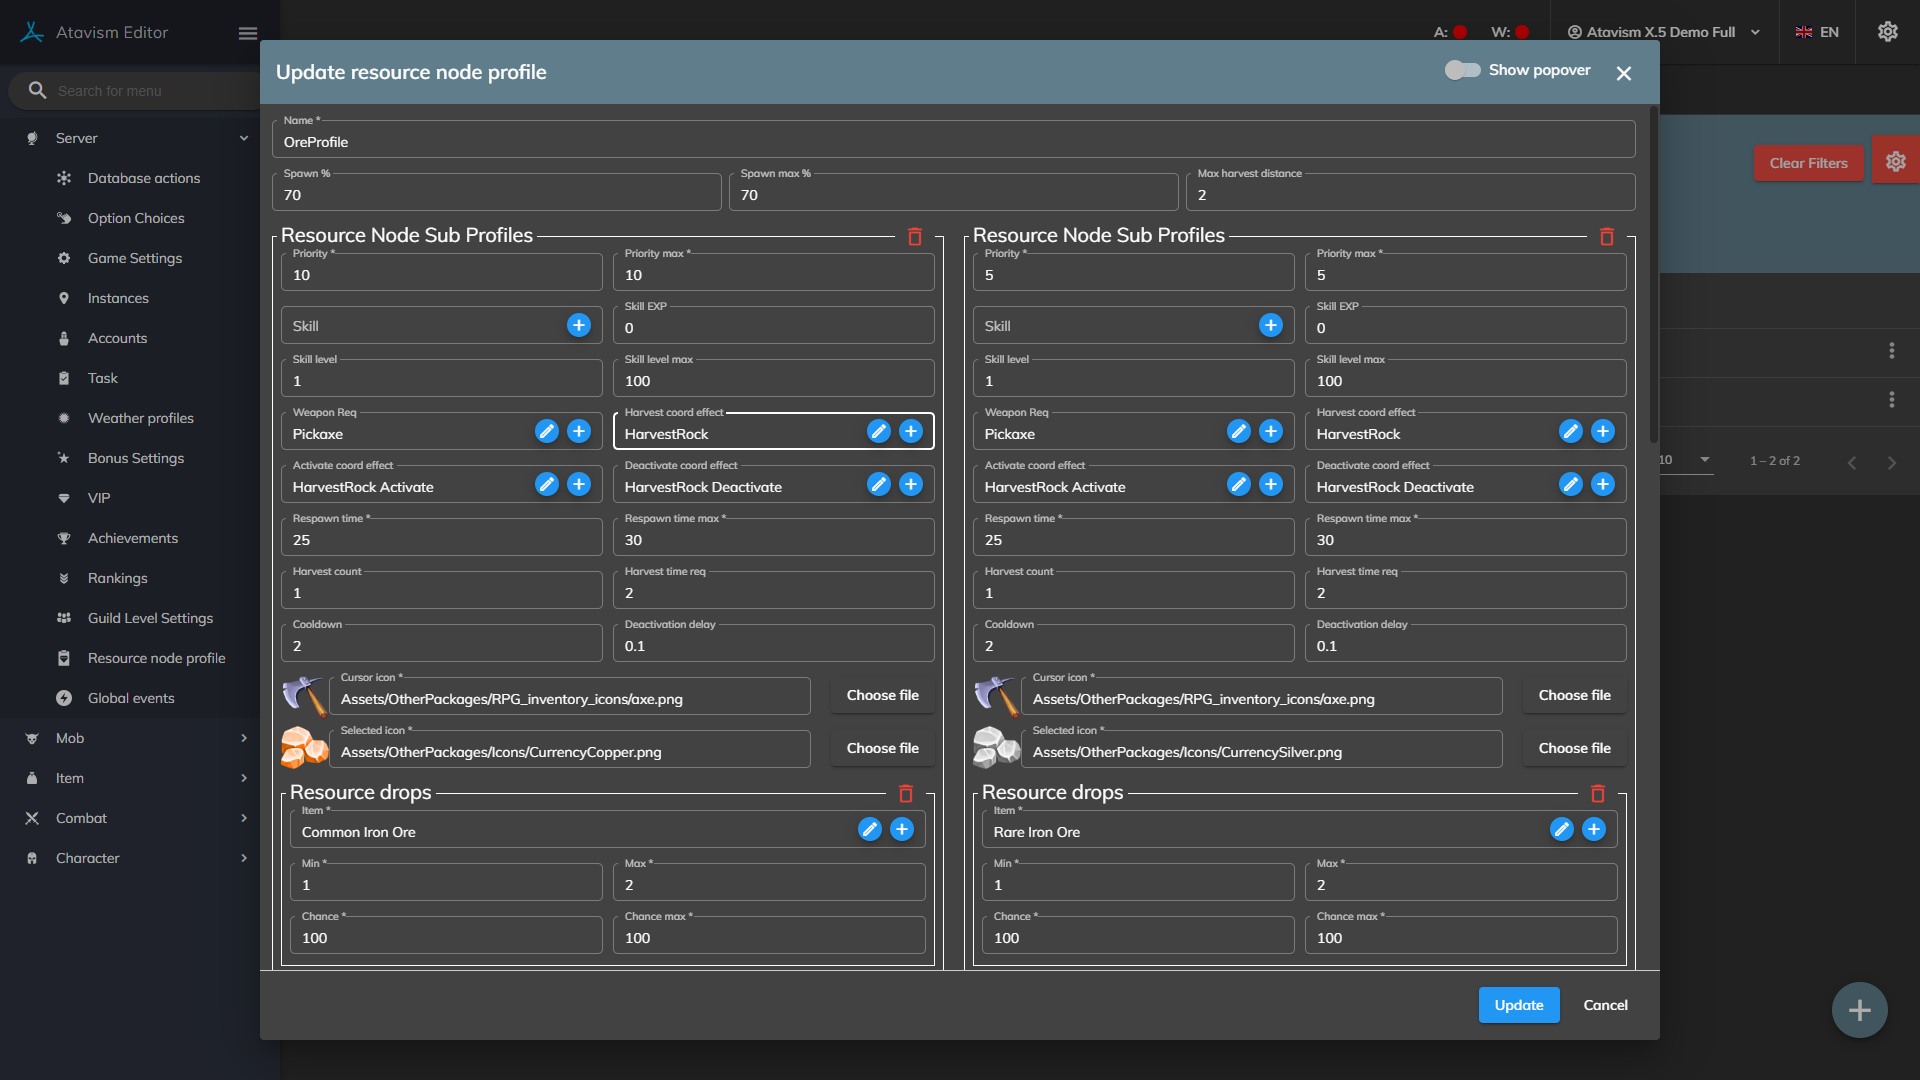
There we have Spawn % and Spawn max %, this is a range, and of course, if the min and max are the same, then Atavism will just take this value, in this case, 70%, so for our 10 nodes on the map random 7 will be populated with resources, each time the server will create instance copy.

Then in our case, we have 3 Sub Profiles, and except for many options, at the start, the most important is a priority, which works like weight or multiplier, so we have:
- Sub Profile 1 with priority 10 that will drop Common Iron ore (black color)
- Sub Profile 2 with priority 5 that will drop Rare Iron Ore (green color)
- Sub Profile 3 with priority 1 that will drop Legendary Iron Ore (yellow color)
which means that
Sub Profile 1 will be chosen two times more often than Sub Profile 2, and 10 times more often than Sub Profile 3,
Sub Profile 2 will be chosen 5 times more often than Sub Profile 3, and 2 times less often than Sub Profile 1, and
Sub Profile 3 will be chosen 10 times less often than Sub Profile 1, and 5 times less often than Sub Profile 2.
Now it’s time for a bit of math, but only if you want to get more in-depth calculations on how it is done on the server. If not you can skip the next section.
As you can see this priority works like a multiplier. Let’s get back to our randomization. We know that we will have 7 nodes populated with resources, now the server has to choose with which Sub Profile and how many. So, it will start from the Sub Profile with the lowest priority up to the highest one. In our case it’s priority 1, which is 1 of the sum of all, so we have 1 + 5 + 10, 1 of 16, which is 16% of the 100, so 6,25% for the first Sub Profile, and we have 10 nodes on the map, and only 7 populated, so 7 resource nodes are our 100% of the Sub Profiles we want to use, so each node is 100% / 7, and one node is 14,28%. Atavism is taking this 6,25% which is more than already spawned 0 node which is 0%, and spawning one node which equals 14,28%, so we will have 1 node with Sub Profile 1 with the lowest priority, then it’s taking Sub Profile with priority 5, which is effectively 5 x 6,25 so 31,25. Atavism will take the previous value of 6,25, add 31,25 to it, and based on the value will spawn a number of nodes with Sub Profile 2, so it will be 37,5% divided by our percentage node value which is 14,28%, which is 2,18, to higher than 2 nodes, rounded to 3, so 2 nodes with Sub Profile 2, and it will continue such calculations until all Sub Profiles will be used. In our case, we have only the last one, and 3 nodes spawned so far, while we should have 7, so it will fill out the remaining 4 with Sub Profile 3.
Now for non-math users and to say it with a human language 🙂
Based on the priority, Atavism will calculate how many nodes with each Sub Profile there should be. The lower the priority compared to the other Sub Profiles, the fewer resource nodes with the defined Sub Profile.
So, as a result, we will have such a spawn.

All of this is calculated when the server is starting/creating a new instance.
Now when a player harvests our Legendary (yellow) node, after the harvest it will be like this

After respawn time, the server will check which node spots are free, in this case, it will be 4 of them and will randomize where to spawn it, so it can be any of the remaining (white ones), for example, different one.

Sub Profile has a lot of parameters like:
Skil: Defines the required skill associated with harvesting for this resource node/sub-profile.
Skill EXP: Defines experience that will be given to the skill when this resource node/sub-profile will be harvested
Skill level – Skill level max: Defines the skill level range for which experience will be given when this resource node/sub-profile is harvested
Tool Req: Defines the tool that will be required for harvesting this resource node
Harvest coord effect: Defines coordinated effect used during harvesting
Activate coord effect: Defines coordinated effect used when the resource node is being activated
Deactivate coord effect: Defines coordinated effect used when the resource node is being deactivated
Respawn time: Defines range in seconds after which the resource node will be respawned after it is harvested
Harvest count: Defines the number of times the resource node can be harvested after it is despawned/deactivated.
Harvest time req: Defines time in seconds that is required to harvest the resource node
Cooldown: Defines the number of seconds between harvesting for this resource node
Deactivation delay: Defines the number of seconds after which the resource node will be removed from the scene after the deactivation message is received. It’s useful if you want to
Cursor icon: Defines the icon that will be presented when the mouse cursor is over the resource node
Cursor icon: Defines the icon that will be presented when the resource node is selected
Resource Drops
Item: Defines the item that will be dropped after harvesting
Min – Max: Defines the number range of how many items will be dropped after harvesting
Chance – Chance max: Defines the percentage range for how often the item will be dropped after harvesting
but it’s also important to know that except for these randomizations, where Ataivsm will select Sub Profile for a particular spot, you can also visualize it.
If we open Unity Editor and look at the Resource node Component, our Ore.
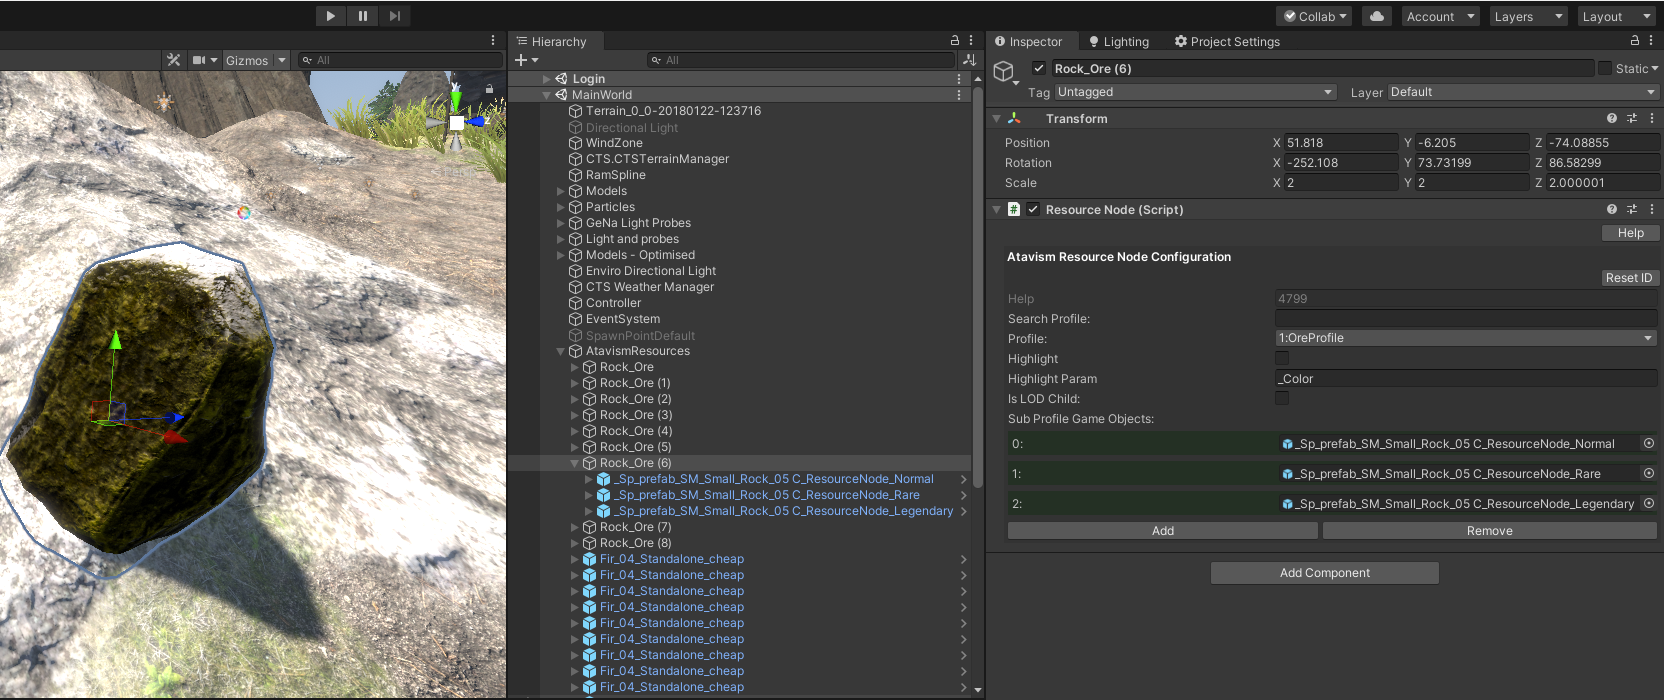
There are some options on the component Like Profile which is the profile we have in the Atavism Standalone Editor.
Then we have the highlight option and Highlight Param which are related to the mouse-over action to tint the resource node to a specific color when the player hovers over the resource node and with Param you can define which shader parameter it will try to tint, as custom shaders.
Is LOD Child defines if the resource node is part of a Unity LOD Group and if the component is on the LOD and the checkbox is ticked, then it will disable the parent game object instead of the actual game object when the resource node is being harvested.
The last parameter is the list of Sub Profiles and this list is basically a list of Sub Profiles defined in the Standalone Editor in the same order, and there you can assign a game object which should be a child of the actual resource node as on the screenshot below.
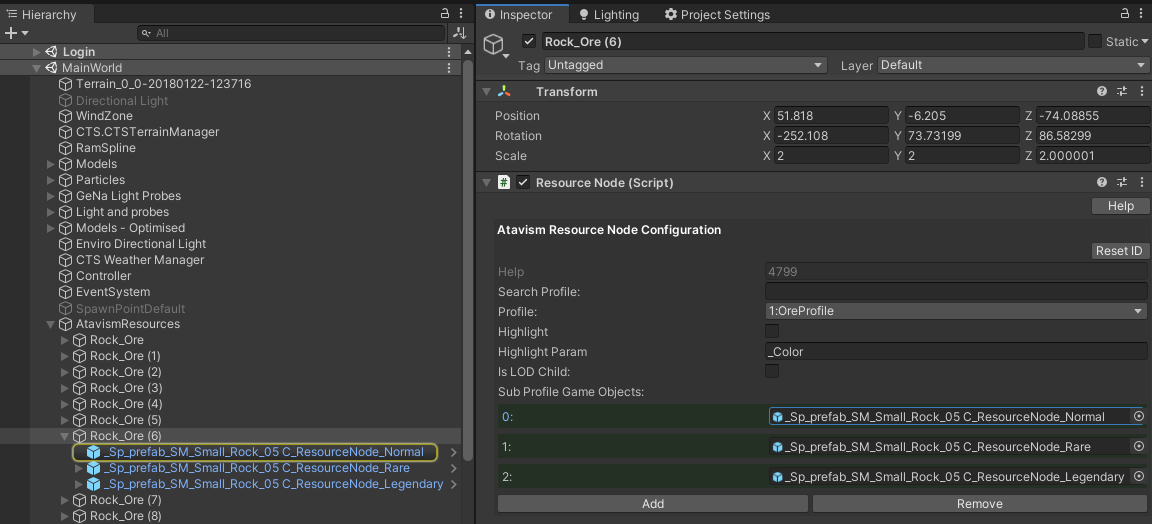
All of these objects should be enabled, and when Atavism chooses one of the Sub Profiles for the resource node it will turn off all the rest and remain only the chosen one.
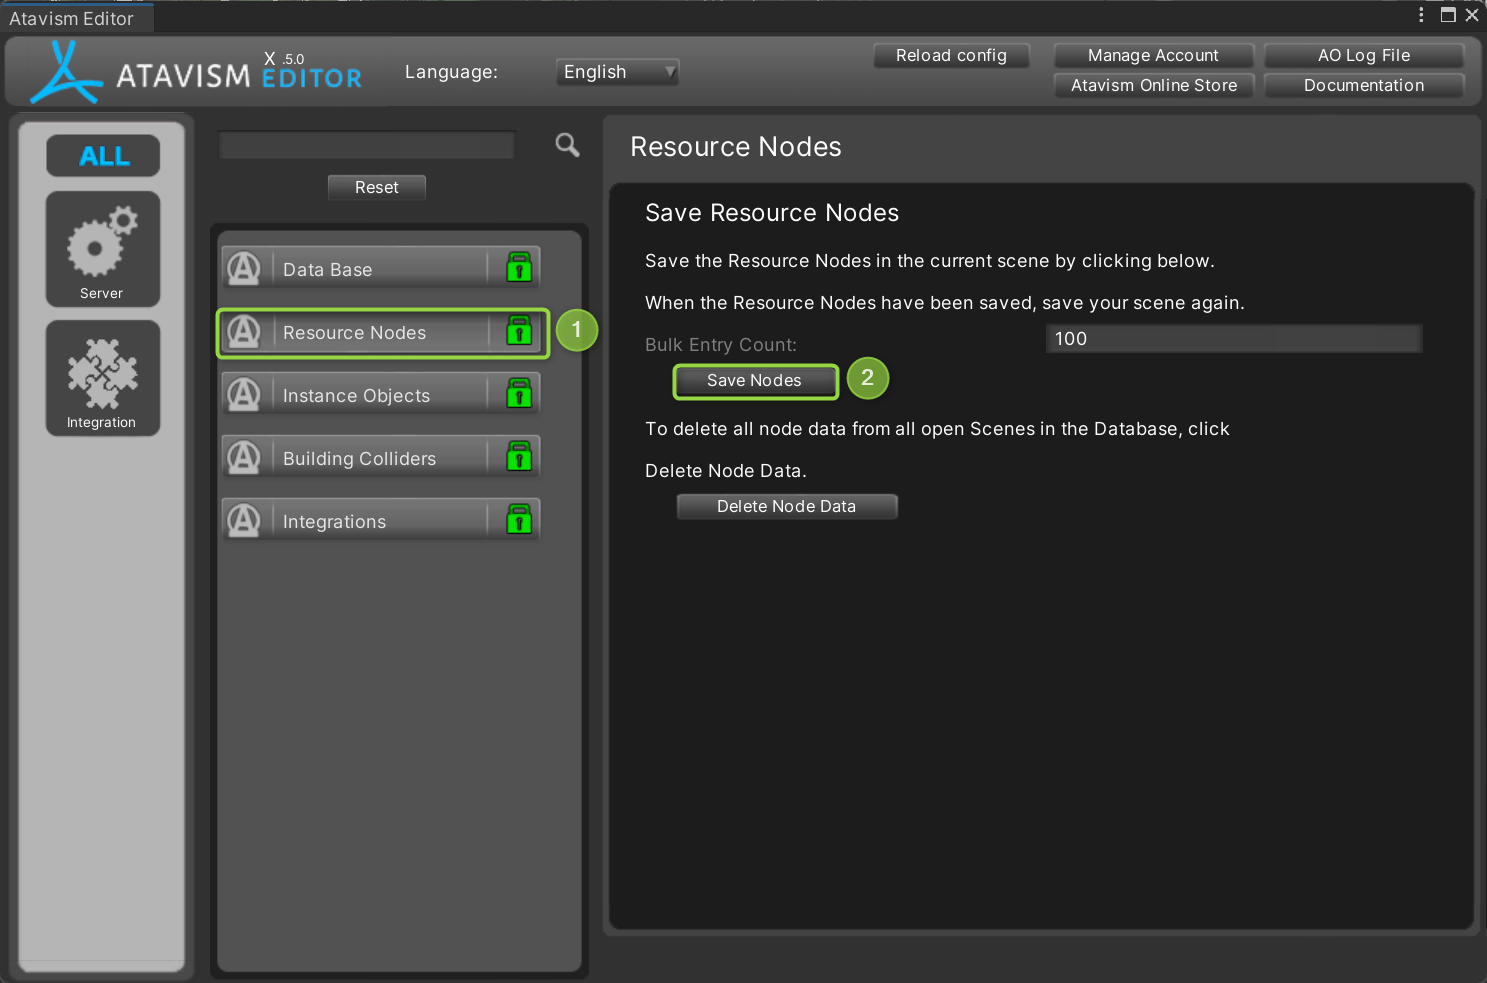
Saving resource nodes based on the scene placement
When you place your resource nodes in the scene, you need to save them somehow. This process is super simple and we just have to open Atavism Editor inside Unity.
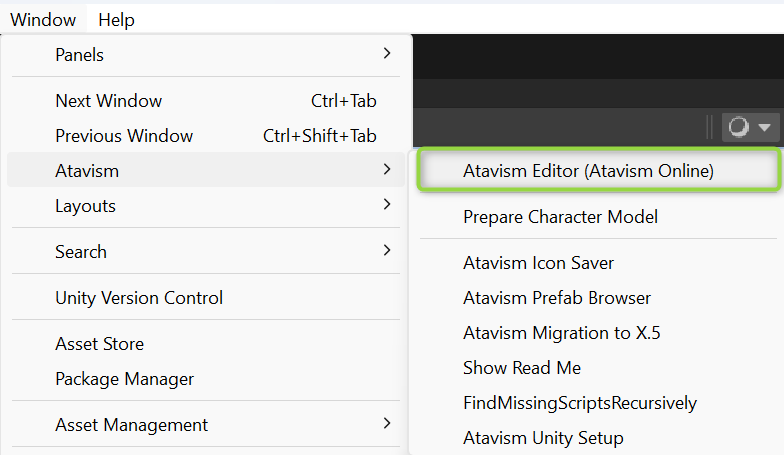
Head over to the Resource Nodes menu section, and click Save Nodes.
Atavism 10.4.0-
Resource Nodes are set up in the Unity Editor then saved to the Content Database with the Atavism Editor.
Creating Resource Drops
The first step is to create Resource Drops which define the item and chance of a drop from a Resource Node. Resource drops are prefabs found in the Resource/Content/ResourceDrops folder. Make a duplicate of one of the existing ones, rename it and set the values as desired. The min/max represent the minimum and maximum amounts the player might get from this node (randomized).
Creating the Resource Nodes
Resource nodes are GameObjects that exist in a Unity Scene. Place your Game Object in the scene and add a Resource Node component.
Add the Resource Drops you want to the Node and set the properties as follows:
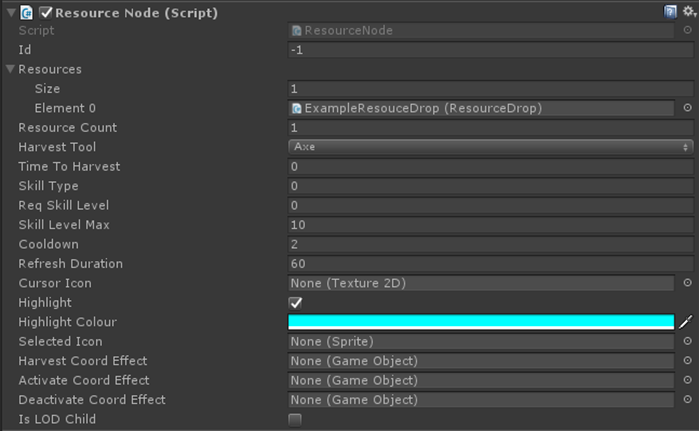
- Resource Count (how many times it can be harvested before it despawns)
- Harvest Tool (what item type the player must have equipped to harvest from this node)
- Skill Type (the skill associated with harvesting from this node)
- Req Skill Level (how high the players skill needs to be)
- Skill Level Max (the players skill will no longer increase from this node once it reaches this level)
- Refresh Duration (how long it takes the node to respawn)
- Cursor Icon (icon of the cursor when you hover over the resource node)
- Highlight (if checked then when you hover over resource node Atavism will try to change the color of texture to the selected value in Highlight Colour
- Harvest Coord Effect (the coord effect (animation/special effect) to play for when the player is harvesting from the node)
- Activate Coord Effect (the coord effect (animation/special effect) to play for when the node will be activated again after harvest)
- Deactivate Coord Effect (the coord effect (animation/special effect) to play for when the node will be harvested and deactivated)
- Is LOD Child (if resource node has LOD Group)
Add as many resource nodes as you want to your scene.
Saving Resources to the database
When you have your Resource Nodes added to your scene, open the Atavism Editor and go to the Resource Nodes plugin. Click on Save Nodes and wait for the “Nodes Saved” message. Now save your scene again as the Nodes would have been given an id by the database.
Restart your server and go forth harvesting those resources.
Additional Note
If you haven’t already added the ResourceLoot.cs component to your UI prefab (or GameObject in your scene), make sure it is added to see the resource loot items pop up when harvesting.