Atavism X (10.7.0) – Date of release 07.12.2022
New Features
- Agent: Added an Atavism Agent to manage the Atavism server. Within you can:
- Install Atavism Server based on mail/license key/version
- Setup config parameters during installation and update them after if necessary
- Update Atavism Server and databases
- Access Logs and download them
- Upload Navmesh files
- Start/Stop/Restart and check the status of Atavism services
- AI: Added a new advanced AI system for mobs that can even handle boss fights. Within the system, mobs can have many different behaviors:
- Offensive – mob will try to reach the defined ability range percentage and use abilities, even if the range will be not far enough
- Defensive – mob will try to reach the defined ability range percentage and use abilities only if the range will be far enough
- Defend – mob will defend the closest mob with the specified tag. It can be useful for caravans, and such
- Flee – mob will fee in opposite direction from attackers, towards friendly mobs, or to one of the defined points. When the mob is entering fleeing mode it can start using abilities on start, during fleeing, and when it will reach the destination point
- Heal – mob will heal the closest mob with the specified tag. The mob can have many behaviors and switch between them based on various conditions:
- Distance – this will check the distance between the mob and its target
- Stat – this will check the defined statistic value for the mob
- Effect – it will check if there is or there isn’t an active effect with the tag on the mob or on its target
- Number of Targets – it will check if there is more or less a number of allies or enemies
These conditions can be set in condition groups, where they have AND operator while between condition groups there is OR operator
The mob can have abilities that can be used based on additional conditions, compared to the behavior ones, so except Distance, Stat, Effect, and Number of Targets there are also: - Event – it will check if a selected event occurred like parry, dodge, miss, damage, heal, critical, stun, sleep
- Combat State – it will check if the target is in combat or not
- Death State – it will check if the target’s death state is true or false
Conditions for abilities are in conditions groups and similar to the behavior groups, there is AND operator within the group and OR between groups.
When a mob will choose specific behavior based on the defined conditions it can equip a specific weapon, like a Melee behavior can equip a sword but when the mob will switch its behavior to Ranged then the weapon will be switched to a bow or a rifle.
- AI: Added a few game settings for the AI Behavior module:
- MOB_COMBAT_BEHAVIOR_DEFEND_CHANGE_TARGET_INTERVAL – defines the time interval in milliseconds of how fast the defender will check who is the highest in the aggro table of the defended target.
- MOB_COMBAT_BEHAVIOR_MOVE_CHECK_INTERVAL – defines how often the target point will be defined for the mob, in milliseconds.
- MOB_COMBAT_BEHAVIOR_USE_ABILITY_TIMEOUT – defines the time within which the mob will try to use the ability, and when it will time out, then the server will randomize new ability to be used. It’s in milliseconds.
- MOB_COMBAT_BEHAVIOR_SELECT_INTERVAL – defines how often the server will check which behavior meets the conditions, in milliseconds – default value: 1000
- MOB_COMBAT_BEHAVIOR_FLEE_ALLIES_CHECK_MAX_DISTANCE – defines maximum distance for the area where allies and enemies are being checked for behavior profile with Number of Targets condition, in meters – default value: 40
- AI: Mobs will now reset and come back to their last positions when they won’t be able to attack.
- AI: Mobs will stop casting abilities if the ability casting time is longer than 0 seconds and casting in a run is set to false.
- Client: Added option to enable Addressable in the Atavism Editor inside Unity in the Integrations section.
- Client: Added option to invert mouse in the game settings in-game.
- Effects: Added definition for every effect if it should be displayed for the player or not.
- Server: Added EXP_GROUP_ADD_PERCENTAGE game setting that defines additional experience when the player is in a group.
- Server: Added support for Java 17 LTS
- Server: Added service discovery option, to be able to additionally start on demand one of the four services that can be multiplied (proxy, combat, world, mobs) and let the server to balance the workload.
- Server: Added KRYO library for serialization and removed
- Standalone Editor: Added option to display database and server versions in the Atavism Standalone Editor.
- UI: Added option to display network lag indicator.
- UI: Added option to display entity level after the name.
- UI: Added option to drag and drop chat window.
Changes to existing features
- Bonuses: Modified chance calculation for bonuses: Loot Chance, Enchanting Chance, Crafting Chance, Reset Sockets Chance, Socketing Chance, Auction Cost Instead of a percentage value added to the chance, it is now added multiplier of the current percentage, and the value.
- Client: Added 3 parameters to make movement smoother:
- Moving Sync Frame Multiply – defines movement multiplier when the player is moving and is out of sync.
- Static Sync Frame Multiply – defines movement multiplier when the player is not moving and is out of sync.
- Static Sync Position Diff Tolerance – defines the maximum difference in meters, between the player’s position on the server and on the client when the client won’t be corrected.
- Database: Modified master.account.username and admin.account.username tables to use the same length which now is 200 characters.
- Items: Modified guild warehouse and claim storage to not be able to put bound items to them, and added game setting to be able to add bound items to player’s banks STORE_BOUND_ITEM_IN_BANK with the default false value.
- Server: Updated Log4j from 2.17.1 to 2.19.0
- Server: Removed MOB_AGGRO_CLOSE_RANGE_CHECK, MOB_AGGRO_MELEE_THREAT_THRESHOLD, and MOB_AGGRO_RANGED_THREAT_THRESHOLD from game settings, as they are obsolete because these parameters are now per mob basis.
- Server: Modified PHP authentication to handle two new responses:
- -4 for database error
- -5 for subscription expired
- Server: Updated Recast4j from 1.4.2 to 1.5.5.
- UI: Modified chat to add messages to TMP by concatenating all messages and adding them as one to TMP instead of adding one line at the end. It should also help to handle RTL languages.
Fixes
- Admin Panel: Fixed the issue where reloading the server through the admin panel in-game was causing claim objects to disappear.
- Client: Fixed issue with Click To Move Controller, where after release, the character was moving to his previously clicked position.
- Client: Fixed issue with loading VIPs, Rankings, and Achievements when World Streamer was used.
- Combat: Fixed issue with dueling where during duel abilities randomly returned an “invalid target” message.
- Combat: Fixed issue with AoE around target ability where the selected target wasn’t taken into account.
- Dialogues: Fixed the issue where if nested dialogue action required another dialogue, then this requirement wasn’t checked.
- Effects: Fixed issue where the effect could be removed by the caster, even if the effect wasn’t set as removable by the player.
- Item Sets: Fixed issue with Item Sets where data weren’t refreshed on the client and the tooltips didn’t display refreshed data.
- Items: Fixed backpack refreshing when the item with delete on activation was used and was part of the stack.
- Items: Fixed the issue where if the currency was the only item to drop from the loot table, then it wasn’t displayed in the loot panel in the game.
- Items: Fixed the issue with the loot table where if two or more items had the same drop chance, then only the first item was selected.
- Items: Fixed issue where an item with passive ability become broken through durability dropped to 0, then the passive effect was removed but after reequipping the item the ability was applied again.
- Items: Fixed issue where if the player tried to pick up items around him using area looting, and he didn’t have enough space in the backpack then items were lost, but the weight was increased by them.
- Regions: Fixed the issue where if the player entered the water region and hold only jump (without other movement keys) then he could jump infinitely, even outside the water region.
- Server: Fixed reload admin panel option that didn’t reload auction house game settings.
- Server: Fixed the issue where if the player felt without moving horizontally, the damage wasn’t applied.
- Server: Fixed the issue with invisible players after teleporting due to a broadcasting bug.
- Server: Fixed the issue with teleport, where the player was moved back to the old position but in the new instance.
- Skills: Fixed the issue with skills being sent by the prefab server that instead of the skill level required was sending information about ability id.
- Spawner: Fixed the issue with the in-scene spawn generator where it replaced spawn points with the latest one.
- VIP: Fixed VIP panel as data weren’t sent properly.
- VIP: Fixed VIP where if the first VIP extension that the player used was VIP point and not VIP time, then the VIP level bonuses were activated, even if the VIP time was set to 0. Added VIP_USE_TIME game setting parameter to define if the VIP should use time or be permanent. The default value for this parameter is set to true.
- UI: Fixed issue where binding keys didn’t work properly if i2localization integration was enabled.
- World Builder: Fixed issue with World Builder where building object could be built on the terrain if it required pieces with defined categories.
- World Builder: Fixed issue with World Builder where it wasn’t possible to build an element on an element, like a bed on the floor using the building from item.
- World Builder: Fixed issue where in the UI World Builder filtering elements by Categories was displaying elements using a different list of categories.
- World Builder: Fixed the issue with World Builder where object preview was colliding with the camera due to layers collisions.
Known issues
- In arena 1 vs 1, if one person will restart the game and log in again, the second player will be dropped from the arena as a winner, the other logged character will be “stuck” in the instance of the arena, but there will be no longer treated as a typical arena.
- When in crafting definition there is no “Must Match Layout” option checked and for example, the same material is used for two slots with the same count, then if that material will be added into the crafting grid in one slot it will show the result item and craft button available, but the server will response that there are no sufficient items. It’s related to that server is checking requirements for an item in each slot for the recipe and if that amount is in the crafting grid.
- When an item reward and an item choice reward are the same then the item count for that item is overridden.
Fresh installation of Atavism X (10.7.0)
In order to install Atavism you can choose one of three types of installation:
1. Using premade Virtual Machine which is Atavism ready environment by following the Atavism Virtual Machine Installation process.
2. Using detailed instructions on what environment requirements should be met in order to install Atavism on your dedicated server.
3. Using the installation tutorial with our new Atavism Windows Manager for Windows Environment.
Then you should adjust your Unity project to work best with Atavism
If you are going to use UMA in your project you can follow the UMA installation step by step.
it is also recommended to refresh lighting and Asset Bundles because both are related to a specific Unity version. In order to rebuild your Asset Bundles (Bomber Bug is using them), you should head into the top menu in Unity Editor and choose Assets->Atavism Build AssetBundles (it will rebuild your asset bundles and then you should navigate to your project directory, and copy file infinitypbr from project_directory\AssetBundles to project_directory\Assets\StreamingAssets.
Updating to Atavism X (10.7.0)
Updating from Atavism X (10.6.0) to Atavism X (10.7.0) is moderately complicated due to many changes on both the server and client sides.
It is highly recommended you create a backup of your server, client, and databases before proceeding in case something goes wrong during the process.
Update using our Virtual Machine Installation
Step 1: Log in to your Virtual Machine using the Winscp client and remove the atavism_server*.zip file first and then the atavism_server directory completely
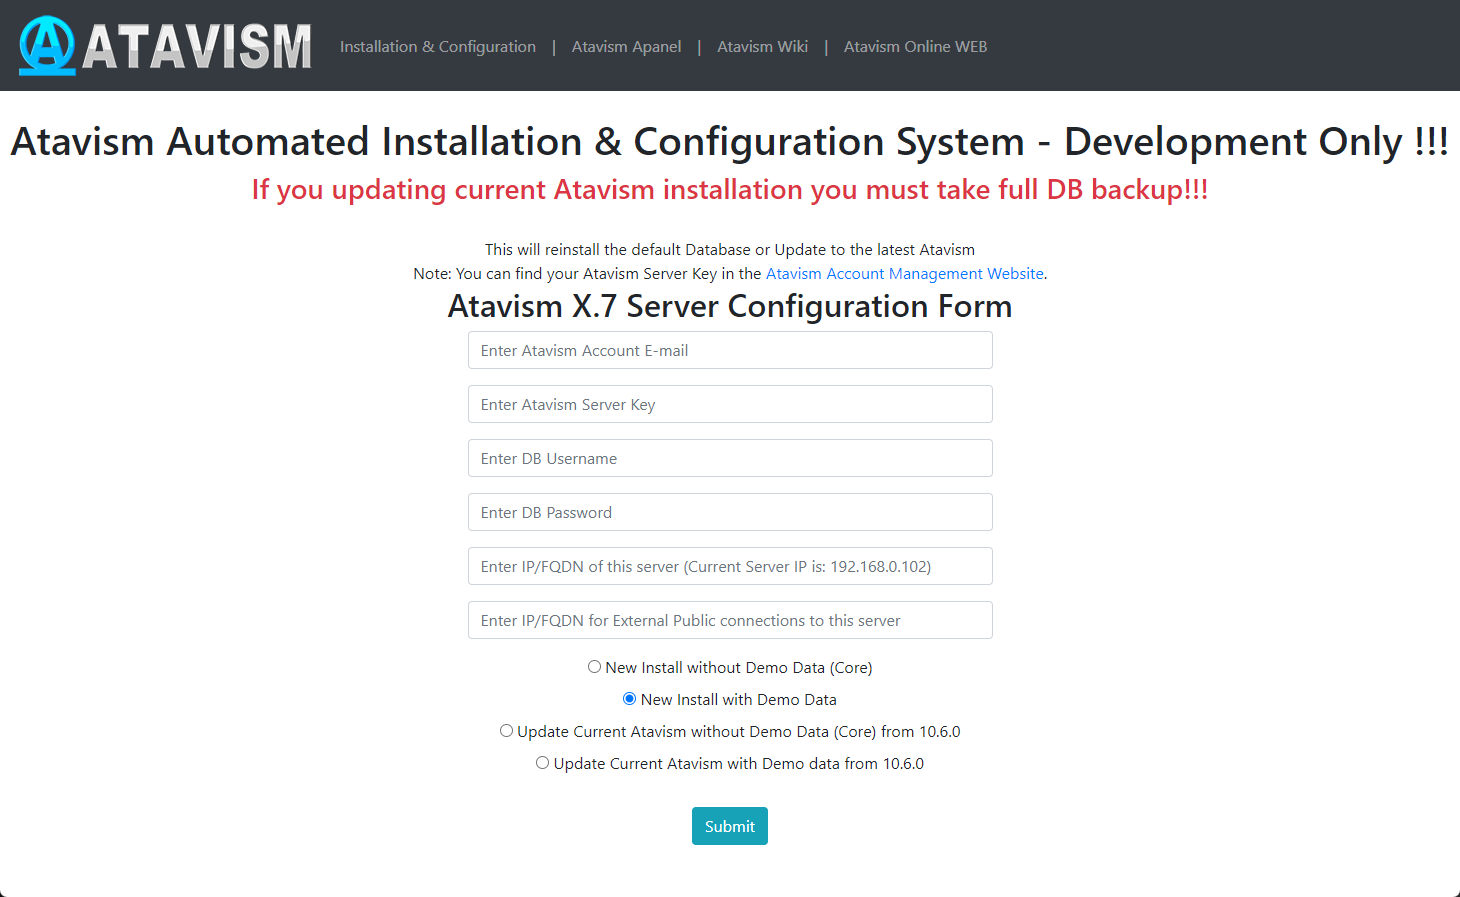
Step 2: Follow instructions like you would do the first installation but with the option Update Current Atavism depending on your installation (Core or with Demo Data). Open address in a web browser http://server_IP/atavism/installation/install.php
Warning: Make a Unity project backup. Importing the prefabs may break any customizations you had previously made to Your ones.
Step 3: Import Atavism Unity Package, Replace Files
Import the AtavismUnity_10.7.0_Patch_10.6.0_for_{Core|Demo}_Auto.unitypackage depending on which installation you did before.
Step 4: Update the UI Canvas
This procedure depends on how you modified your canvas. If it’s default then just open the AtavismBlankMainWorld scene and replace all components within your world scene, and repeat this procedure for the CharacterSelection scene.
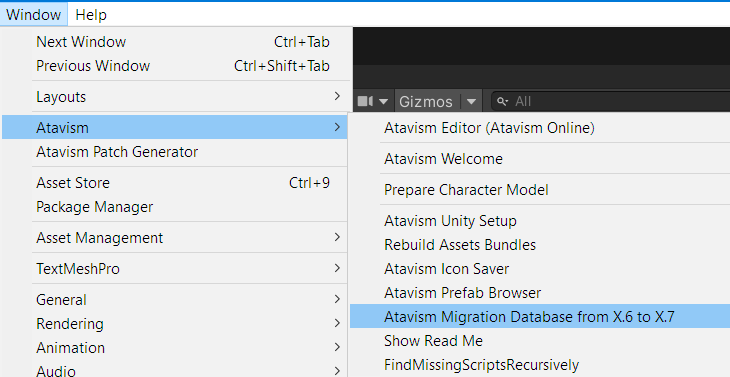
Step 5: Open Unity Editor and from the top menu select Atavism Migration to X.7
Update using Custom Linux Installation
Step 1: Replace Server Files
Copy over all server files and adjust them as you did before with the previous Atavism version. Because server-side scripts and configuration files were changed, we recommend you put a fresh copy of the Atavism 10.7.0 server files.
Step 2: Update the Databases
Important note: Each time you are updating your database or files make a backup to have a copy of your work
Scripts to update your Atavism X (10.6.0) databases to Atavism X (10.7.0) are in your Atavism Server package. There are two types of scripts, structure, and data for both types of installations (Core and with Demo Data), you should use the proper ones depending on your previous installation method. In order to update the database, first, you have to update the structure, then the data. The script file for structure update :
- sql/updates/From_Atavism10.6.0/{Core|Demo}/Structure/admin.sql
- sql/updates/From_Atavism10.6.0/{Core|Demo}/Structure/master.sql
- sql/updates/From_Atavism10.6.0/{Core|Demo}/Structure/world_content.sql
and script files for data updates:
- sql/updates/From_Atavism10.6.0/{Core|Demo}/Data/admin.sql
- sql/updates/From_Atavism10.6.0/{Core|Demo}/Data/world_content.sql
If you have renamed any of your databases from the default names (admin, atavism, master, world_content) make sure you have proper names in the “use” clause at the beginning of each script.
Step 3: Import Atavism Unity Package, Replace Files
Import the AtavismUnity_10.7.0_Patch_10.6.0_for_{Core|Demo}_Auto.unitypackage depending on which installation you did before.
Step 4: Update the UI Canvas
This procedure depends on how you modified your canvas. If it’s default then just open the AtavismBlankMainWorld scene and replace all components within your world scene, and repeat this procedure for the CharacterSelection scene.
Step 5: Open Unity Editor and from the top menu select Atavism Migration to X.7

Update using Atavism Windows Manager Installation
Step 1: Open the directory where you installed Atavism Manager (by default in c:\Atavism Manager)
Step 2: Rename the atavism_server directory to atavism_server_old or any other name
Step 3: Download the Atavism server zip file from apanel
Step 4: Unpack the atavism_server*.zip file into your Atavism Manager installation directory
Step 5: Open the command line console Windows + r shortcut and type cmd
Step 6: Change the directory to your Atavism Manager installation directory by typing the command
cd “c:\Atavism Manager\mariadb-5.5.61-win32\bin” or cd “c:\Atavism Manager\mariadb-10.6.11-winx64\bin” depending on which version of the database you are using
and start the database if it’s not started yet by invoking the command
mysqld
Step 7: Invoke database update commands where the root is the database user, the test is the password for the database user, following with by the path to the Atavism Manager installation directory. If you are not using our default databases, please adjust these commands.
If you have renamed any of your databases from the default names (admin, atavism, master, world_content) make sure you have proper names in the “use” clause at the beginning of each script.
Important note: Each time you are updating your database or files make a backup to have a copy of your work
mysql -u root -ptest admin < “c:\Atavism Manager\atavism_server\sql\updates\From_Atavism10.6.0\Demo\Structure\admin.sql”
mysql -u root -ptest master < “c:\Atavism Manager\atavism_server\sql\updates\From_Atavism10.6.0\Demo\Structure\master.sql”
mysql -u root -ptest world_content < “c:\Atavism Manager\atavism_server\sql\updates\From_Atavism10.6.0\Demo\Structure\world_content.sql”
mysql -u root -ptest admin < “c:\Atavism Manager\atavism_server\sql\updates\From_Atavism10.6.0\Demo\Data\admin.sql”
mysql -u root -ptest world_content < “c:\Atavism Manager\atavism_server\sql\updates\From_Atavism10.6.0\Demo\Data\world_content.sql”
You can use any third-party tool to handle this process for example MySQL Workbench or any other database management tool
Step 8: Start the Atavism.exe application
Step 9: Fill data according to your previous configuration including database credentials (if you changed them)
Step 10: Import Atavism Unity Package, Replace Files
Import the AtavismUnity_10.7.0_Patch_10.6.0_for_{Core|Demo}.unitypackage depending on which installation you did before.
Step 11: Update the UI Canvas
This procedure depends on how you modified your canvas. If it’s default then just open the AtavismBlankMainWorld scene and replace all components within your world scene, and repeat this procedure for the CharacterSelection scene.
Step 12: Open Unity Editor and from the top menu select Atavism Migration to X.7

List of changed files:
New Files (2)
Dragonsan\AtavismObjects\Scripts\UGUI\UGUILag.cs
Dragonsan\AtavismEditor\Editor\Interfaces\MySQL_8x_Libs.unitypackage
Updated Files (121)
Standard Assets\Atavism Core\Networking\Rdp\AtavismRdpConnection.cs
Standard Assets\Atavism Core\Networking\MessageTypes.cs
Standard Assets\Atavism Core\Networking\AtavismNetworkHelper.cs
Standard Assets\Atavism Core\Editor\InitialSetup.cs
Standard Assets\Atavism Core\Base\AtavismWorldManager.cs
Standard Assets\Atavism Core\Base\AtavismPlayer.cs
Standard Assets\Atavism Core\Base\AtavismPathInterpolator.cs
Standard Assets\Atavism Core\Base\AtavismObjectNode.cs
Standard Assets\Atavism Core\Base\AtavismGameWorld.cs
Standard Assets\Atavism Core\Base\AtavismClient.cs
Standard Assets\Atavism Core\NetworkAPI.cs
Standard Assets\Atavism Core\ClientAPI.cs
Standard Assets\Atavism Core\Base\AtavismLoginHelper.cs
Resources\Buildings\Trader\Trader.prefab
Resources\Buildings\Prefabs\Default Pieces\Default Piece Light.prefab
Resources\Buildings\Prefabs\Default Pieces\Default Piece Foundation.prefab
Resources\Buildings\Prefabs\Default Furnitures\Piece Default Light.prefab
Resources\Buildings\Prefabs\Default Furnitures\Piece Default Chair.prefab
Resources\Buildings\Prefabs\Default Furnitures\Piece Default Bed Table.prefab
Resources\Buildings\Levels of Building (AquariusMax)\Shed Stages\Shed_Build_6_Final.prefab
Resources\Buildings\Levels of Building (AquariusMax)\AquariusMaxEBS\Window_Wall_A4.prefab
Resources\Buildings\Levels of Building (AquariusMax)\AquariusMaxEBS\Straight_Wall_A4.prefab
Resources\Buildings\Levels of Building (AquariusMax)\AquariusMaxEBS\Floor_A3.prefab
Resources\Buildings\Levels of Building (AquariusMax)\AquariusMaxEBS\Door_Wall_A4.prefab
Resources\Buildings\House\Stage2.prefab
Resources\OrcFemaleNonUma.prefab
Resources\HumanMaleNonUma.prefab
Resources\ExampleCharacter.prefab
Dragonsan\UGUIMiniMap for Atavism\Content\Scripts\Core\bl_MiniMap.cs
Dragonsan\Scenes\SinglePlayerPrivate.unity
Dragonsan\Scenes\MainWorld.unity
Dragonsan\Scenes\Login.unity
Dragonsan\Scenes\GuildPrivate.unity
Dragonsan\Scenes\Deathmatch 2v2.unity
Dragonsan\Scenes\Deathmatch 1v1.unity
Dragonsan\Scenes\Click2MoveWorld.unity
Dragonsan\Scenes\CharacterSelection.unity
Dragonsan\Scenes\BlankAtavismScene.unity
Dragonsan\Scenes\Arena2v2.unity
Dragonsan\Scenes\Arena1v1.unity
Dragonsan\Prefabs\Waepons\Broadsword\TwoHand00.prefab
Dragonsan\MobsAssets\BomberBug.controller
Dragonsan\Loading Screen for Atavism\Content\Scripts\Core\bl_SceneLoader.cs
Dragonsan\Editor\PrepareCharacterModel.cs
Dragonsan\Editor\AtavismWelcome.cs
Dragonsan\Easy Build System for Atavism\Features\Scripts\Extensions\MaterialExtension.cs
Dragonsan\Easy Build System for Atavism\Features\Scripts\Core\Base\Piece\Condition\InternalPhysicsCondition.cs
Dragonsan\Easy Build System for Atavism\Features\Scripts\Core\Base\Piece\Condition\InternalAreaCondition.cs
Dragonsan\Easy Build System for Atavism\Features\Scripts\Core\Base\Piece\PieceBehaviour.cs
Dragonsan\Easy Build System for Atavism\Features\Scripts\Core\Base\Manager\BuildManager.cs
Dragonsan\Easy Build System for Atavism\Features\Scripts\Core\Base\Builder\BuilderBehaviour.cs
Dragonsan\AtavismObjects\Scripts\UGUI\UI Prefabs\DraonsanFloatingMobPanel 1.prefab
Dragonsan\AtavismObjects\Scripts\UGUI\UI Prefabs\CanvasSettings.prefab
Dragonsan\AtavismObjects\Scripts\UGUI\UIGeneralSettings.cs
Dragonsan\AtavismObjects\Scripts\UGUI\UGUIWorldBuilder.cs
Dragonsan\AtavismObjects\Scripts\UGUI\UGUIVipWindow.cs
Dragonsan\AtavismObjects\Scripts\UGUI\UGUIVip.cs
Dragonsan\AtavismObjects\Scripts\UGUI\UGUITooltip.cs
Dragonsan\AtavismObjects\Scripts\UGUI\UGUITargetPortrait.cs
Dragonsan\AtavismObjects\Scripts\UGUI\UGUISkillButton.cs
Dragonsan\AtavismObjects\Scripts\UGUI\UGUIResourceLootListEntry.cs
Dragonsan\AtavismObjects\Scripts\UGUI\UGUIRepairSlot.cs
Dragonsan\AtavismObjects\Scripts\UGUI\UGUIRankingMenuSlot.cs
Dragonsan\AtavismObjects\Scripts\UGUI\UGUIRanking.cs
Dragonsan\AtavismObjects\Scripts\UGUI\UGUIMerchantItemSlot.cs
Dragonsan\AtavismObjects\Scripts\UGUI\UGUIMailAttachmentSlot.cs
Dragonsan\AtavismObjects\Scripts\UGUI\UGUILootListEntry.cs
Dragonsan\AtavismObjects\Scripts\UGUI\UGUIItemDisplay.cs
Dragonsan\AtavismObjects\Scripts\UGUI\UGUIInventorySlot.cs
Dragonsan\AtavismObjects\Scripts\UGUI\UGUIInventoryAuctionSlot.cs
Dragonsan\AtavismObjects\Scripts\UGUI\UGUIGroupMember.cs
Dragonsan\AtavismObjects\Scripts\UGUI\UGUIGearSocketSlot.cs
Dragonsan\AtavismObjects\Scripts\UGUI\UGUIGameMenu.cs
Dragonsan\AtavismObjects\Scripts\UGUI\UGUIFps.cs
Dragonsan\AtavismObjects\Scripts\UGUI\UGUIEffect.cs
Dragonsan\AtavismObjects\Scripts\UGUI\UGUICraftRecipeSlot.cs
Dragonsan\AtavismObjects\Scripts\UGUI\UGUIControls.cs
Dragonsan\AtavismObjects\Scripts\UGUI\UGUIChatController.cs
Dragonsan\AtavismObjects\Scripts\UGUI\UGUICharacterEquipSlot.cs
Dragonsan\AtavismObjects\Scripts\UGUI\UGUICharacterEquipFrame.cs
Dragonsan\AtavismObjects\Scripts\UGUI\UGUIBuildObjectsList.cs
Dragonsan\AtavismObjects\Scripts\UGUI\UGUIBagSlot.cs
Dragonsan\AtavismObjects\Scripts\UGUI\UGUIAuctionSlot.cs
Dragonsan\AtavismObjects\Scripts\UGUI\UGUIAtavismActivatable.cs
Dragonsan\AtavismObjects\Scripts\UGUI\UGUIAdminPanel.cs
Dragonsan\AtavismObjects\Scripts\UGUI\UGUIActionBarSlot.cs
Dragonsan\AtavismObjects\Scripts\UGUI\UGUIAchievementSlot.cs
Dragonsan\AtavismObjects\Scripts\UGUI\UGUIAchievement.cs
Dragonsan\AtavismObjects\Scripts\UGUI\UGUIAbilitySlot.cs
Dragonsan\AtavismObjects\Scripts\UGUI\UGUIAbility.cs
Dragonsan\AtavismObjects\Scripts\GameObject Components\Region.cs
Dragonsan\AtavismObjects\Scripts\CoordinatedEffects\CoordAnimation.cs
Dragonsan\AtavismObjects\Scripts\WorldBuilderInterface.cs
Dragonsan\AtavismObjects\Scripts\WorldBuilder.cs
Dragonsan\AtavismObjects\Scripts\SDETargeting.cs
Dragonsan\AtavismObjects\Scripts\MobController3D.cs
Dragonsan\AtavismObjects\Scripts\LoadingScreen.cs
Dragonsan\AtavismObjects\Scripts\Inventory.cs
Dragonsan\AtavismObjects\Scripts\Crafting.cs
Dragonsan\AtavismObjects\Scripts\ClickToMoveInputController.cs
Dragonsan\AtavismObjects\Scripts\AtavismVip.cs
Dragonsan\AtavismObjects\Scripts\AtavismSettings.cs
Dragonsan\AtavismObjects\Scripts\AtavismPrefabManager.cs
Dragonsan\AtavismObjects\Scripts\AtavismMobName.cs
Dragonsan\AtavismObjects\Scripts\AtavismMecanimMobController3D.cs
Dragonsan\AtavismObjects\Scripts\AtavismLegacyAnimationMobController3D.cs
Dragonsan\AtavismObjects\Scripts\AtavismInventoryItem.cs
Dragonsan\AtavismObjects\Scripts\AtavismEffect.cs
Dragonsan\AtavismObjects\Scripts\AtavismCursor.cs
Dragonsan\AtavismObjects\Scripts\AtavismCombat.cs
Dragonsan\AtavismObjects\Scripts\AtavismBuildObjectTemplate.cs
Dragonsan\AtavismObjects\Scripts\Atavism3rdPersonInput.cs
Dragonsan\AtavismObjects\Scripts\Abilities.cs
Dragonsan\AtavismObjects\Fonts\LiberationSans SDF.asset
Dragonsan\AtavismObjects\Editor\AtavismMigration.cs
Dragonsan\AtavismObjects\Editor\AtavismBuildAssetBundles.cs
Dragonsan\AtavismObjects\Canvas.prefab
Dragonsan\AtavismObjects\AnimatorController.controller
Dragonsan\AtavismEditor\Editor\Plugins\ServerIntegrations.cs
Dragonsan\AtavismEditor\Editor\Plugins\ServerEffects.cs
Dragonsan\AtavismEditor\Editor\Language\English.xml
Dragonsan\AtavismEditor\Editor\PrefabBrowser.cs
Deleted Files (5)
Dragonsan\AtavismObjects\CharacterCreateObjects\WarriorClass.prefab
Dragonsan\AtavismObjects\CharacterCreateObjects\RogueClass.prefab
Dragonsan\AtavismObjects\CharacterCreateObjects\OrcRace.prefab
Dragonsan\AtavismObjects\CharacterCreateObjects\MageClass.prefab
Dragonsan\AtavismObjects\CharacterCreateObjects\HumanRace.prefab