Atavism X (10.3.0) – Date of release 24.11.2020
New Features

- Atavism Editor: Added command line projectpath parameter for Atavism Editor Standalone Editor, to prepare it for Atavism Hub application.
- Atavism Editor: Added the option to create new option choices entry on-demand as it was for other modules.
- Atavism Editor: Added definition for option choices module if the entry should be deletable or not.
- Added Player Shops functionality where you can:
Sell or buy items for a defined price using your own character, that will remain on the server as long as your player will be logged in
Spawn defined NPC that is mob template who will sell or buy items for a defined price with an option to remain on the server as long as your player or even after logout. With this option, you can define how many shops your player can place in the world with a specific tag, and how long NPC will remain to not spam your game with inactive NPC shops
You can also define a number of slots for items to sell/buy
You can also define player shop name in-game
The shop has an animation state that can be used to show an animation during the sale
The player can cancel both types of shops after they will be set, and then items to sell and currency to buy will be returned using the in-game mail system
Shops can be placed in a world instance
- Added Guilds functionalities where you can:
Set guild levels and their requirements like a number of items. The Guild level can also increase the maximum guild members number
Define the guild warehouse with a number of slots that can be open using NPC dialogue. The number of slots can be altered using guild levels
Define a guild store that can be open using NPC dialogue. Different guild level can have different merchant table assigned
With new guild privileges, you can handle guild warehouse to add get and put privileges to your guild groups
New guild quests where you can define guild level as a requirement will let your players to get rewards that can be used further to level your guild, and get access to more demanded guild stores and increase guild warehouse
- Added Dialogues functionalities where you can:
Use new dialogue actions like Quest start, quest progress, open guild warehouse, open auction house, open gear modification, open mailbox, open merchant, and guild merchant. Each action can now have its own requirements like an item with the option to consume it on usage or not, currency and amount, required started and completed a quest but also excluding quest, so if your player will start or complete specified quest he won’t be able to use the defined dialogue option. In addition, there were added similar requirements as for quests, so player level, race, class, a skill level, a statistic with value, and guild level. So you can make nice variations with these actions and requirements. Previously dialogues were limited up to 8 actions per dialogue, and this limitation was completely removed, so now you can have as many as you want.
Dialogues actions are not saved and stored with player data, so requirements like talk with someone to be able to follow and talk further with someone else is now possible.
In the end, there is now an option to define voice over for every dialogue action and opening dialogue, to make your game even more immersive. - Added new horse model thanks to the courtesy of Malbers Aset Store Publisher who provided the model, animations, and sounds.
Changes to existing features
- Effects: Modified effects: Create Item, Create Item Form Loot, Bonus, Task Complete, Reset Skill, Add Skill Point, Teach Skill that could only invoke actions on the caster and not on the target
- Mount: Designed Animation Controller for the mount by adding animation parameters and changing states, transitions, and adding blend trees.
- Server: Added logic to RELEASE_ON_LOGIN game settings that defines if the dead player after relog or server restart should be automatically released or not
Fixes
- Atavism Editor: Fixed the issue where project path was modified including drive letter (on windows)
- Atavism Editor: Fixed the issue where the media manager didn’t present icons with capital letters as an extension
- Atavism Editor: Fixed the issue when deleting profile caused an exception “Cannot set property ‘deleted’ of undefined
- Atavism Editor: Fixed the issue for canvas dialogues, where the right-click context menu was in the incorrect position
- Atavism Editor: Fixed the issue with Effects: Restore, Stat, Stealth, where Skill Mod field should be a float, not int
- Atavism Editor: Fixed the issue where duplicated item with many requirements caused that requirements were in a different order
- Atavism Editor: Fixed an exception that could occur if the Editor Window was opened for a long period of time
- Combat: Fixed GLOBAL_COOLDOWN parameter that wasn’t loaded properly
- Combat: Fixed the issue where after instance change mobs didn’t aggro nor pet didn’t follow the player
- Combat: Fixed the issue when the player attacked a mob and switched instance back and forth then the mob stopped aggroing
- Currency: Fixed the issue with integer and not long currency value in mails
- Dialogues: Fixed non-working requirements for dialogues like faction, quests, dialogues.
- Effects: Fixed the issue where for DoT effect pulse parameter was set to 1 it hit 2 times
- Effects: Fixed AoE Friendly effect that was skipping selected target from affected entities
- Loading Screen: Fixed the issue where after disconnection loading screen flickered multiple times
- Mobs: Fixed the issue where Mob Server used its own time to spawn main/alternative mob template
- Mobs: Fixed Alternative mob template spawner where the mob wasn’t spawned if it wasn’t spawned as the main mob on the server
- Mobs: Fixed spawner that spawned/edited/deleted entities only in the current instance, and not all instance copies
- Regions: Fixed the issue where the player died in the water region and during that server was restarted, then after release player had constant water region effect on himself
- Server: Fixed AgisLoginPlugin that didn’t load Stat Function Definitions from the database. This prevented from changing the attack speed name parameter
Known issues
- You can log in to an account multiple times and login multiple characters if you will only stop on the character selection screen and then you will log in again in another copy of the game.
- In arena 1 vs 1, if one person will restart the game and log in again, the second player will be dropped from the arena as a winner, the other logged character will be “stuck” in the instance of the arena, but there will be no longer treated as a typical arena.
- When in crafting definition there is no “Must Match Layout” option checked and for example, the same material is used for two slots with the same count, then if that material will be added into the crafting grid in one slot it will show the result item and craft button available, but the server will response that there are no sufficient items. It’s related to that server is checking requirements for an item in each slot for the recipe and if that amount is in the crafting grid.
- When an item reward and in item choice reward are the same then the item count for that item is overridden.
Fresh installation of Atavism X (10.3.0)
In order to install Atavism you can choose one of three types of installation:
1. Using premade Virtual Machine which is Atavism ready environment by following the Atavism Virtual Machine Installation process.
2. Using detailed instruction on what environment requirements should be met in order to install Atavism on your dedicated server.
3. Using the installation tutorial with our new Atavism Windows Manager for Windows Environment.
Then you should adjust your Unity project to work best with Atavism
If you are going to use UMA in your project you can follow UMA installation step by step.
it is also recommended to refresh lighting and Asset Bundles because both are related to a specific Unity version. In order to rebuild your Asset Bundles (Bomber Bug is using them), you should head into the top menu in Unity Editor and chose Assets->Atavism Build AssetBundles (it will rebuild your asset bundles and then you should navigate to your project directory and copy file infinitypbr from project_directory\AssetBundles to project_directory\Assets\StreamingAssets.
Updating to Atavism X (10.3.0)
Updating from Atavism X (10.2.1) to Atavism X (10.3.0) is moderately complicated due to many changes in both server and client-side.
It is highly recommended you create a backup of both your server, client, and databases before proceeding in case something goes wrong during the process.
Update using our Virtual Machine Installation
Step 1: Log in to your Virtual Machine using Winscp client and remove the atavism_server*.zip file first and then the atavism_server directory completely
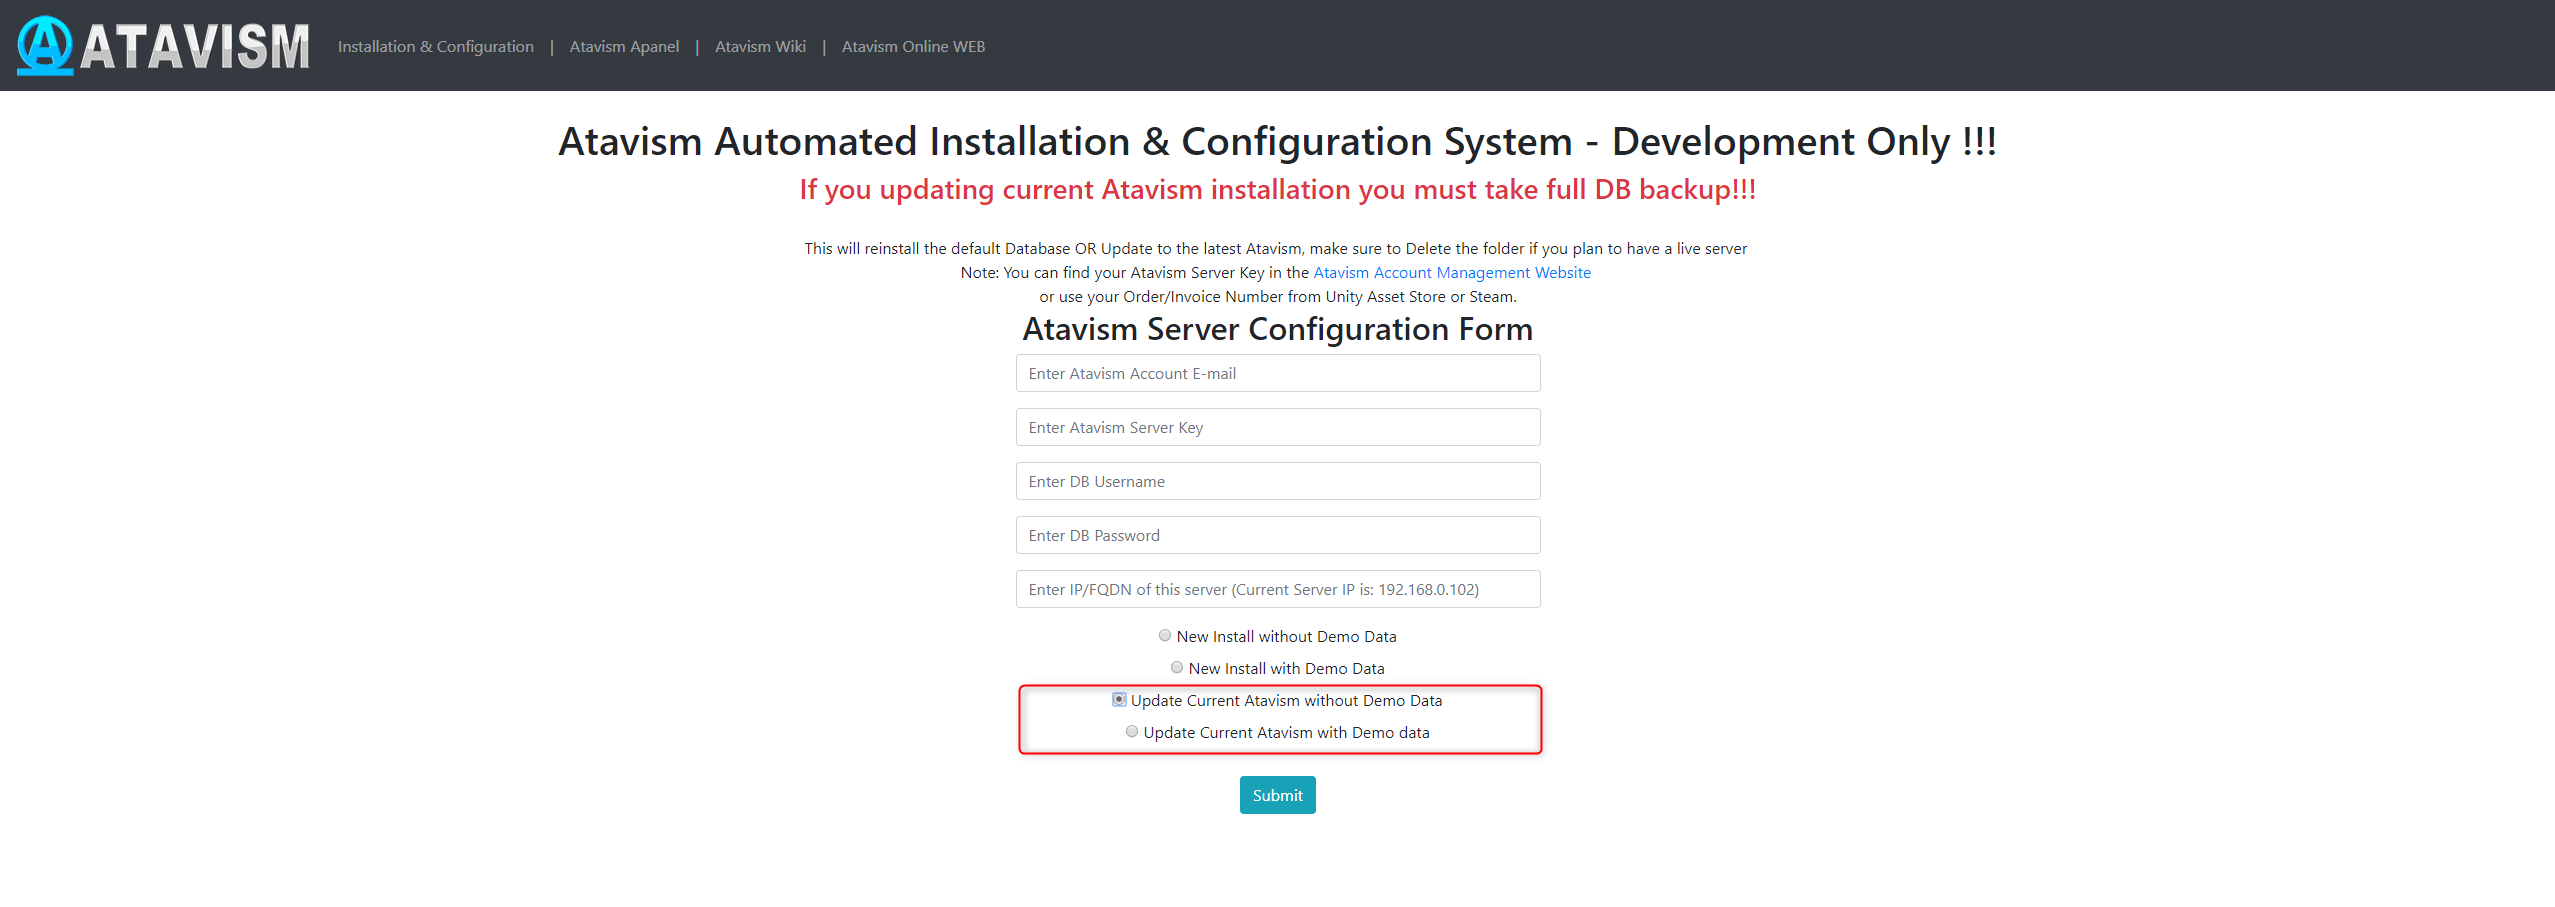
Step 2: Follow instructions like you would do the first installation but with the option Update Current Atavism depending on your installation (Core or with Demo Data). Open address in a web browser http://server_IP/atavism/installation/install.php
Warning: Make a Unity project backup. Importing the prefabs may break any customizations you had previously made to Your ones.
Step 3: Import Atavism Unity Package, Replace Files
Import the AtavismUnity_10.3.0_Patch_10.2.1_for_{Core|Demo}_Auto.unitypackage depending on which installation you did before.
Step 4: Update the UI Canvas
This procedure depends on how you modified your canvas. If it’s default then just open the AtavismBlankMainWorld scene and replace all components within your world scene, and repeat this procedure for the CharacterSelection scene.
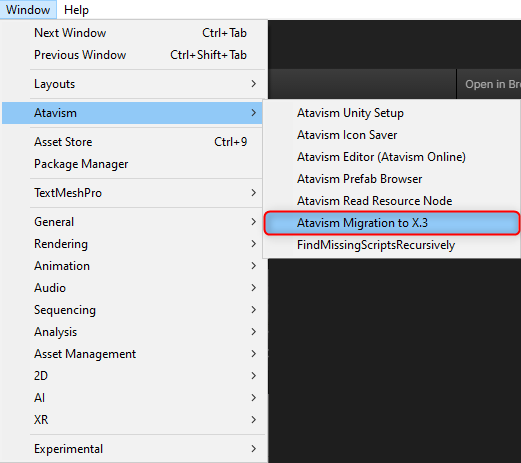
Step 5: Open Unity Editor and from the top menu select Atavism Migration to X.3
Update using Custom Linux Installation
Step 1: Replace Server Files
Copy over all server files and adjust them as you did before with the previous Atavism version. Because server-side scripts and configuration files were changed, we recommend you to put a fresh copy of Atavism 10.3.0 server files.
Step 2: Update the Databases
Important note: Each time you are updating your database or files make a backup to have a copy of your work
Scripts to update your Atavism X (10.2.1) databases to Atavism X (10.3.0) are in your Atavism Server package. There are two types of scripts, structure, and data for both types of installations (Core and with Demo Data), you should use the proper ones depending on your previous installation method. In order to update the database, first, you have to update the structure, then the data. The script file for structure update :
- sql/updates/From_Atavism10.2.1/{Core|Demo}/Structure/admin.sql
- sql/updates/From_Atavism10.2.1/{Core|Demo}/Structure/world_content.sql
and script files for data update :
- sql/updates/From_Atavism10.2.1/{Core|Demo}/Data/admin.sql
- sql/updates/From_Atavism10.2.1/{Core|Demo}/Data/world_content.sql
If you have renamed any of your databases from the default names (admin, atavism, master, world_content) make sure you have proper names in the “use” clause at the beginning of each script.
Step 3: Import Atavism Unity Package, Replace Files
Import the AtavismUnity_10.3.0_Patch_10.2.1_for_{Core|Demo}_Auto.unitypackage depending on which installation you did before. It is recommended to replace all files as almost all were changed in some way.
Step 4: Update the UI Canvas
This procedure depends on how you modified your canvas. If it’s default then just open the AtavismBlankMainWorld scene and replace all components within your world scene, and repeat this procedure for the CharacterSelection scene.
Step 5: Open Unity Editor and from the top menu select Atavism Migration to X.3
Update using Atavism Windows Manager Installation
Step 1: Open the directory where you installed Atavism Manager (by default in c:\Atavism Manager)
Step 2: Rename atavism_server directory to atavism_server_old or any other name
Step 3: Download the Atavism server zip file from apanel
Step 4: Unpack the atavism_server*.zip file into your Atavism Manager installation directory
Step 5: Open command line console Windows + r shortcut and type cmd
Step 6: Change directory to your Atavism Manager installation directory by typing the command
cd “c:\Atavism Manager\mariadb-5.5.61-win32\bin”
and start the database if it’s not started yet by invoking the command
mysqld
Step 7: Invoke database update commands where the root is the database user, the test is the password for the database user, following with by the path to the Atavism Manager installation directory. If you are not using our default databases, please adjust these commands.
If you have renamed any of your databases from the default names (admin, atavism, master, world_content) make sure you have proper names in the “use” clause at the beginning of each script.
Important note: Each time you are updating your database or files make a backup to have a copy of your work
mysql -u root -ptest admin < “c:\Atavism Manager\atavism_server\sql\updates\From_Atavism10.2.1\Demo\Structure\admin.sql”
mysql -u root -ptest admin < “c:\Atavism Manager\atavism_server\sql\updates\From_Atavism10.2.1\Demo\Structure\world_content.sql”
mysql -u root -ptest admin < “c:\Atavism Manager\atavism_server\sql\updates\From_Atavism10.2.1\Demo\Data\admin.sql”
mysql -u root -ptest admin < “c:\Atavism Manager\atavism_server\sql\updates\From_Atavism10.2.1\Demo\Data\world_content.sql”
You can use any third-party tool to handle this process for example with MySQL Workbench or any other database management tool
Step 8: Start Atavism.exe application
Step 9: Fill data according to your previous configuration including database credentials (if you changed them)
Step 10: Import Atavism Unity Package, Replace Files
Import the AtavismUnity_10.3.0_Patch_10.2.1_for_{Core|Demo}_Auto.unitypackage depending on which installation you did before. It is recommended to replace all files as almost all were changed in some way.
Step 11: Update the UI Canvas
This procedure depends on how you modified your canvas. If it’s default then just open the AtavismBlankMainWorld scene and replace all components within your world scene, and repeat this procedure for the CharacterSelection scene.
Step 12: Open Unity Editor and from the top menu select Atavism Migration to X.3
List of changed files:
New Files (56)
Dragonsan\AtavismObjects\Scripts\UGUI\UI Prefabs\DragonsanShopEntry.prefab
Dragonsan\AtavismObjects\Scripts\UGUI\UI Prefabs\Guild Resources Item.prefab
Dragonsan\AtavismObjects\Scripts\UGUI\UI Prefabs\ShopListEntryPrefab.prefab
Dragonsan\AtavismObjects\Scripts\UGUI\UGUICreateShop.cs
Dragonsan\AtavismObjects\Scripts\UGUI\UGUICreateShopEntity.cs
Dragonsan\AtavismObjects\Scripts\UGUI\UGUIPlayerShopList.cs
Dragonsan\AtavismObjects\Scripts\UGUI\UGUIShopClose.cs
Dragonsan\AtavismObjects\Scripts\UGUI\UGUIShopItemSlot.cs
Dragonsan\AtavismObjects\Scripts\UGUI\UGUIShopListEntry.cs
Dragonsan\AtavismObjects\Scripts\UGUI\UGUIShopWindow.cs
Dragonsan\AtavismObjects\Scripts\AnimatorDelay.cs
Dragonsan\AtavismObjects\Scripts\AtavismNpcAudioManager.cs
Dragonsan\AtavismObjects\Scripts\AtavismPlayerShop.cs
OtherPackages\Horse\Model\Horse Animator Controller New.controller
OtherPackages\Malbers Animations\01_Experimental\Legacy Horse\Materials\Horse2Palomino.mat
OtherPackages\Malbers Animations\01_Experimental\Legacy Horse\Materials\Mane.mat
OtherPackages\Malbers Animations\01_Experimental\Legacy Horse\Materials\Saddle.mat
OtherPackages\Malbers Animations\01_Experimental\Legacy Horse\Textures\Horse2Normals.png
OtherPackages\Malbers Animations\01_Experimental\Legacy Horse\Textures\Horse2Palomino.png
OtherPackages\Malbers Animations\01_Experimental\Legacy Horse\Textures\Mane T_D.png
OtherPackages\Malbers Animations\01_Experimental\Legacy Horse\Textures\Mane T_N.png
OtherPackages\Malbers Animations\01_Experimental\Legacy Horse\Textures\Mount_ss.png
OtherPackages\Malbers Animations\01_Experimental\Legacy Horse\Textures\MountColor.png
OtherPackages\Malbers Animations\01_Experimental\Legacy Horse\Textures\MountNormal.png
OtherPackages\Malbers Animations\01_Experimental\Legacy Horse\Legacy Horse.fbx
OtherPackages\Malbers Animations\01_Experimental\Legacy Horse\Legacy Horse.prefab
OtherPackages\Malbers Animations\Horse AnimSet Pro\2 – Animations\Animations Clips\Horse\H_Gallop.FBX
OtherPackages\Malbers Animations\Horse AnimSet Pro\2 – Animations\Animations Clips\Horse\H_Idle_01.FBX
OtherPackages\Malbers Animations\Horse AnimSet Pro\2 – Animations\Animations Clips\Horse\H_Jump_Forward.FBX
OtherPackages\Malbers Animations\Horse AnimSet Pro\2 – Animations\Animations Clips\Horse\H_Jump_Gallop.FBX
OtherPackages\Malbers Animations\Horse AnimSet Pro\2 – Animations\Animations Clips\Horse\H_Jump_Sprint.FBX
OtherPackages\Malbers Animations\Horse AnimSet Pro\2 – Animations\Animations Clips\Horse\H_Sprint.FBX
OtherPackages\Malbers Animations\Horse AnimSet Pro\2 – Animations\Animations Clips\Horse\H_Walk.FBX
OtherPackages\Malbers Animations\Horse AnimSet Pro\2 – Animations\Animations Clips\Horse\H_Walk_Back.FBX
OtherPackages\Malbers Animations\Horse AnimSet Pro\2 – Animations\Animations Clips\Rider\Rider_Canter.FBX
OtherPackages\Malbers Animations\Horse AnimSet Pro\2 – Animations\Animations Clips\Rider\Rider_Gallop.FBX
OtherPackages\Malbers Animations\Horse AnimSet Pro\2 – Animations\Animations Clips\Rider\Rider_Idle_01.FBX
OtherPackages\Malbers Animations\Horse AnimSet Pro\6 – Audio\Horse\Horse Breathing.wav
OtherPackages\Malbers Animations\Horse AnimSet Pro\6 – Audio\Horse\Horse Breathing_01.wav
OtherPackages\Malbers Animations\Horse AnimSet Pro\6 – Audio\Horse\Horse Breathing_02.wav
OtherPackages\Malbers Animations\Horse AnimSet Pro\6 – Audio\Horse\Horse HeadShake.wav
OtherPackages\Malbers Animations\Horse AnimSet Pro\6 – Audio\Horse\Horse Nose Sound.wav
OtherPackages\Malbers Animations\Horse AnimSet Pro\6 – Audio\Horse\Horse Step_01.wav
OtherPackages\Malbers Animations\Horse AnimSet Pro\6 – Audio\Horse\Horse Step_02.wav
OtherPackages\Malbers Animations\Horse AnimSet Pro\6 – Audio\Horse\Horse Step_03.wav
OtherPackages\Malbers Animations\Horse AnimSet Pro\6 – Audio\Horse\Horse Step_04.wav
OtherPackages\Malbers Animations\Horse AnimSet Pro\6 – Audio\Horse\Horse Step_05.wav
OtherPackages\Malbers Animations\Horse AnimSet Pro\6 – Audio\Horse\horse-whinny_01.wav
OtherPackages\Malbers Animations\Horse AnimSet Pro\6 – Audio\Horse\horse-whinny_02.wav
OtherPackages\Malbers Animations\Horse AnimSet Pro\6 – Audio\Horse\horse-whinny_03.wav
OtherPackages\Malbers Animations\Horse AnimSet Pro\6 – Audio\Horse\Neigh1.wav
OtherPackages\Malbers Animations\Horse AnimSet Pro\6 – Audio\Horse\Neigh2.wav
OtherPackages\Malbers Animations\Horse AnimSet Pro\6 – Audio\Horse\Neigh3.wav
OtherPackages\Malbers Animations\Horse AnimSet Pro\6 – Audio\Horse\Whistle Stop.wav
OtherPackages\Malbers Animations\Horse AnimSet Pro\6 – Audio\Horse\Whistle.wav
Resources\Legacy Horse Variant.prefab
Updated Files (130)
Atavism demo\Models with Materials\Materials\blacksmith_stone_floor snow.mat
Atavism demo\Models with Materials\Materials\M_Fir_01_Cross Snow.mat
Atavism demo\Models with Materials\Materials\M_Fir_02_Cross Snow.mat
Atavism demo\Models with Materials\Materials\M_Fir_03_Cross Snow.mat
Atavism demo\Models with Materials\Materials\M_Fir_04_Cross Snow.mat
Atavism demo\Models with Materials\Materials\M_Fir_07_Cross Snow.mat
Atavism demo\Models with Materials\Materials\M_Fir_Bark_01_Snow.mat
Atavism demo\Models with Materials\Materials\M_Fir_Bark_02_Snow.mat
Atavism demo\Models with Materials\Materials\M_Fir_Leaves Snow.mat
Atavism demo\Models with Materials\Materials\mat_boat_01.mat
Atavism demo\Models with Materials\Materials\mat_boat_scaffold_01.mat
Atavism demo\Models with Materials\Materials\mat_dragonhead_01.mat
Atavism demo\Models with Materials\Materials Snow\arc_left_snow.mat
Atavism demo\Models with Materials\Materials Snow\Blacksmith_planks_snow.mat
Atavism demo\Models with Materials\Materials Snow\blacksmith_stone_snow.mat
Atavism demo\Models with Materials\Materials Snow\Bridge_main_snow.mat
Atavism demo\Models with Materials\Materials Snow\Bridge_stone_floor_snow.mat
Atavism demo\Models with Materials\Materials Snow\house_foundation_snow 2.mat
Atavism demo\Models with Materials\Materials Snow\house_foundation_snow.mat
Atavism demo\Models with Materials\Materials Snow\mat_barrel_01_snow.mat
Atavism demo\Models with Materials\Materials Snow\mat_building_01_snow.mat
Atavism demo\Models with Materials\Materials Snow\mat_building_02_snow.mat
Atavism demo\Models with Materials\Materials Snow\mat_crane_01_snow.mat
Atavism demo\Models with Materials\Materials Snow\mat_crane_02_snow.mat
Atavism demo\Models with Materials\Materials Snow\mat_fence_02_snow.mat
Atavism demo\Models with Materials\Materials Snow\mat_gate_01_snow.mat
Atavism demo\Models with Materials\Materials Snow\mat_gate_02_snow.mat
Atavism demo\Models with Materials\Materials Snow\mat_menhir_01_snow.mat
Atavism demo\Models with Materials\Materials Snow\mat_plank_01_snow.mat
Atavism demo\Models with Materials\Materials Snow\mat_strawroof_01_snow.mat
Atavism demo\Models with Materials\Materials Snow\mat_strawroof_cutout_01_snow.mat
Atavism demo\Models with Materials\Materials Snow\mat_tower_01_snow.mat
Atavism demo\Models with Materials\Materials Snow\mat_tower_02_snow.mat
Atavism demo\Models with Materials\Materials Snow\mat_tower_03_snow.mat
Atavism demo\Models with Materials\Materials Snow\Well_main_snow.mat
Atavism demo\Models with Materials\Materials Snow\Well_steps_snow.mat
Atavism demo\NatureManufacture Assets\Advanced Rock Pack\Rocks\Materials\M_Atlas_Middle_Rocks_01.mat
Atavism demo\NatureManufacture Assets\Advanced Rock Pack\Rocks\Materials\M_Atlas_Small_Rocks_01.mat
Atavism demo\NatureManufacture Assets\Advanced Rock Pack\Rocks\Materials\M_Atlas_Small_Rocks_01Resources.mat
CTS\Terrains\Terrain_0_0-20180122-123716_2104044.mat
CTS\Terrains\Terrain_0_0-20180122-123716_2302000.mat
CTS\Terrains\Terrain_0_0-20180122-123716_2349776.mat
Dragonsan\AtavismEditor\Editor\EditorCore\AtavismUnity.cs
Dragonsan\AtavismEditor\Editor\Language\English.xml
Dragonsan\AtavismObjects\Editor\AtavismMigration.cs
Dragonsan\AtavismObjects\Scripts\Editor\EquipmentDisplayEditor.cs
Dragonsan\AtavismObjects\Scripts\GameObject Components\AtavismMount.cs
Dragonsan\AtavismObjects\Scripts\UGUI\UI Prefabs\CanvasLoader.prefab
Dragonsan\AtavismObjects\Scripts\UGUI\UI Prefabs\CanvasSettings.prefab
Dragonsan\AtavismObjects\Scripts\UGUI\UI Prefabs\DInteractionEntry.prefab
Dragonsan\AtavismObjects\Scripts\UGUI\UI Prefabs\DragonsanMerchantItemEntry.prefab
Dragonsan\AtavismObjects\Scripts\UGUI\UI Prefabs\GuildMemberEntry 1.prefab
Dragonsan\AtavismObjects\Scripts\UGUI\UGUIActionBarSlot.cs
Dragonsan\AtavismObjects\Scripts\UGUI\UGUIAuction.cs
Dragonsan\AtavismObjects\Scripts\UGUI\UGUIChatController.cs
Dragonsan\AtavismObjects\Scripts\UGUI\UGUIControls.cs
Dragonsan\AtavismObjects\Scripts\UGUI\UGUICraftingPanel.cs
Dragonsan\AtavismObjects\Scripts\UGUI\UGUIDialogueOption.cs
Dragonsan\AtavismObjects\Scripts\UGUI\UGUIDialoguePanel.cs
Dragonsan\AtavismObjects\Scripts\UGUI\UGUIErrorText.cs
Dragonsan\AtavismObjects\Scripts\UGUI\UGUIGearModification.cs
Dragonsan\AtavismObjects\Scripts\UGUI\UGUIGroupMember.cs
Dragonsan\AtavismObjects\Scripts\UGUI\UGUIGuildPanel.cs
Dragonsan\AtavismObjects\Scripts\UGUI\UGUIMailBox.cs
Dragonsan\AtavismObjects\Scripts\UGUI\UGUIMerchantItemEntry.cs
Dragonsan\AtavismObjects\Scripts\UGUI\UGUIMerchantItemSlot.cs
Dragonsan\AtavismObjects\Scripts\UGUI\UGUIPetCommand.cs
Dragonsan\AtavismObjects\Scripts\UGUI\UGUISkillsWindow.cs
Dragonsan\AtavismObjects\Scripts\UGUI\UGUITargetPortrait.cs
Dragonsan\AtavismObjects\Scripts\UGUI\UGUIToolBarMenu.cs
Dragonsan\AtavismObjects\Scripts\Abilities.cs
Dragonsan\AtavismObjects\Scripts\AtavismCombat.cs
Dragonsan\AtavismObjects\Scripts\AtavismCursor.cs
Dragonsan\AtavismObjects\Scripts\AtavismEffect.cs
Dragonsan\AtavismObjects\Scripts\AtavismEventMessageHandler.cs
Dragonsan\AtavismObjects\Scripts\AtavismGuild.cs
Dragonsan\AtavismObjects\Scripts\AtavismMecanimMobController3D.cs
Dragonsan\AtavismObjects\Scripts\AtavismMobName.cs
Dragonsan\AtavismObjects\Scripts\AtavismMobStealth.cs
Dragonsan\AtavismObjects\Scripts\AtavismSettings.cs
Dragonsan\AtavismObjects\Scripts\CharacterSelectionCreationManager.cs
Dragonsan\AtavismObjects\Scripts\Crafting.cs
Dragonsan\AtavismObjects\Scripts\EquipmentDisplay.cs
Dragonsan\AtavismObjects\Scripts\Inventory.cs
Dragonsan\AtavismObjects\Scripts\Mailing.cs
Dragonsan\AtavismObjects\Scripts\MobController3D.cs
Dragonsan\AtavismObjects\Scripts\NpcInteraction.cs
Dragonsan\AtavismObjects\Scripts\SDETargeting.cs
Dragonsan\AtavismObjects\Scripts\Startup.cs
Dragonsan\AtavismObjects\Scripts\WorldBuilder.cs
Dragonsan\AtavismObjects\AnimatorController.controller
Dragonsan\Loading Screen for Atavism\Content\Scripts\Core\bl_SceneLoader.cs
Dragonsan\MobsAssets\BomberBug.controller
Dragonsan\Scenes\BlankAtavismScene.unity
Dragonsan\Scenes\BlankCharacterSelection.unity
Dragonsan\Scenes\BlankLogin.unity
Dragonsan\Scenes\Login.unity
Dragonsan\Scenes\MainWorld.unity
Dragonsan\UGUIMiniMap for Atavism\Content\Art\Models\Materials\Areas.mat
OtherPackages\Horse\Model\Horse Animator Controller.controller
OtherPackages\SimpleParticlePack\Resources\Directional\SimpleFlame(Blue).prefab
Resources\Content\CoordinatedEffects\Examples\AoELocationChanneling\AoE_Location_Channeling_Activating.prefab
Resources\Mobs\SFBay\BomberBug01.prefab
Resources\Mobs\SFBay\BomberBug01S0.prefab
Resources\Mobs\SFBay\BomberBug02.prefab
Resources\Mobs\SFBay\BomberBug02S0.prefab
Resources\Mobs\SFBay\BomberBug03.prefab
Resources\Mobs\SFBay\BomberBug03S0.prefab
Resources\Mobs\SFBay\BomberBug04.prefab
Resources\Mobs\SFBay\BomberBug04S0.prefab
Resources\Mobs\SFBay\BomberBug05.prefab
Resources\Mobs\SFBay\BomberBug05S0.prefab
Resources\Mobs\SFBay\BomberBug06.prefab
Resources\Mobs\SFBay\BomberBug06S0.prefab
Resources\Mobs\SFBay\BomberBug07.prefab
Resources\Mobs\SFBay\BomberBug07S0.prefab
Resources\Mobs\SFBay\BomberBug08.prefab
Resources\Mobs\SFBay\BomberBug08S0.prefab
Resources\Mobs\SFBay\BomberBug09.prefab
Resources\Mobs\SFBay\BomberBug09S0.prefab
Resources\Challenger_prefab.prefab
Resources\Challenger_prefabF.prefab
Resources\Horse.prefab
Resources\Volund_Rig.prefab
SFBayStudios\SFB Demo Scripts\SFB_AudioManager.cs
SFBayStudios\SFB Dragon\Game Ready Files\Models\DragonMount.controller
Standard Assets\Atavism Core\AtavismCore.dll
UMA\Example\Animation\RPG Character Animation Pack\Animations\Unarmed\RPG-Character@Unarmed-Death1.FBX
UMA\Example\Animation\RPG Character Animation Pack\Animations\Unarmed\RPG-Character@Unarmed-Idle.FBX
UMA\Example\Animation\RPG Character Animation Pack\Animations\Unarmed\RPG-Character@Unarmed-Jump.FBX