Build Object Plugin
Atavism 10.4.0+
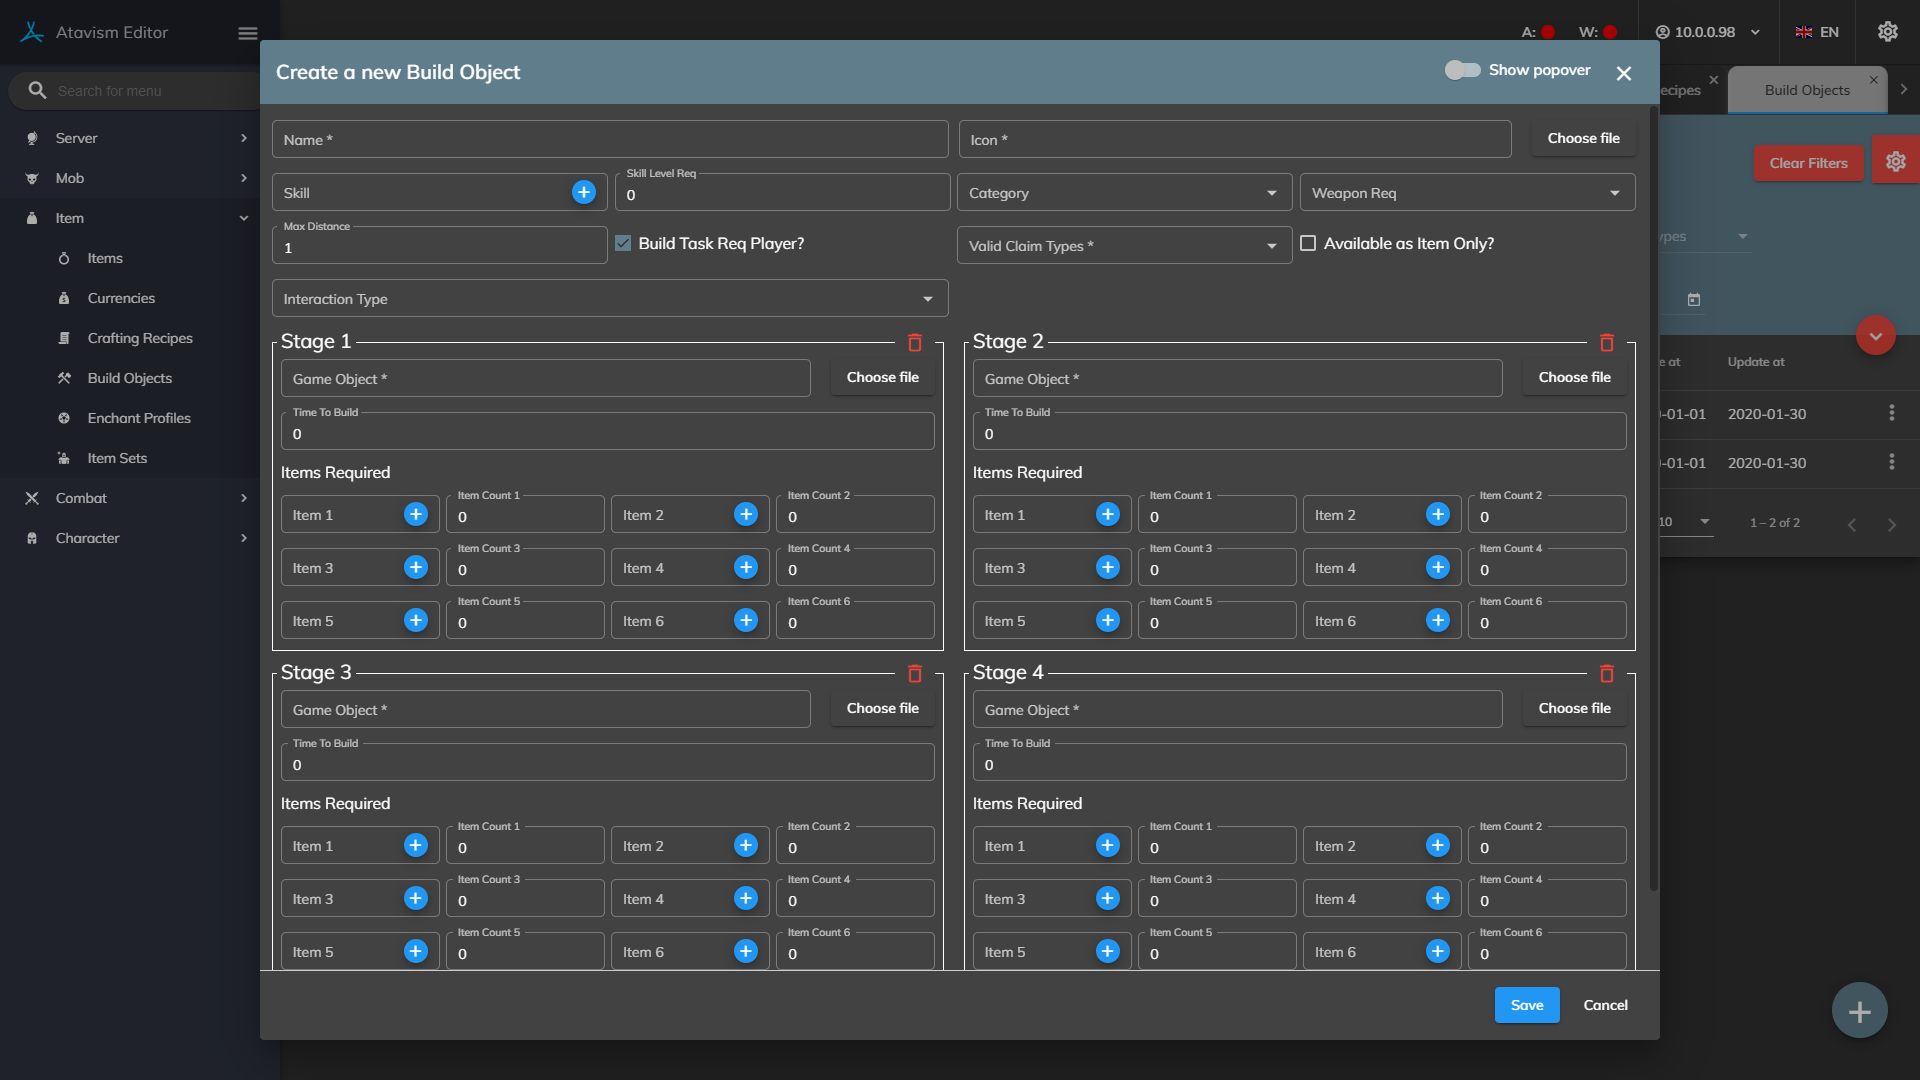
Create a new build object template
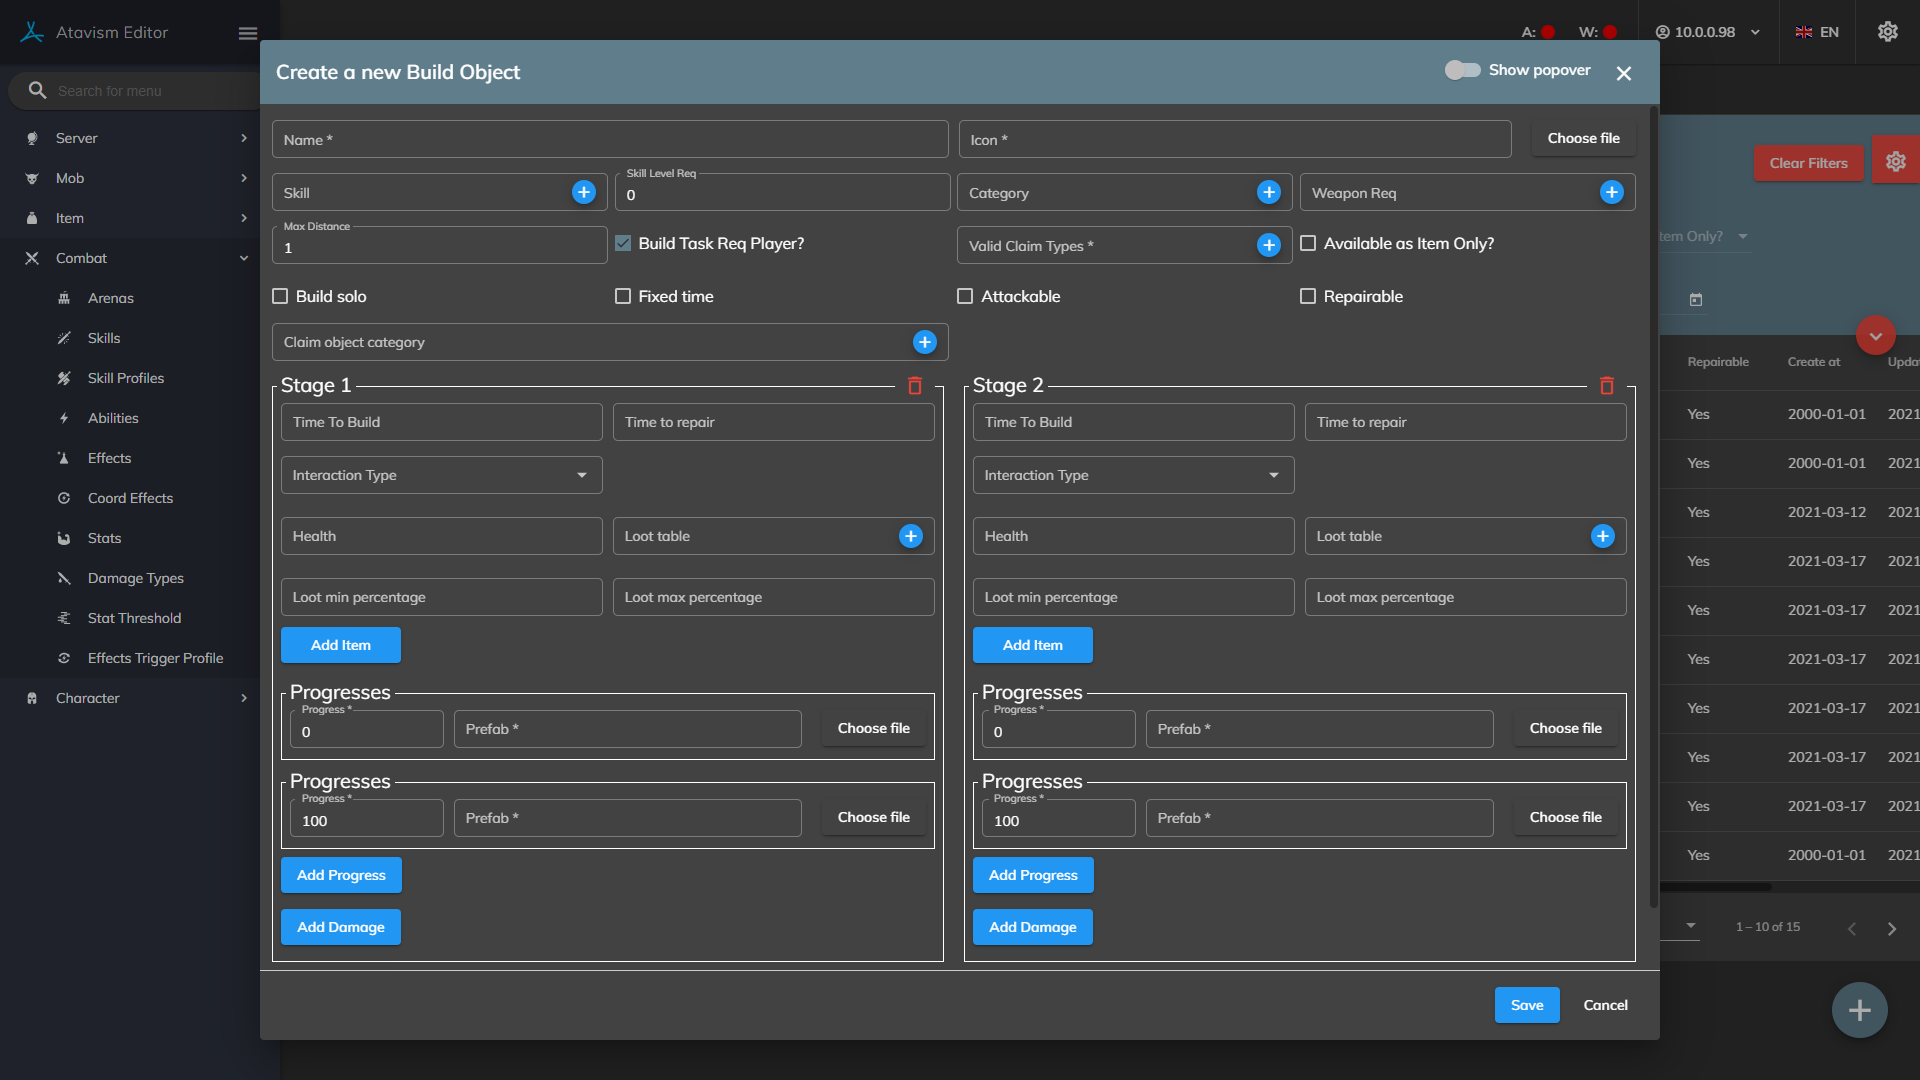
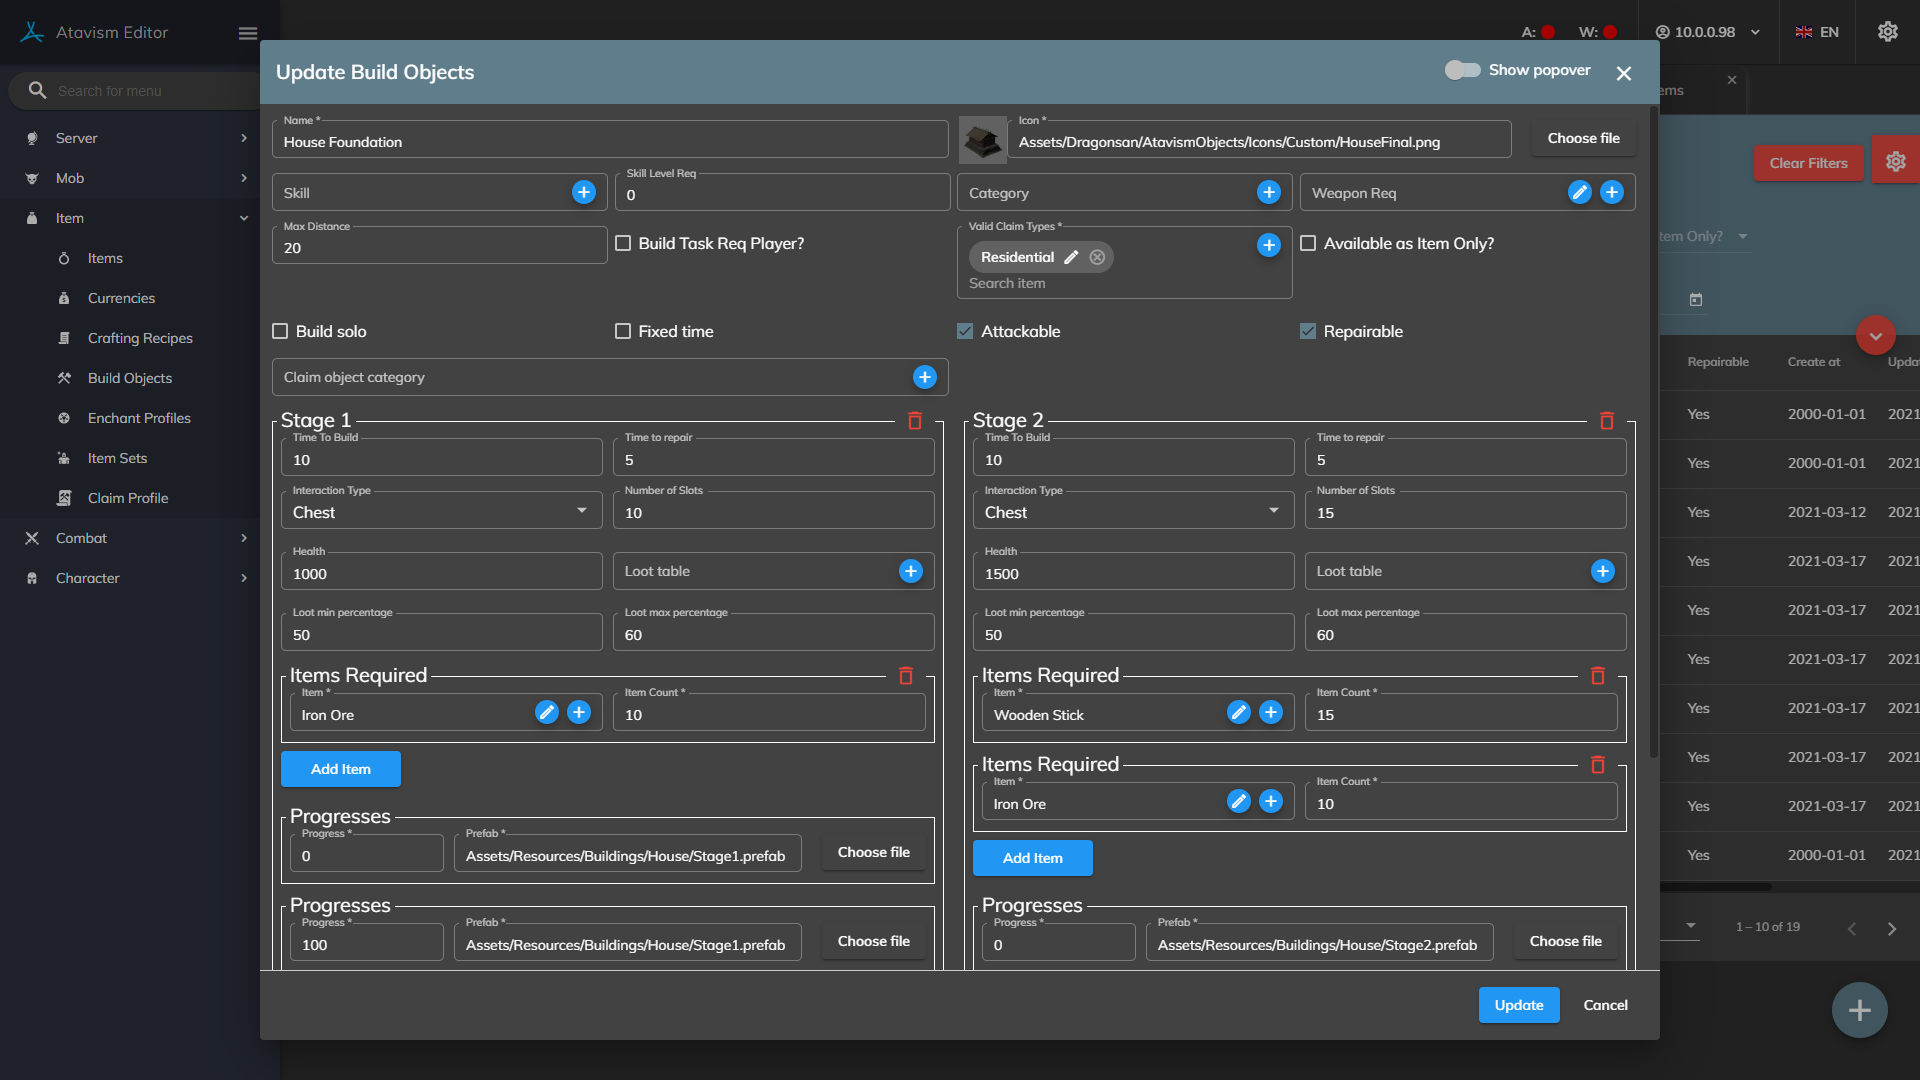
Name: Name of the new build object
Icon: The icon that will be drawn in the GUI for the building
Skill: Skill needed to perform this action/build object in the game (can be defined in Skills Plugin)
Skill Level Req: Specify the level of skill that the player must have to perform this action
Category: Select category (can be defined in Option Choices Plugin)
Weapon Req: Select what weapon player should have to be able to perform this action (can be defined in Option Choices Plugin)
Max Distance: How far away the player can build the object from where he is currently standing. If you want your players to have to stand beside the object they build set it to something low like 2, or if they can place the object anywhere in the claim set it larger such as 20.
Build Task Req Player? Check the box if the build task should require the player presence
Valid Claim Type: Select from a list (can be defined in Option Choices Plugin). Defines building claim type that will be checked compared to the claim type on the claim, to allow build this building or not.
Available as Item Only?: Defines if this building should be available only as an item or also in the building list
Build solo: Defines if other players can help to build this building
Fixed time: Defines if the building time should be altered by the build_speed statistic
Attackable: Defines if the building should be attachable or not
Repairable: Defines if the building should be repairable or not
Claim Object Category: Select from a list (can be defined in Option Choices Plugin). Defines the category of building, based on which you can limit the number of buildings from the same category per claim. it can be defined in the Claim Profile where you are defining:
- Name: Name of the new Claim Profile
- Object Category: Select from a list (can be defined in Option Choices Plugin).
- Count: Defines the number of objects that can be built within the claim from the defined Object Category

Stage #
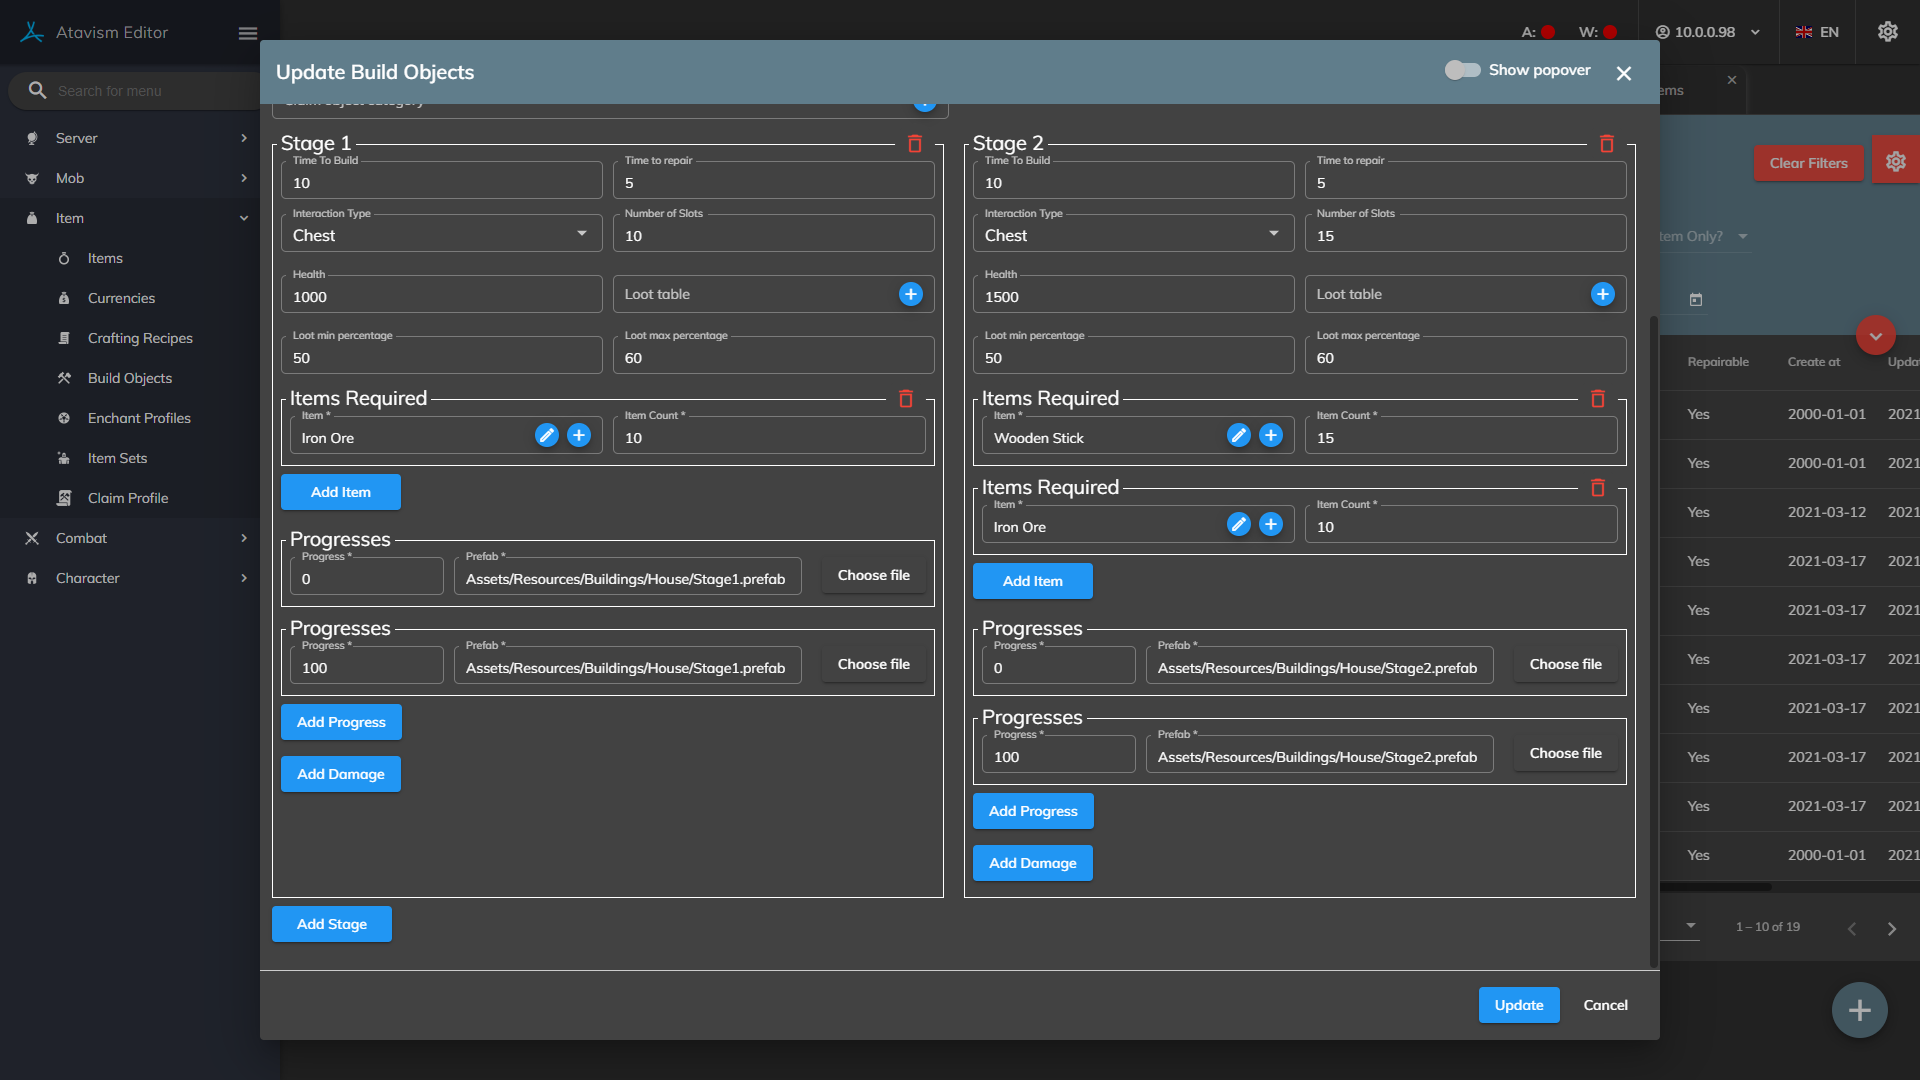
Time to Build: How long it will take to finish building this element/stage
Time to Repair: How long it will take to repair this building stage
Interaction Type: Select from the list (this allows the owner or player with proper permissions to interact with the last stage of the built object):
- Chest: Allows storing items in the storage. You can define a number of slots.
- Resource: Allows gathering resources, you can select a loot table that defines what items will be gathered from that building. Useful for simulating farming.
- NPC: Allows spawning Mob/NPC which should be defined in Mob Spawn Data Plugin, where you can setup Mob as a merchant or an enemy.
- Effect: Allows selecting effect which will be applied to the player or in an area like a buff. The effect can be defined in Effects Plugin.
- Instance: Allows defining something like a gateway to an instance where the player will be teleported to. An instance should be defined in Instances Plugin.
- Leave Instance: Leave from the current instance to the previous one.
Health: Defines health of the building stage
Loot table: Select a loot table for the building stage. It will be triggered when the building will be destroyed to drop the loot defined in the selected loot table. It will be added independently from the Loot min percentage and Loot max percentage.
Loot min percentage-Loot max percentage: Defines percentage range for the drop when building stage will be destroyed. It’s a percentage of materials/items required to build that building stage.
Items Required
Item #: Select an item from the list. This item and its amount will be required to build this building stage
Item # Count: Quantity of item that is needed for a build at this stage
Progresses
Progress: Defines percentage for building progress based on which prefab will be presented. It must have at least prefabs for 0% and 100% progression. Progress percentage is calculated based on the building time. You can define up to 101 prefabs one for each percentage counting from 0 to 100.
Prefab: Select prefab for this progress. It’s a unity prefab with Claim Object Component on it When the building progress will reach the specific percentage the prefab for that percentage will be presented, and the old will be removed.
Damages
Progress: Defines percentage for building damage based on which prefab will be presented. It’s based on the building health parameter.
Prefab: Select prefab for this damage. When the building health will drop below 100% then the first suitable damage prefab with the highest percentage progress will be presented, until it will drop further below its level then another damage prefab will be presented, and this will be continued until the building will be destroyed.
Building System & Object Building
Claims
Claims are areas of the world that players ‘lay claim to’ allowing them to build in the area. Players may buy and sell claims and place objects freely within their claim and any other claims they have been given permission to build in.
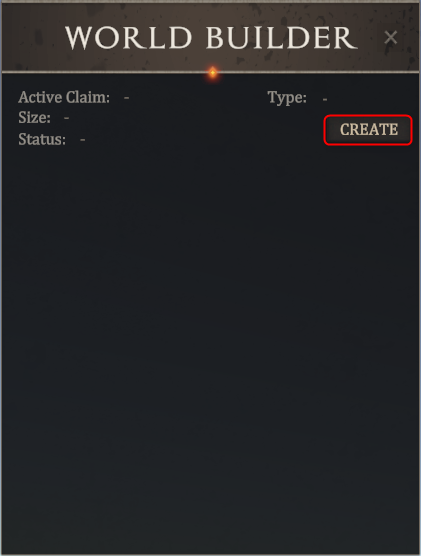
Players can view the claims in the world by opening up the World Builder UI from the rightmost button in the toolbar menu located at the top right of the screen. When they enter a claim they will be shown a UI that gives them options based on their permissions for that claim.
Setting up Claims
Claims can be added to the world in two ways.
- They can be spawned by admin players from the World Builder UI.
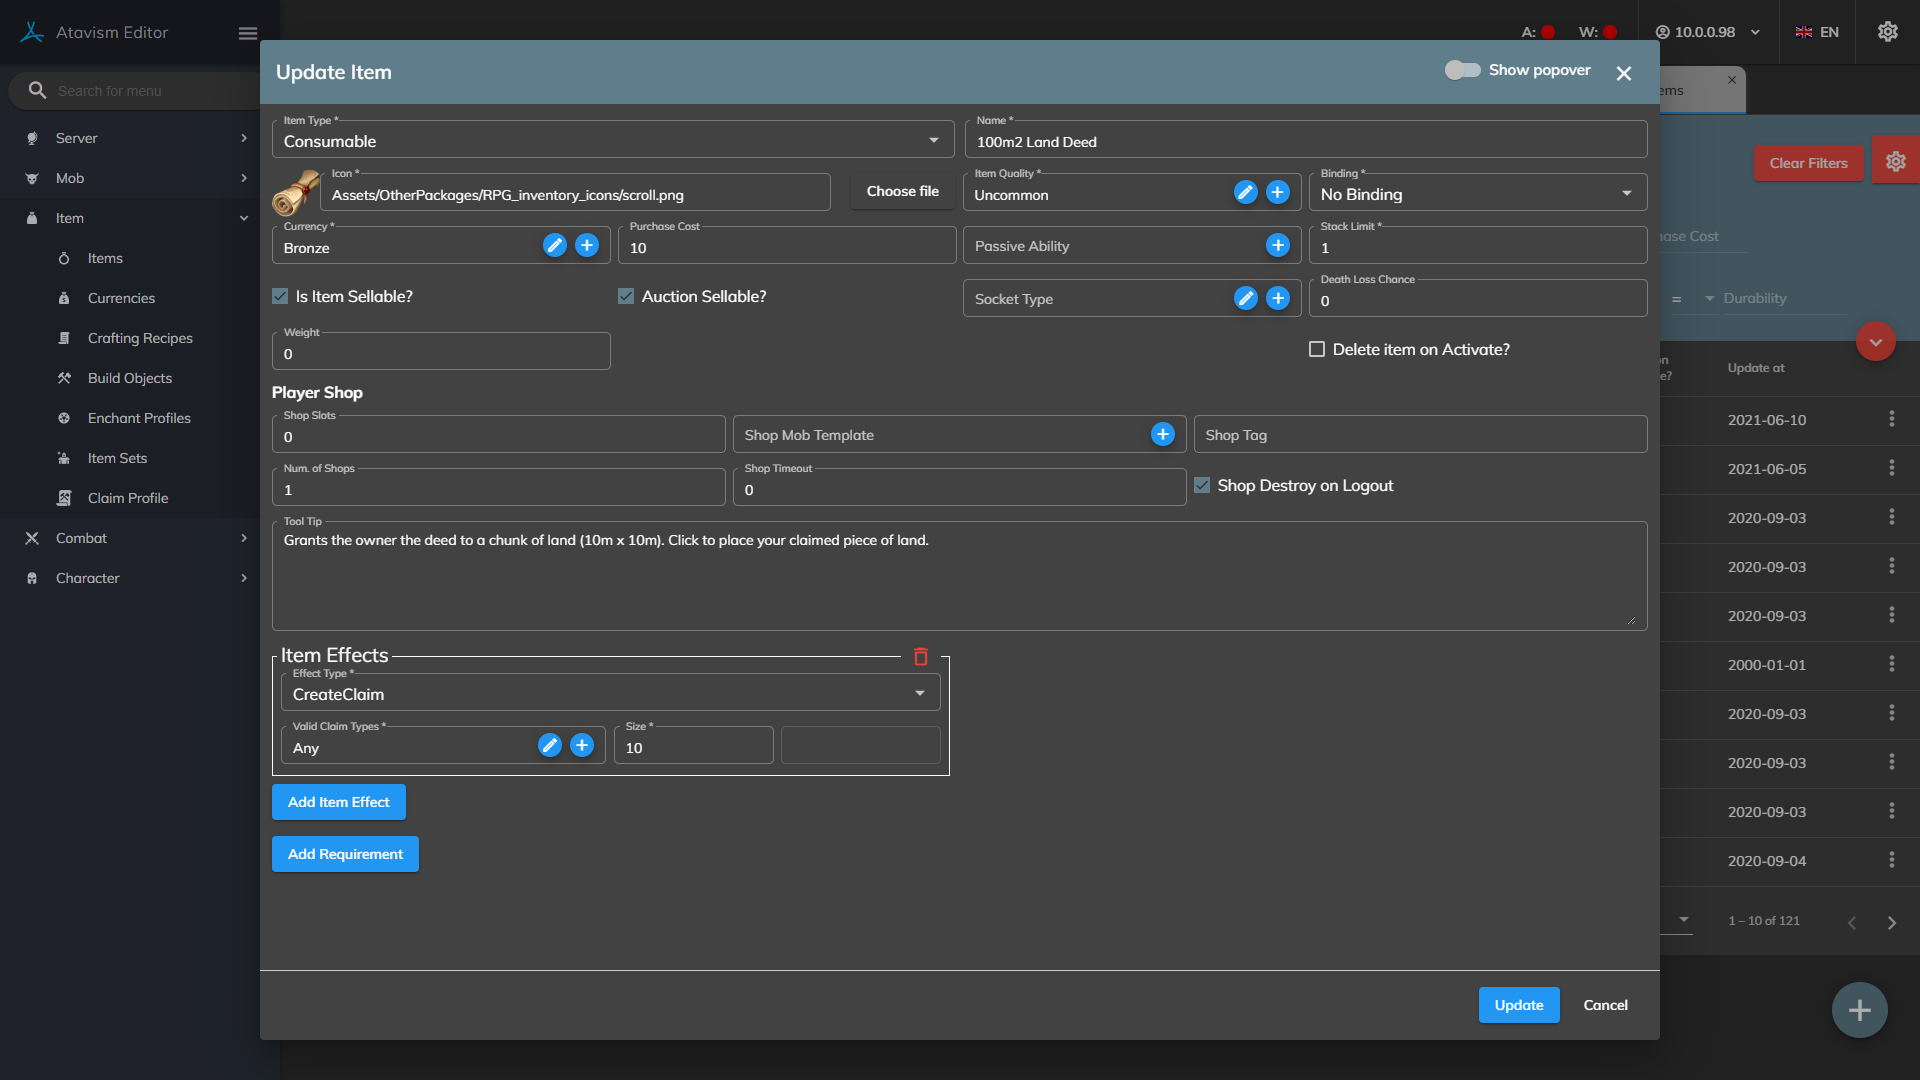
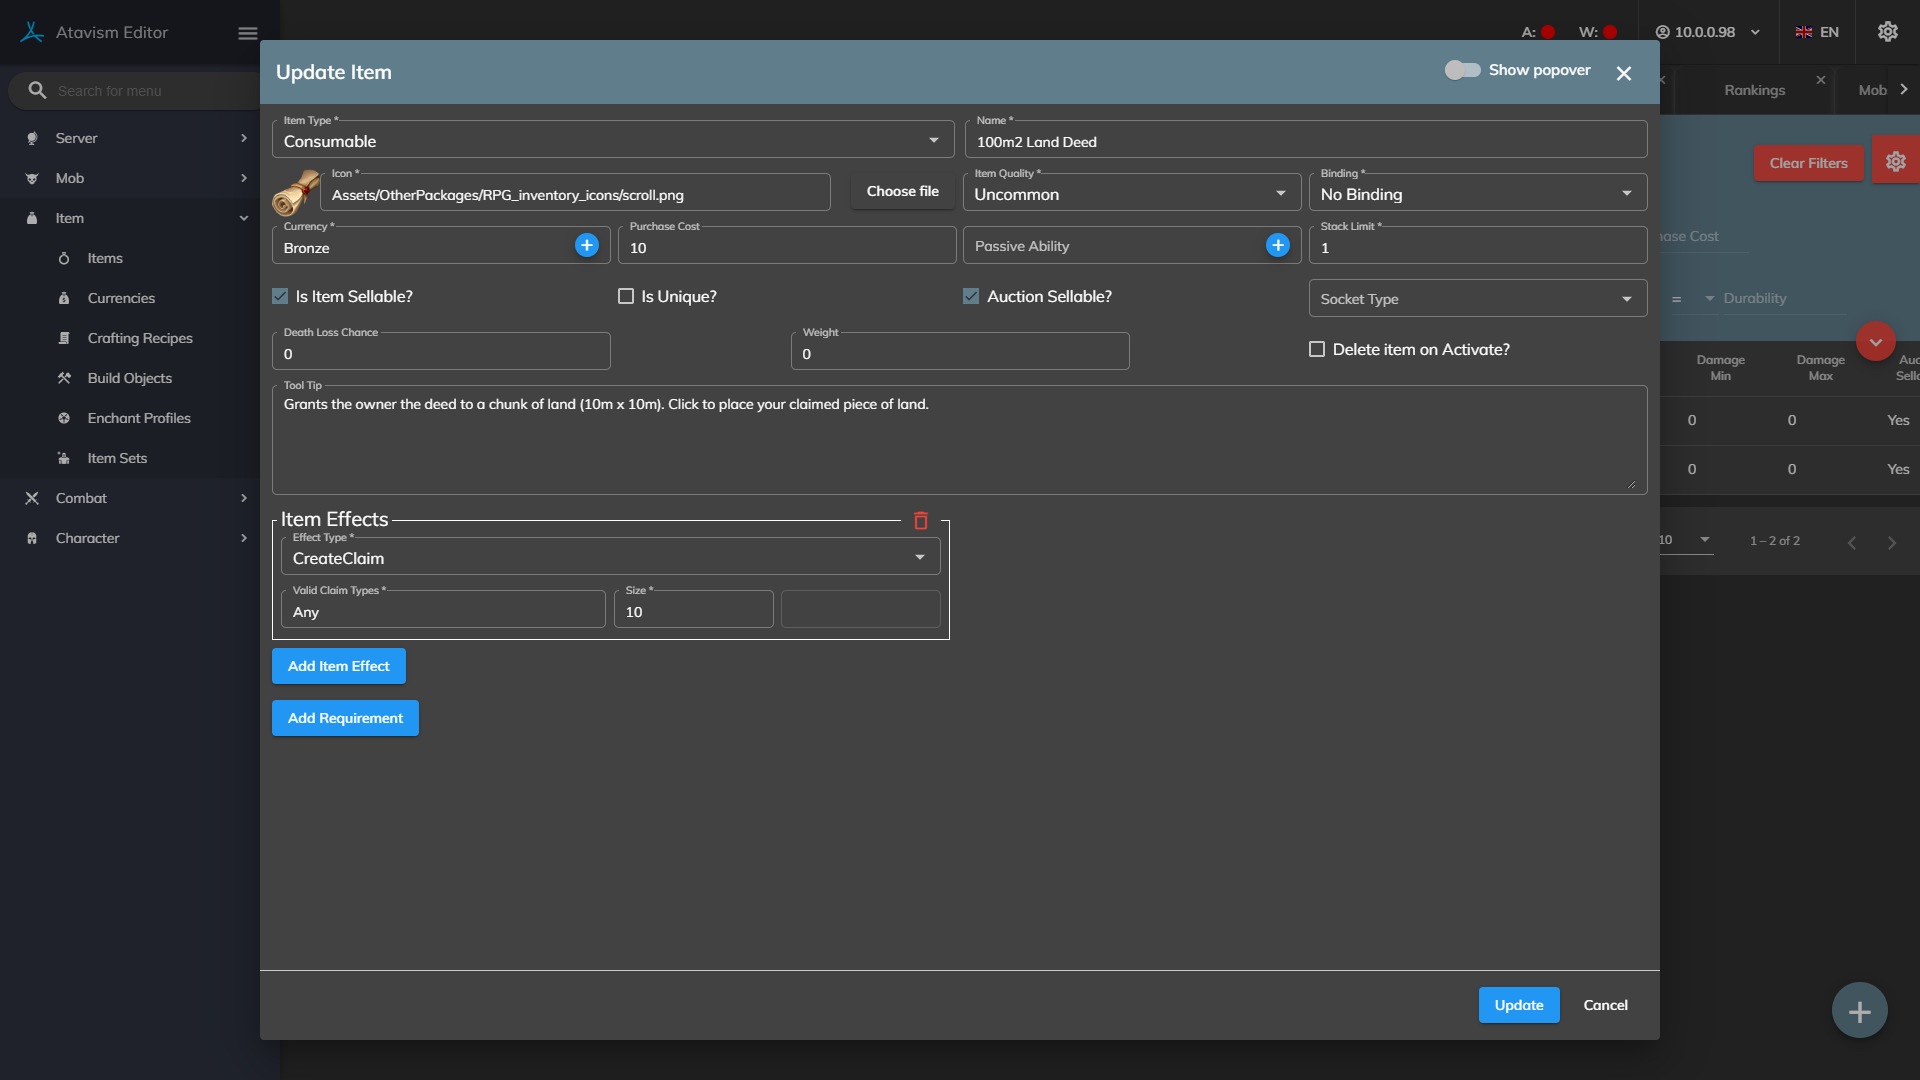
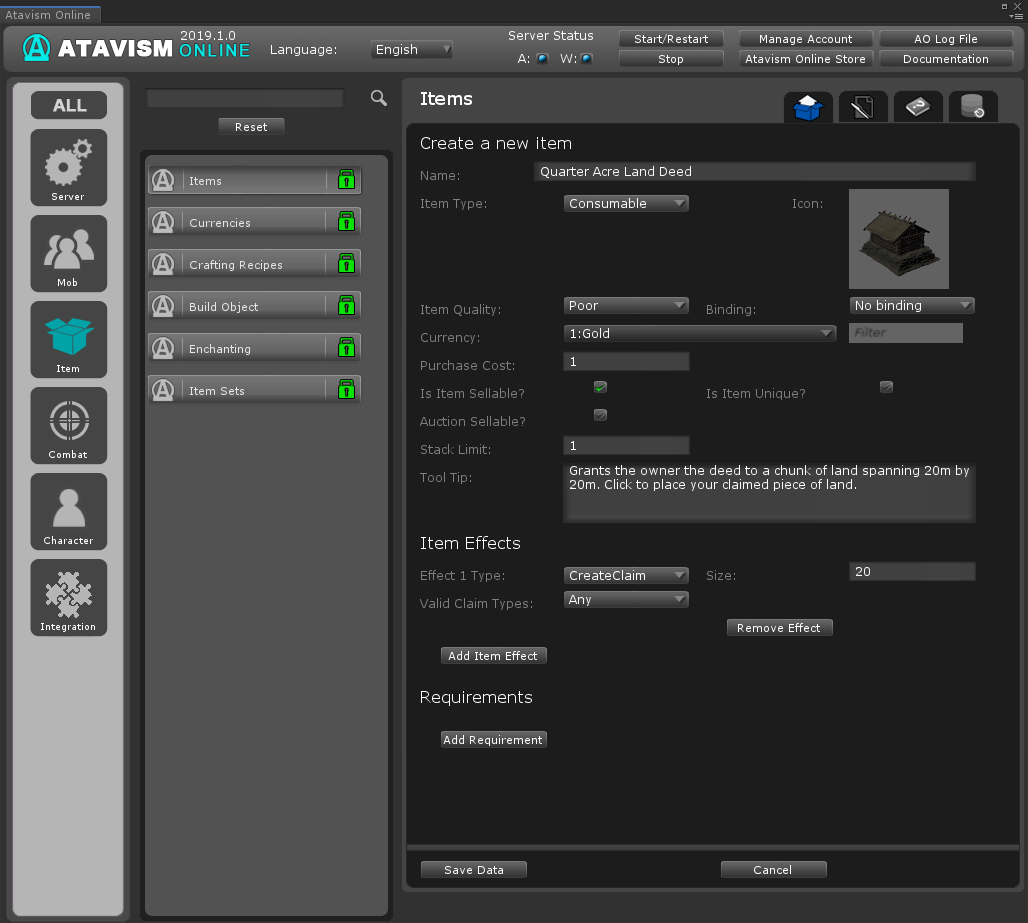
- Items with a ‘CreateClaim‘ effect can be used. Make sure the size field is filled in. It is in meters.
When a player clicks on a Create Claim item it will spawn the Claim where they are standing unless they are too close to an existing Claim. The item will only be removed if the Claim is successfully created.
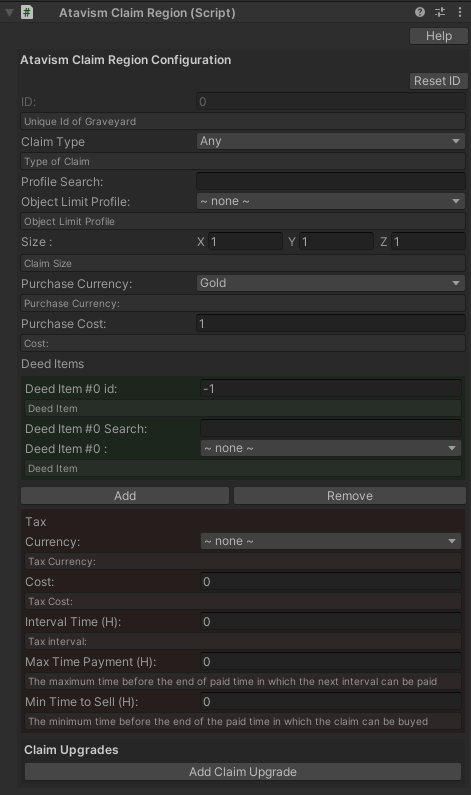
- Or using the Atavism Claim Region component. Using this method is the most convenient because as an admin you can define claim placement, tax, Object LImit Profile that defines the number of buildings within building category possible to build in the claim, Claim Type but also it’s possible to define Claim upgrade, so at the start the claim can be 10×10 meters, and then 20×10 at level 2, 25×15 at level 3, etc. You can also define upgrade costs using items and currency.
Building Objects
Players can place down building objects in their claims or other claims they have permission to build in. Objects can be a single place down object such as a chair, or they can be structural building items such as a wall that players can build up over time with resources.
The objects in the claim can be interacted with and keep their state saved to the server, such as a door that can be opened and closed.
To facilitate the setup of the Build Objects a Plugin has been added to the Atavism Editor.
Setting up a Build Object
Step 1) Creating the Prefab
Before a user can have an object to place in the world a prefab needs to be created in Unity. The Prefab will need the ClaimObject component added to it along with a collider either on the object or one of its children so it can detect mouse over and clicks.
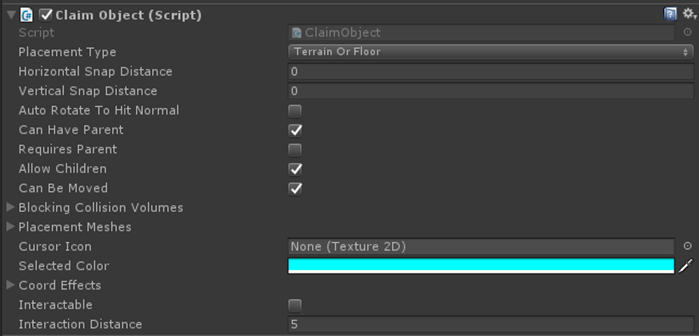
The settings on the Claim Object component do not need to be set but can be set to customize behavior.
Example:
The Cursor Icon setting allows you to set what the cursor should look like while the player’s mouse is over the object. The selected color is what color the object should turn when it is selected so the player knows which object is selected. The Coord Effects are the different coordinated effects the object can play when clicked.
Step 2) Creating the Build Object Template
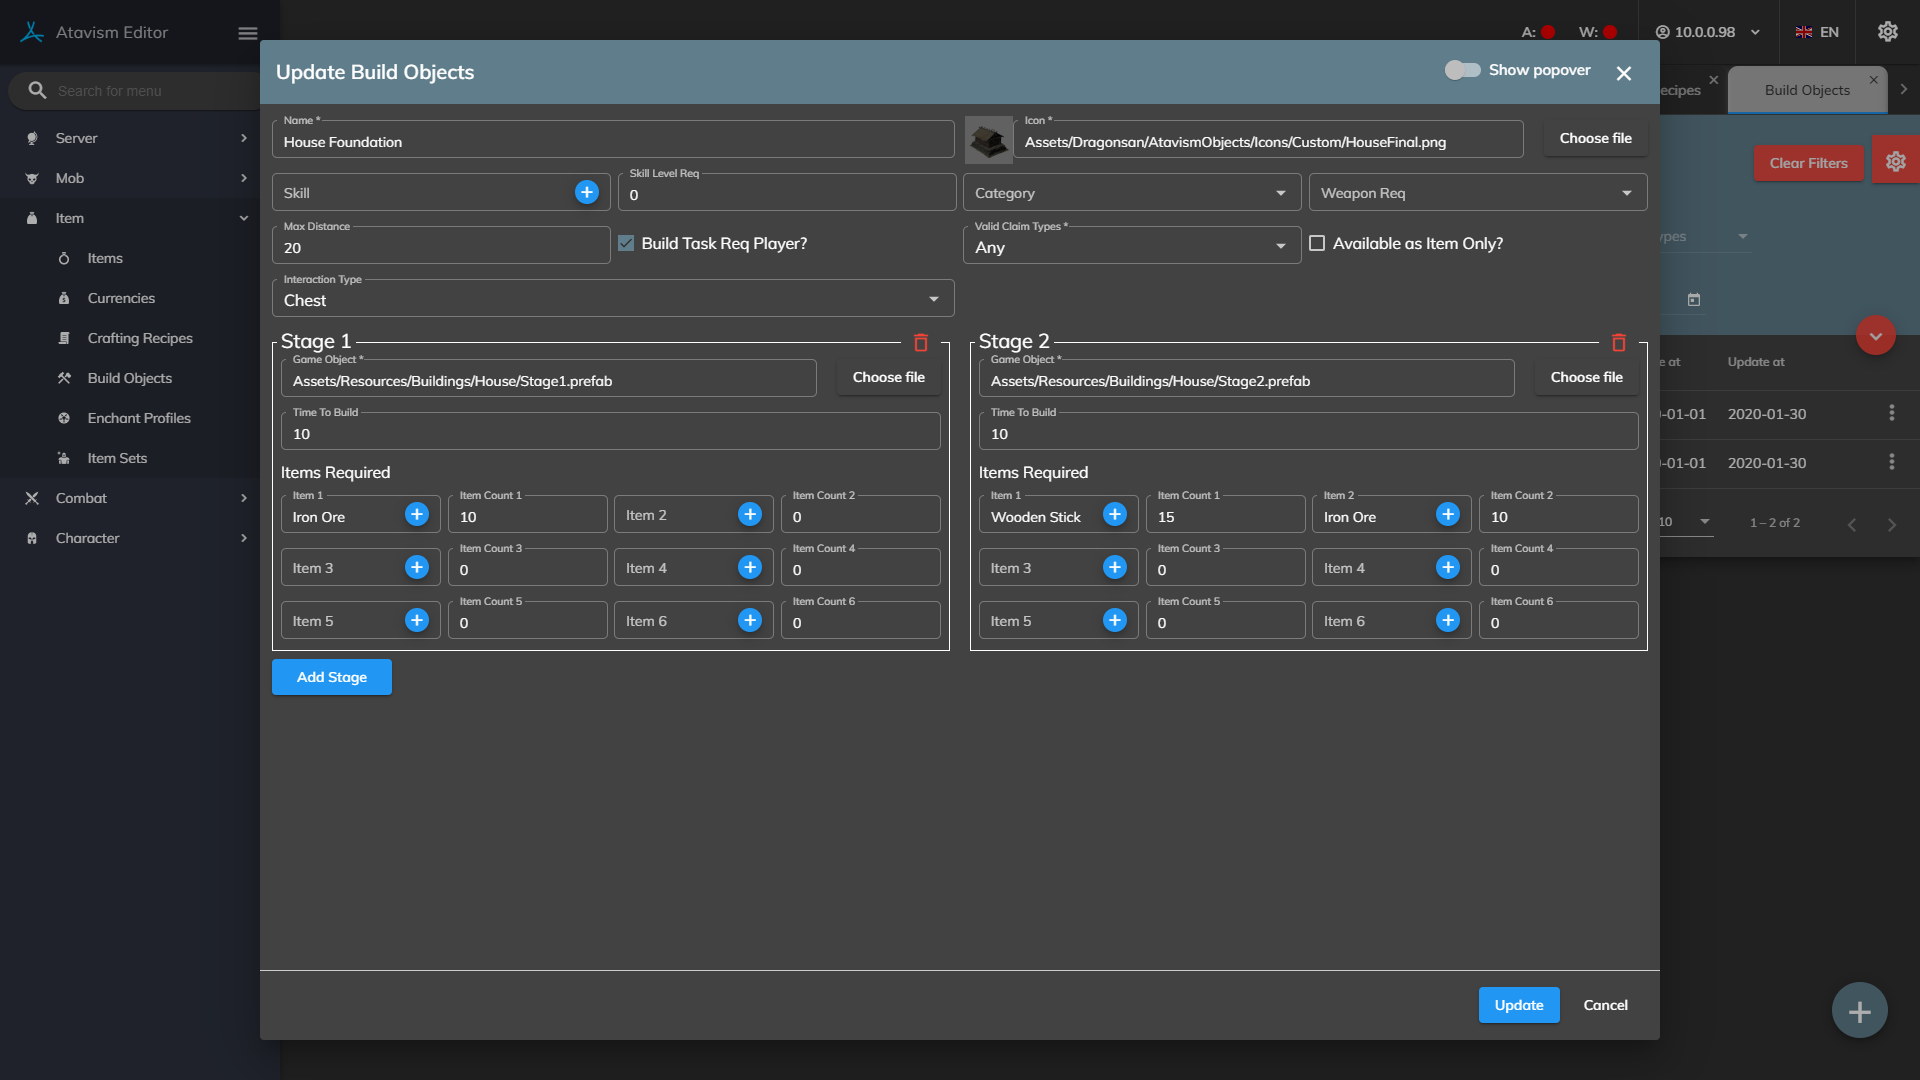
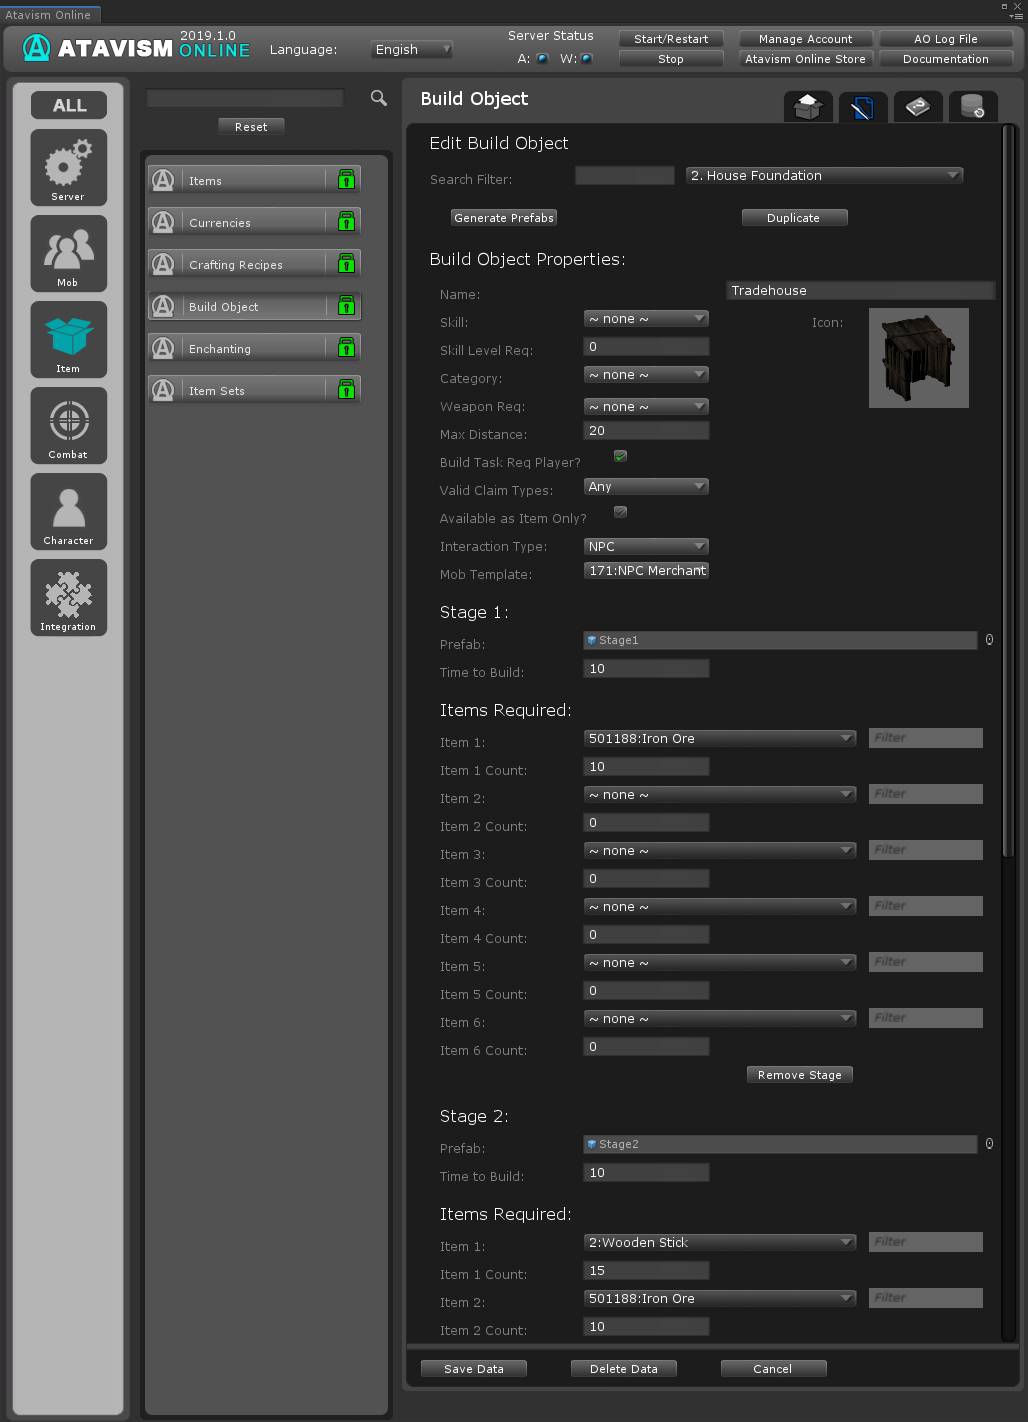
Once the prefab has been made, go into the Build Object Plugin in the Atavism Editor and create a new template. Set the name and other requirements as needed, then drag the prefab into the Stage 1 Prefab slot along with setting the Items needed to be able to build this object.
Example:
Setting notes:
- You can set a skill and skill level required to build the object along with needing a specific weapon type equipped. If a skill is set the player can skill up from building this object.
- Max Distance is how far away the player can build the object from where they are currently standing. If you want your players to have to stand beside the object they build set it to something low like 2, or if they can place the object anywhere in the claim set it larger such as 20.
- Available as Item Only is used to hide items from the Create Object list in the World Builder UI, meaning they have to click on the item in their Inventory to place the object.
- Drag the Prefab created from Step 1 into the Prefab slot.
- Time to build is how many seconds it takes for the player to build the object. If they move while building it the creation will be canceled.
- Items Required allows you to set up to 6 different materials required to construct this build object.
If you want additional stages to your build object (allowing players to build up their object) then click the Add stage and set the new prefab for each stage.
Save the data when done.
Note that the server will need to be restarted before the template will be available to build.
Placing Build Objects in the Claim
From the build menu
Any Build Object Template not marked as “Available as Item Only” will be in the build menu for players when they are in the claim. From the claim menu click on the “Create Object” button and then click on the object you want to place. The player needs to have the required item for stage 1 as defined in the template.
The model should now show where the cursor is on the screen and allow the player to place down the object. The player must place it within the “Max Distance” setting set on the template. When the player clicks to place the object in the world it will then send the task request to the server and the player will start building the object. The player cannot move while building the object, which will take as long as the “Time to Build” setting is in the template.
You can also use the radial menu using the Tab button. It’s based on the EBS – Easy Build System from the Unity Asset Store
From an Inventory Item
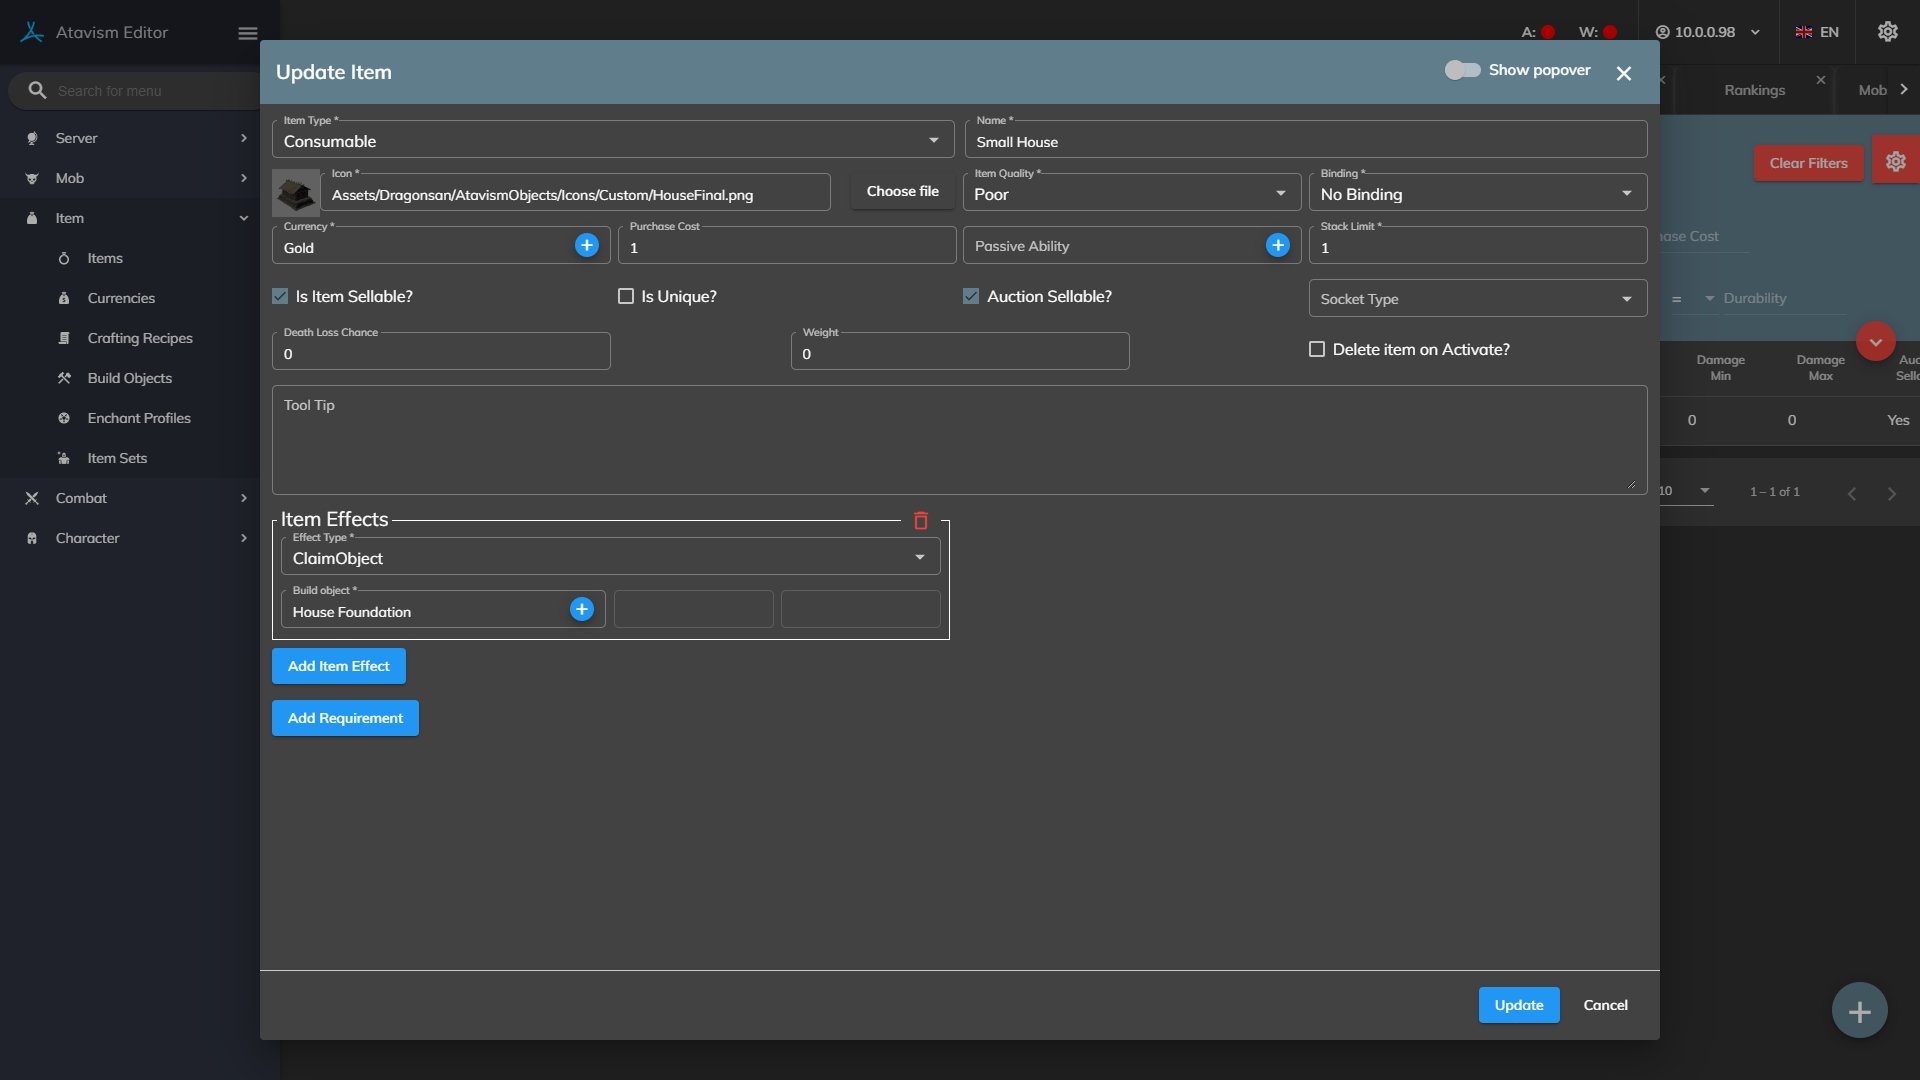
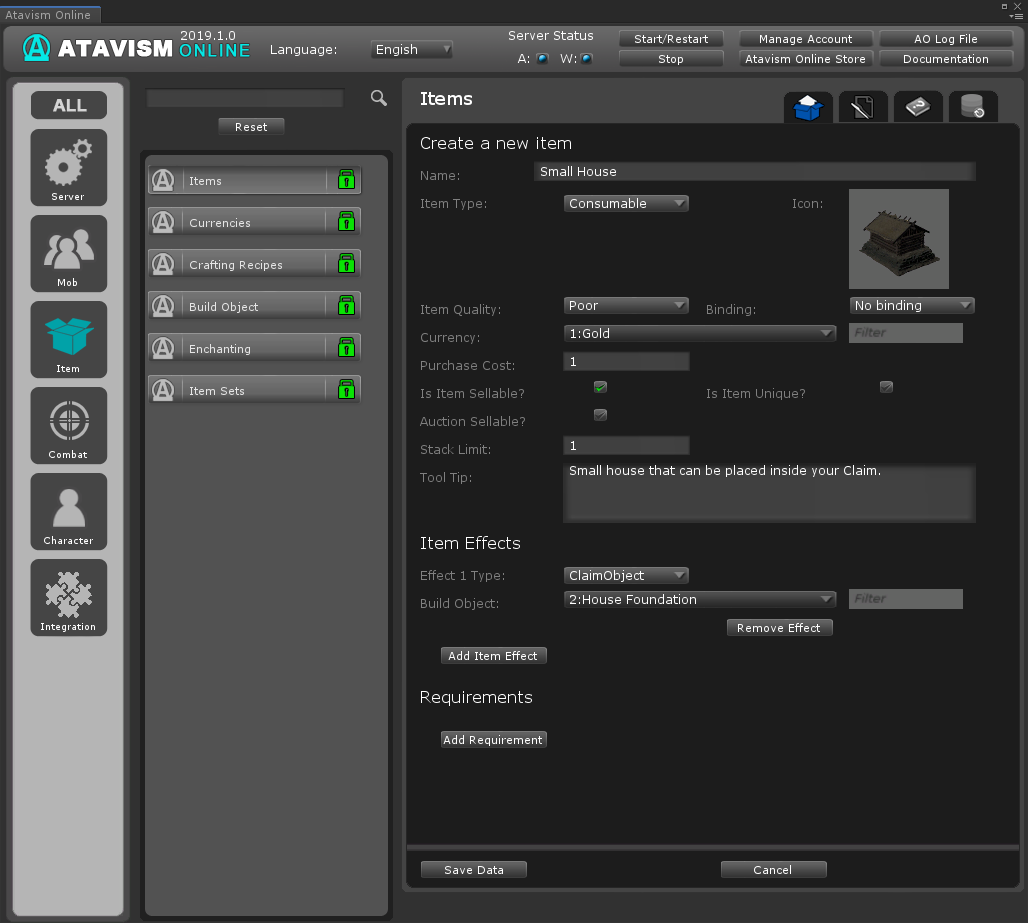
A Claim Object can be linked to an Inventory Item by adding a ClaimObject effect to an item.
Example:
Players can place that item in their Claim by opening up the World Builder UI and clicking on the “Place Item” button. They then click on the item in their Bag and it will display the model by their cursor allowing them to choose where to place it.
It is recommended that Claim Objects as Items do not require other materials or have a build time as it may confuse users, but the option is yours to set it how you like.
Atavism 10.2.0/10.3.0
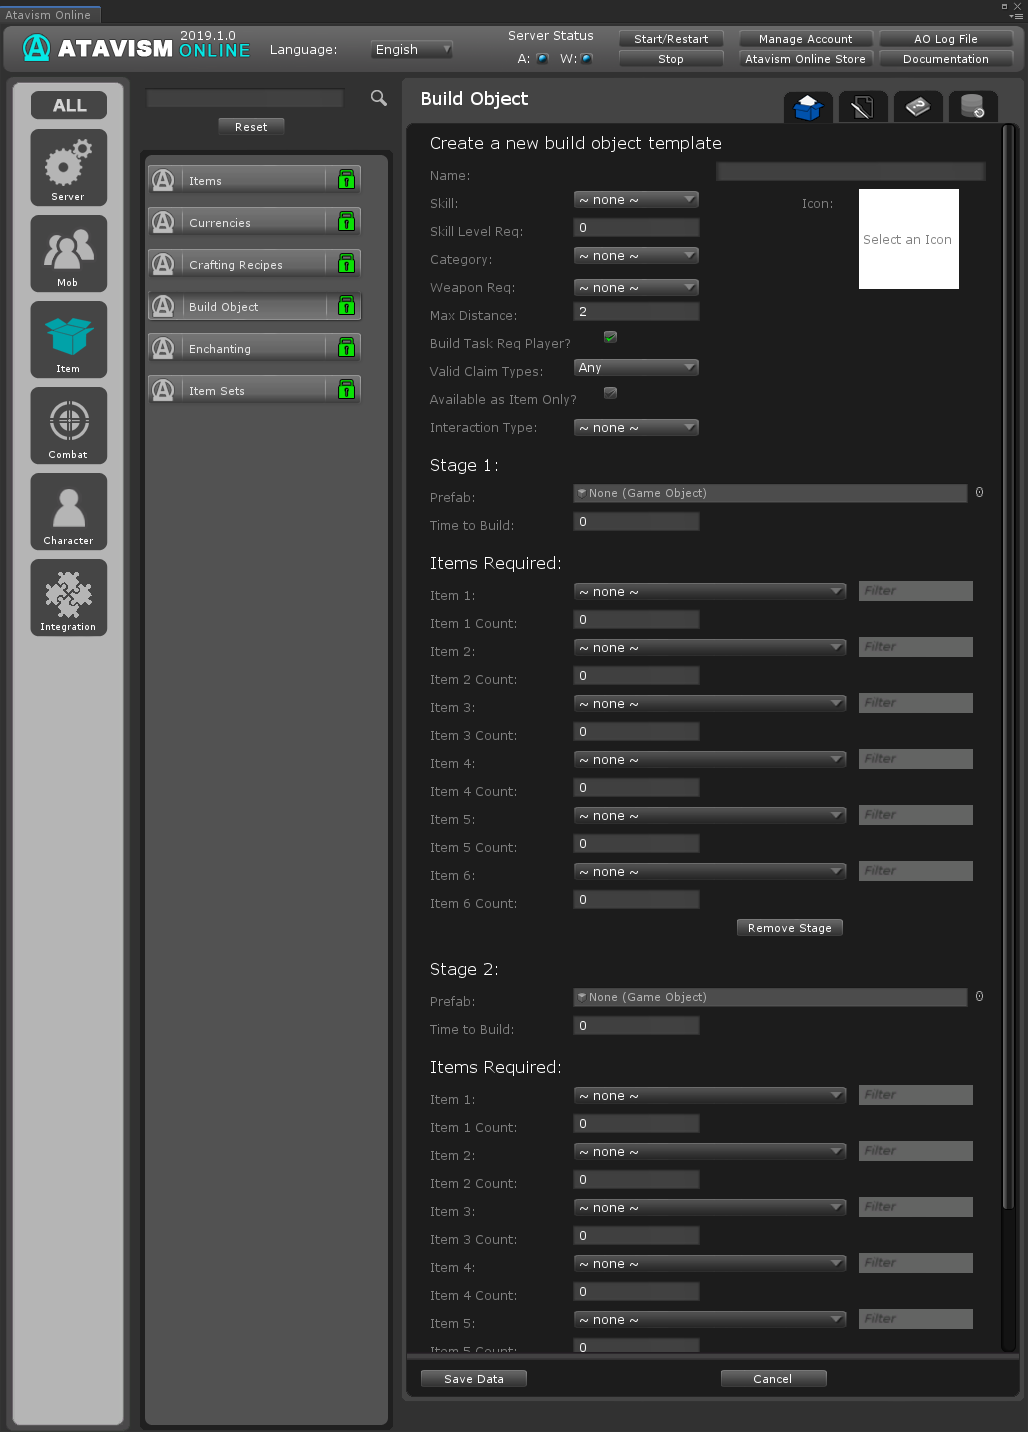
Create a new build object template
Name: Name of the new build object
Skill: Skill needed to perform this action/build object in the game (can be defined in Skills Plugin)
Category: Select category (can be defined in Option Choices Plugin)
Skill Level Req: Specify the level of skill that player must have to perform this action
Weapon Req: Select what weapon player should have to be able to perform this action (can be defined in Option Choices Plugin)
Max Distance: How far away the player can build the object from where they are currently standing. If you want your players to have to stand beside the object they build set it to something low like 2, or if they can place the object anywhere in the claim set it larger such as 20.
Build Task Req Player? Check the box if build task should require player presence (it doesn’t work for the first stage of the building)
Valid Claim Type: Select from a list (can be defined in Option Choices Plugin)
Available as Item Only?: Defines if this building should be available only as an item or also in the building list
Interaction Type: Select from the list (this allows the owner or player with proper permissions to interact with the last stage of the built object):
- Chest: Allows storing items in the storage. You can define a number of slots.
- Resource: Allows gathering resources, you can select a loot table which defines what items will be gathered from that building. Useful for simulating farming.
- NPC: Allows spawning Mob/NPC which should be defined in Mob Spawn Data Plugin, where you can setup Mob as a merchant or an enemy.
- Effect: Allows selecting effect which will be applied to the player or in an area like a buff. The effect can be defined in Effects Plugin.
- Instance: Allows defining something like a gateway to an instance where the player will be teleported to. An instance should be defined in Instances Plugin.
- Leave Instance: Leave from the current instance to the previous once.
Stage #
Prefab: Select prefab for this stage. It’s unity prefab with Claim Object Component on it
Time to Build: How long it will take to finish building this element/stage
Items Required
Item #: Select item from the list
Item # Count: Quantity of item that is needed for a build at this stage
You can request up to 6 items per stage. You can create multiple stages if build/construction.
Building System & Object Building
Claims
Claims are areas of the world that players ‘lay claim to’ allowing them to build in the area. Players may buy and sell claims and place objects freely within their claim and any other claims they have been given permission to build in.
Players can view the claims in the world by opening up the World Builder UI from the rightmost button in the toolbar menu located at the top right of the screen. When they enter a claim they will be shown a UI that gives them options based on their permissions for that claim.
Setting up Claims
Claims can be added to the world in two ways.
- They can be spawned by admin players from the World Builder UI.
- Items with a ‘CreateClaim‘ effect can be used. Make sure the size field is filled in. It is in meters.
Example:
When a player clicks on a Create Claim item it will spawn the Claim where they are standing unless they are too close to an existing Claim. The item will only be removed if the Claim is successfully created.
Building Objects
Players can place down building objects in their claims or other claims they have permission to build in. Objects can be a single place down object such as a chair, or they can be structural building items such as a wall that players can build up over time with resources.
The objects in the claim can be interacted with and keep their state saved to the server, such as a door that can be opened and closed.
To facilitate the setup of the Build Objects a Plugin has been added to the Atavism Editor.
Setting up a Build Object
Step 1) Creating the Prefab
Before a user can have an object to place in the world a prefab needs to be created in Unity. The Prefab will need the ClaimObject component added to it along with a collider either on the object or one of its children so it can detect mouse over and clicks.
The settings on the Claim Object component do not need to be set but can be set to customize behavior.
Example:
The Cursor Icon setting allows you to set what the cursor should look like while the player’s mouse is over the object. The selected color is what color the object should turn when it is selected so the player knows which object is selected. The Coord Effects are the different coordinated effects the object can play when clicked.
Step 2) Creating the Build Object Template
Once the prefab has been made, go into the Build Object Plugin in the Atavism Editor and create a new template. Set the name and other requirements as needed, then drag the prefab into the Stage 1 Prefab slot along with setting the Items needed to be able to build this object.
Example:
Setting notes:
- You can set a skill and skill level required to build the object along with needing a specific weapon type equipped. If a skill is set the player can skill up from building this object.
- Max Distance is how far away the player can build the object from where they are currently standing. If you want your players to have to stand beside the object they build set it to something low like 2, or if they can place the object anywhere in the claim set it larger such as 20.
- Available as Item Only is used to hide items from the Create Object list in the World Builder UI, meaning they have to click on the item in their Inventory to place the object.
- Drag the Prefab created from Step 1 into the Prefab slot.
- Time to build is how many many seconds it takes for the player to build the object. If they move while building it the creation will be canceled.
- Items Required allows you to set up to 6 different materials required to construct this build object.
If you want additional stages to your build object (allowing players to build up their object) then click the Add stage and set the new prefab for each stage.
Save the data when done.
Note that the server will need to be restarted before the template will be available to build.
Placing Build Objects in the Claim
From the build menu
Any Build Object Template not marked as “Available as Item Only” will be in the build menu for players when they are in the claim. From the claim menu click on the “Create Object” button and then click on the object you want to place. The player needs to have the required item for stage 1 as defined in the template.
The model should now show where the cursor is on the screen and allow the player to place down the object. The player must place it within the “Max Distance” setting set on the template. When the player clicks to place the object in the world it will then send the task request to the server and the player will start building the object. The player cannot move while building the object, which will take as long as the “Time to Build” setting is in the template.
From an Inventory Item
A Claim Object can be linked to an Inventory Item by adding a ClaimObject effect to an item.
Example:
Players can place that item in their Claim by opening up the World Builder UI and clicking on the “Place Item” button. They then click on the item in their Bag and it will display the model by their cursor allowing them to choose where to place it.
It is recommended that Claim Objects as Items do not require other materials or have a build time as it may confuse users, but the option is yours to set it how you like.
Atavism 10.1.0-
Create a new build object template
Name: Name of the new build object
Skill: Skill needed to perform this action/build object in the game (can be defined in Skills Plugin)
Category: Select category (can be defined in Option Choices Plugin)
Skill Level Req: Specify the level of skill that player must have to perform this action
Weapon Req: Select what weapon player should have to be able to perform this action (can be defined in Option Choices Plugin)
Max Distance: How far away the player can build the object from where they are currently standing. If you want your players to have to stand beside the object they build set it to something low like 2, or if they can place the object anywhere in the claim set it larger such as 20.
Build Task Req Player? Check the box if build task should require player presence (it doesn’t work for the first stage of the building)
Valid Claim Type: Select from a list (can be defined in Option Choices Plugin)
Available as Item Only?: Defines if this building should be available only as an item or also in the building list
Interaction Type: Select from the list (this allows the owner or player with proper permissions to interact with the last stage of the built object):
- Chest: Allows storing items in the storage. You can define a number of slots.
- Resource: Allows gathering resources, you can select a loot table which defines what items will be gathered from that building. Useful for simulating farming.
- NPC: Allows spawning Mob/NPC which should be defined in Mob Spawn Data Plugin, where you can setup Mob as a merchant or an enemy.
- Effect: Allows selecting effect which will be applied to the player or in an area like a buff. The effect can be defined in Effects Plugin.
- Instance: Allows defining something like a gateway to an instance where the player will be teleported to. An instance should be defined in Instances Plugin.
- Leave Instance: Leave from the current instance to the previous once.
Stage #
Prefab: Select prefab for this stage. It’s unity prefab with Claim Object Component on it
Time to Build: How long it will take to finish building this element/stage
Items Required
Item #: Select item from the list
Item # Count: Quantity of item that is needed for a build at this stage
You can request up to 6 items per stage. You can create multiple stages if build/construction.
Building System & Object Building
Claims
Claims are areas of the world that players ‘lay claim to’ allowing them to build in the area. Players may buy and sell claims and place objects freely within their claim and any other claims they have been given permission to build in.
Players can view the claims in the world by opening up the World Builder UI from the rightmost button in the toolbar menu located at the top right of the screen. When they enter a claim they will be shown a UI that gives them options based on their permissions for that claim.
Setting up Claims
Claims can be added to the world in two ways.
- They can be spawned by admin players from the World Builder UI.
- Items with a ‘CreateClaim‘ effect can be used. Make sure the size field is filled in. It is in meters.
Example:
When a player clicks on a Create Claim item it will spawn the Claim where they are standing unless they are too close to an existing Claim. The item will only be removed if the Claim is successfully created.
Building Objects
Players can place down building objects in their claims or other claims they have permission to build in. Objects can be a single place down object such as a chair, or they can be structural building items such as a wall that players can build up over time with resources.
The objects in the claim can be interacted with and keep their state saved to the server, such as a door that can be opened and closed.
To facilitate the setup of the Build Objects a Plugin has been added to the Atavism Editor.
Setting up a Build Object
Step 1) Creating the Prefab
Before a user can have an object to place in the world a prefab needs to be created in Unity. The Prefab will need the ClaimObject component added to it along with a collider either on the object or one of its children so it can detect mouse over and clicks.
The settings on the Claim Object component do not need to be set but can be set to customize behavior.
Example:
The Cursor Icon setting allows you to set what the cursor should look like while the player’s mouse is over the object. The selected color is what color the object should turn when it is selected so the player knows which object is selected. The Coord Effects are the different coordinated effects the object can play when clicked.
Step 2) Creating the Build Object Template
Once the prefab has been made, go into the Build Object Plugin in the Atavism Editor and create a new template. Set the name and other requirements as needed, then drag the prefab into the Stage 1 Prefab slot along with setting the Items needed to be able to build this object.
Example:
Setting notes:
- You can set a skill and skill level required to build the object along with needing a specific weapon type equipped. If a skill is set the player can skill up from building this object.
- Max Distance is how far away the player can build the object from where they are currently standing. If you want your players to have to stand beside the object they build set it to something low like 2, or if they can place the object anywhere in the claim set it larger such as 20.
- Available as Item Only is used to hide items from the Create Object list in the World Builder UI, meaning they have to click on the item in their Inventory to place the object.
- Drag the Prefab created from Step 1 into the Prefab slot.
- Time to build is how many many seconds it takes for the player to build the object. If they move while building it the creation will be canceled.
- Items Required allows you to set up to 6 different materials required to construct this build object.
If you want additional stages to your build object (allowing players to build up their object) then click the Add stage and set the new prefab for each stage.
Save the data when done.
Note that the server will need to be restarted before the template will be available to build.
Placing Build Objects in the Claim
From the build menu
Any Build Object Template not marked as “Available as Item Only” will be in the build menu for players when they are in the claim. From the claim menu click on the “Create Object” button and then click on the object you want to place. The player needs to have the required item for stage 1 as defined in the template.
The model should now show where the cursor is on the screen and allow the player to place down the object. The player must place it within the “Max Distance” setting set on the template. When the player clicks to place the object in the world it will then send the task request to the server and the player will start building the object. The player cannot move while building the object, which will take as long as the “Time to Build” setting is in the template.
From an Inventory Item
A Claim Object can be linked to an Inventory Item by adding a ClaimObject effect to an item.
Example:
Players can place that item in their Claim by opening up the World Builder UI and clicking on the “Place Item” button. They then click on the item in their Bag and it will display the model by their cursor allowing them to choose where to place it.
It is recommended that Claim Objects as Items do not require other materials or have a build time as it may confuse users, but the option is yours to set it how you like.

