Instances Plugin
Atavism 10.2.0+
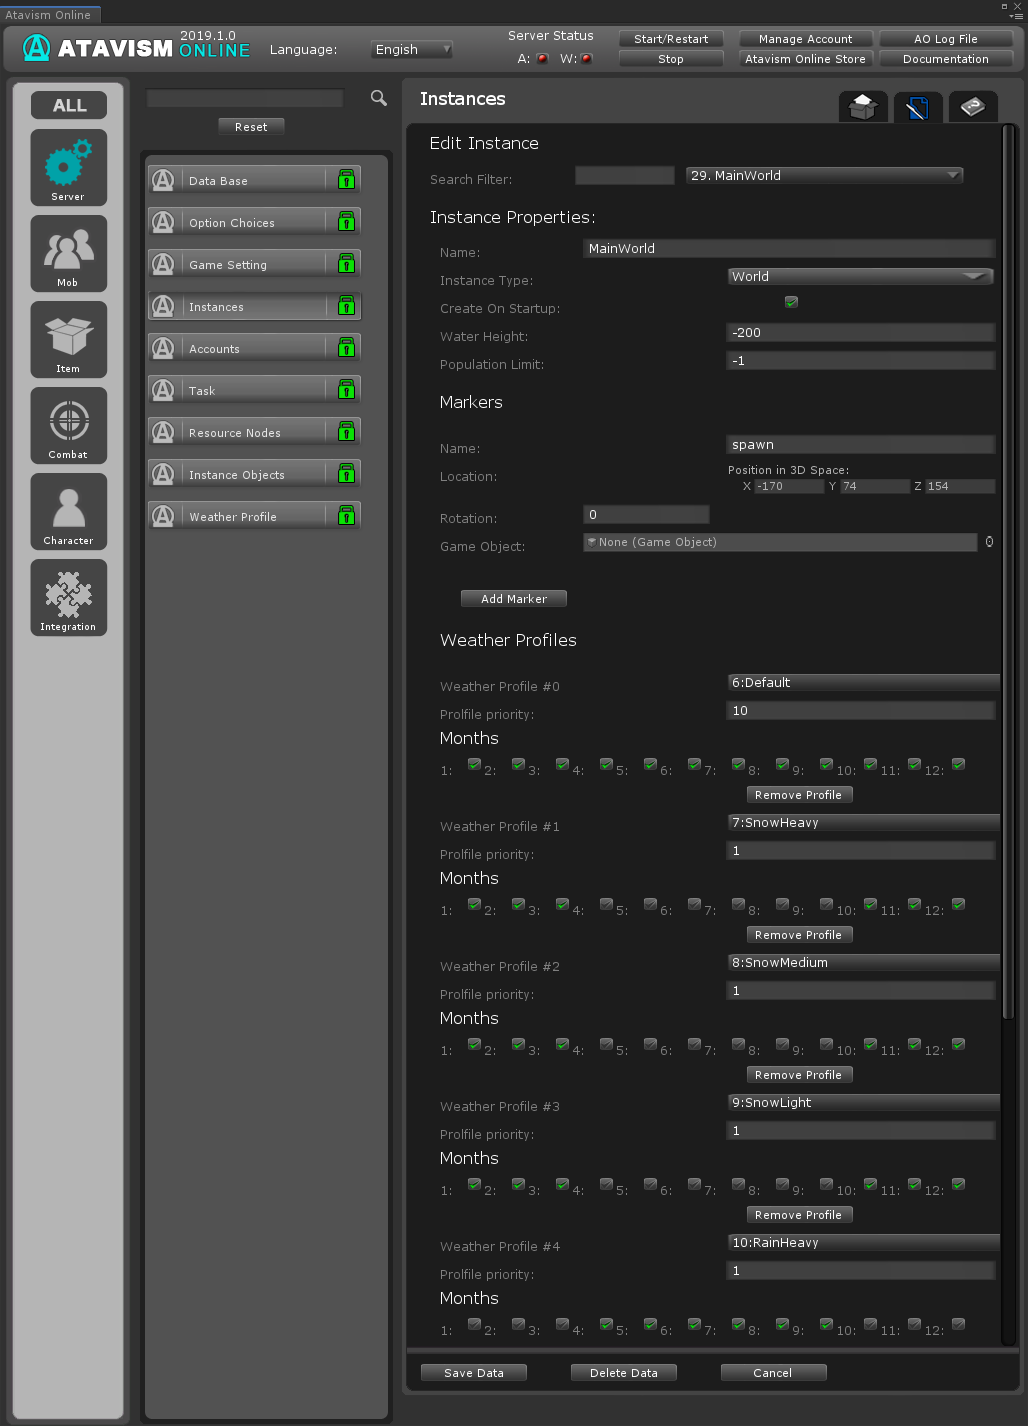
This is where you set up your instances. By default, the MainWorld instance is already set up. If you have more instances (Unity Scenes) to setup you will do it here. One thing to make sure is that you add the scene to the Unity Build Settings or Atavism won’t find that instance when it’s running.
Creating a new instance
Name: Name of the instance in the game. This must be exactly the same as the instance scene name.
Instance Type: Dropdown menu containing options:
- World (Main World instance type)
- Dungeon (Dungeon which can be used for single-player/solo instance)
- Group Dungeon (Dungeon instance dedicated to groups. Only players that are grouped can enter this type of instance)
- Player Instance (Private player instance. Only instance “owner” can enter it, or other players that will be invited by the owner. The owner must be online. Other players are invited from the owner’s friendlist)
- Arena (Instance dedicated to Arena. Player or group leader can enter Arena queue, and once the number of required players is met, Arena starts, and players are teleported to Arena starting locations)
- Guild (Private guild instance for guild members)
Create on Startup: Define that the instance will be created when the server starts. Important Note: For all World type instances this option should be selected
Water Height: Defines water level globally for a specific instance, below that level gravity won’t be applied to players and mobs and automatically will switch animations to swimming
Population Limit: Max number of players (-1 – unlimited)
Markers
Name: Spawn (default name used by the server to set default spawn location/rotation for the instance)
Location: World position where to spawn in the Instance
Rotation: World rotation
Weather Profiles
Here you can adjust which weather profile which was previously defined in Weather Plugin, should be used in which months
Weather Profile #: Choose profile defined in Weather Plugin
Profile Priority: Defines how often this profile will be chosen on the server compared to other profiles, for example, if one profile will have this value set to 50 and the other to 1, then the profile with a higher value will be chosen 50 times more often than the other one (based on probability)
Months: In which months this profile can be applied
Weather Seasons
Defines which season should be applied in which months
Weather Season #: One of four seasons
Months: Defines months for that particular season
Atavism 10.1.0-
This is where you set up your instances. By default, the MainWorld instance is already set up. If you have more instances (Unity Scenes) to setup you will do it here. One thing to make sure is that you add the scene to the Unity Build Settings or Atavism won’t find that instance when it’s running.
Creating a new instance
Name: Name of the instance in the game. This must be exactly the same as the instance scene name.
Instance Type: Dropdown menu containing options:
- World (Main World instance type)
- Dungeon (Dungeon which can be used for single-player/solo instance)
- Group Dungeon (Dungeon instance dedicated to groups)
- Player Instance (Private player instance)
- Arena (Instance dedicated to Arena)
- Guild (Private guild instance for guild members)
Create on Startup: Define that the instance will be created when the server starts. Important Note: For all World type instances this option should be selected
Water Height: Defines water level globally for a specific instance, below that level gravity won’t be applied to players and mobs and automatically will switch animations to swimming
Population Limit: Max number of players (-1 – unlimited)
Markers
Name: Spawn (default name used by the server to set default spawn location/rotation for the instance)
Location: World position where to spawn in the Instance
Rotation: World rotation
Game Object: A optional Game Object to get the location from. Most people create a cube and name it spawns and uses it here to set their spawn location. Then just turn it off so it does not get rendered, that way you always know where you set your spawn point in that scene.
Weather Profiles
Here you can adjust which weather profile which was previously defined in Weather Plugin, should be used in which months
Weather Profile #: Choose profile defined in Weather Plugin
Profile Priority: Defines how often this profile will be chosen on the server compared to other profiles, for example, if one profile will have this value set to 50 and other to 1, then the profile with a higher value will be chosen 50 times more often than the other one (based on probability)
Months: In which months this profile can be applied
Weather Seasons
Defines which season should be applied in which months
Weather Season #: One of four seasons
Months: Defines months for that particular season


